- 1 -
Bluetooth®
5-button Laser Mouse
M-BT5BL Series
User’s Guide
Thank you for purchasing the ELECOM M-BT5BL Series Bluetooth® 5-button
Laser Mouse. The M-BT5BL is a 5-button wireless laser mouse that employs
Bluetooth® wireless technology. It is equipped with Back and Forward
buttons that are handy for browsing the Internet, as well as a resolution
adjustment button for changing mouse speed.
This manual describes the operating instructions and safety precautions
for using the M-BT5BL Series. Ensure that you have read this manual before
using the product. After reading this manual, store it somewhere safe for
future reference.
* Except in certain cases, the M-BT5BL Series is referred to as “this product” in
this manual.
WARNING
Do not attempt to disassemble, modify or repair this product by
yourself, as this may cause a fire, electric shock or product damage.
Do not put this product in fire, as the product may burst,
resulting in a fire or injury.
CAUTION
Do not place this product in any of the following
environments:
In a car exposed to sunlight, a place exposed to direct
•
sunlight, or a place that becomes hot (around a heater, etc.)
In a moist place or a place where condensation may occur
•
In an uneven place or a place exposed to vibration
•
In a place where a magnetic field is generated (near a magnet, etc.)
•
In a dusty place
•
This product does not have a waterproof structure. Use and
store this product in a place where the product body will not
be splashed with water or other liquid.
Rain, water mist, juice, coffee, steam or sweat may also cause
product damage.
When you no longer need to use this product and the
battery, be sure to dispose of it in accordance with the local
ordinances and laws of your area.
Batteries
CAUTION
Use AAA alkaline batteries, AAA manganese batteries, or
rechargeable AAA nickel hydride battery with this product.
If this product will be unused for a long period of time,
remove the battery to avoid battery leakage and failure.
Cleaning the Mouse
If the product body becomes dirty, wipe it with a soft, dry cloth.
Use of a volatile liquid (paint thinner, benzene, alcohol, etc.)
may affect the material quality and colour of the product.
Cautions for Wireless Equipment
This product is wireless equipment using the entire range
of the 2.4 GHz band and it is possible to avoid the band of
mobile object identification systems. FH-SS is used for the radio wave method. The
interference distance is 10 m.
The 2.4 GHz band is also used by medical equipment, Bluetooth, and wireless LAN
equipment conforming to the IEEE802.11b/11g /11n standard.
Before using this product, check that there are no other “radio
•
stations”* operating nearby.
If electromagnetic interference occurs between this product and
•
other “radio stations”, move this product to another location or stop
using this product.
* Other “radio stations” refer to industrial, scientific and medical devices using the
2.4 GHz band like this product, other radio stations of this type, licensed radio
station premises for mobile object identification system that is used in factory
production lines, certain non-licensed low power radio stations and amateur
radio stations.
WARNING
Do not use this product with a device that may have a serious
●
function or influence. There are rare cases where an external
radio wave at the same frequency or the radio wave emitted
from a mobile phone causes this product to malfunction, slow
down, or fail to operate.
Do not use this product in a hospital or other locations where
●
the use of radio waves is prohibited. The radio waves of this
product may affect electronic and medical devices (e.g.
pacemaker).
The use of a wireless mouse in an aircraft is prohibited by
●
aviation law because doing so may interfere with flight safety.
Turn off the power of the mouse body before boarding an
aircraft and do not use it in the aircraft.
* ELECOM is not liable for any accident or social damages
incurred by the failure of this product.
Cautions for Laser Mouse
Though this product complies with the IEC60825-1 Class 1 laser safety
standard to ensure safety, pay special attention to the following before use.
(1) Never observe the laser beam by using an optical measure such as
a microscope or magnifier or view the laser with the naked eye for
a long period of time. Doing so may have an adverse effect on the
eye. (Some laser beams cannot be seen with the naked eye.)
(2) Never aim the rear surface of the mouse at a person’s eyes, as this is
very dangerous.
(3) The laser sensor may not work on glass or mirrored surfaces.
(4) Do not use this product for any application other than as a PC
mouse.
(5) If this product is subjected to temperatures beyond its
specifications, turn off the PC, and do not use the product until the
temperature returns to the operable range.
(6) If this product is not operating normally, turn off the PC.
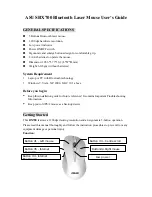
Part Names
b
a
c
g
f
k
l
e
j
d
h
i
a
Tilt wheel
The tilt wheel can be turned back and forward with your finger or
pressed like a button to operate the PC.
Tilting the tilt wheel to the right or left lets you scroll horizontally.
You must download and install ELECOM MouseAssistant 2 for
Windows from our company’s web site to use the horizontal
scrolling function with Windows.
Using the horizontal scrolling and button allocation
functions (on the separate sheet)
b
Right button
Used for right-click operation.
c
Left button
Used for left-click operation.
d
Forward button/
e
Back button
Back button
Performs the back action in a
web browser.
Forward button
Performs the forward action in a
web browser.
Forward button
Back button
To use the Back and Forward buttons with a Mac, you need to
install the ELECOM Mouse Assistant 2 Mac OS X version that can
be downloaded from the ELECOM website.
Refer to “5. Using the horizontal scrolling and button
allocation functions” (Page 3)
f
Remaining battery level indicator lamp/pairing
indicator lamp
Turns red when the mouse is in a pairing standby state.
Indicates when to replace the batteries.
* Flashes in red for a certain period of time if the remaining
battery level gets low during use.
g
Pairing button
Pairs the mouse with a PC Bluetooth module or a Bluetooth adapter.
h
Laser sensor
When the mouse body is moved, this sensor detects mouse
movement.
* Never observe the laser beam using an optical means such as a
microscope or magnifying glass or view the laser with the naked
eye for a long period of time. Doing so may damage the eyes.
(Some laser beams cannot be seen with the naked eye.)
i
Power switch
Used to turn the mouse body on and off.
j
Battery cover
This cover is removed to install batteries.
k
Battery housing
Batteries are inserted here.
l
Battery removal sheet
Used to remove the batteries from the battery housing.
Initial Setup Procedure
When using this product for the first time, operate and configure this
product and the PC in the order shown below.
To use this product, your PC must support the Bluetooth HID
•
profile or have a Bluetooth adapter connected.
Do not remove your existing mouse until this product is
•
successfully connected. You need to use your existing mouse
to configure the PC.
Insert the batteries
1
Turn on the power
2
Pair the mouse with the PC
3
Check mouse operation
4
* Refer to the back of this sheet.
Meaning of symbols
WARNING
Failure to observe precautions may result in
serious personal injury or death due to fire,
electric shock, or other causes.
CAUTION
Failure to observe precautions may result in
personal injury due to electric shock or other
causes, and may damage other equipment.
Prohibited action
Mandatory action
Situation that needs attention
Notes and reference information
Package Contents
This product’s packaging contains the items listed below. Before using
the product, check that all items are present. We make every effort to
ensure that all products are packaged correctly. However, in the event
that an item is missing or damaged, contact the retailer from whom you
purchased the product.
Mouse x1
•
AAA alkaline battery x1
•
User’s Manual x1
•
Safety Precautions
Observe these precautions carefully to avoid personal injury, damage,
fire, and other problems.
WARNING
If a foreign object (water, metal chip, etc.) enters the product,
immediately stop using the product and disconnect the
receiver unit from the PC, and remove the battery from
the mouse. If you continue to use the product under these
conditions, it may cause a fire or electric shock.
If an abnormality is found with this product (emission of heat,
smoke or abnormal smell from the product), immediately stop
using the product, shutdown the PC, and after thoroughly
checking that heat from the product will not cause burns,
remove the battery from the mouse. After doing this, contact
the retailer from whom you purchased the product.
Do not drop or hit this product.
If this product is damaged, immediately stop using the
product, and remove the battery from the mouse.
If you continue to use the product under these conditions, it
may cause a fire or electric shock.
Pairing the Mouse with the PC
3
To connect this product to the PC using Bluetooth, you need to pair the product with the PC.
Pairing involves registering Bluetooth devices (in this case, the mouse and the PC) with each other, and authorising a connection with a registered
•
device.
Use your existing mouse or touch pad to operate the PC until the pairing process is completed successfully.
•
When using Windows®
This section describes the procedure when using the standard
Windows® Bluetooth function.
Windows® 7 and Windows Vista® SP2
* Screen appearance may change depending on operating system, but
the procedure is the same.
In the notification area,
click , then right-click
the Bluetooth icon ( )
and click [Add a Device].
The [Add a Device] window
is displayed.
If the
•
is displayed in the notification area in Windows® 7,
right-click and then click [Add a Device].
If no icon is displayed, click the [Start] button, click
•
[Control Panel], and then click [Add a Device].
Press the pairing button
on this product.
The pairing indicator lamp turns
on during the pairing procedure
and turns off when the procedure
is complete (step
).
If this product is not displayed in the list, check that its
power is turned on, press the pairing button, and then
click
.
Click [ELECOM BLUETOOTH
LASER MOUSE] and then click
.
Product registration starts.
Click
.
[ELECOM BLUETOOTH LASER
MOUSE] is added to the [Bluetooth
Devices] window.
You can now use the mouse.
Refer to “4. Checking Mouse Operation” on the back of this sheet to
confirm that the mouse works correctly.
Pairing button
Windows Vista® (–SP1) and Windows® XP
* Screen appearance may change depending on operating system, but
the procedure is the same.
In the task tray or the
notification area, right-click the
Bluetooth icon ( ) and click
[Add a Bluetooth Device].
The [Add Bluetooth Device
Wizard] is displayed.
If the icon is not displayed, click the [Start] button, click
[Control Panel], click [Hardware and Sound], and then
click [Bluetooth Devices]. When the [Bluetooth Devices]
window is displayed, click [Add].
Select the [My device is set
up and ready to be found.]
check box and then click
.
The system starts searching for
Bluetooth devices to add.
Hold down the pairing button
on this product while the
torch icon ( is displayed.
The pairing indicator lamp turns
on during the pairing procedure
and turns off when the procedure
is complete (step
).
If this product is not displayed in the list, check that its
power is turned on, press the pairing button, and then
click
.
Click [ELECOM BLUETOOTH
LASER MOUSE] and then
click
.
Select [Don't use a passkey],
and click
.
Product registration starts.
Click
.
[ELECOM BLUETOOTH LASER MOUSE] is added
to the [Bluetooth Devices] window.
Click
.
You can now use the mouse.
Refer to “4. Checking Mouse Operation” on the back of this sheet to
confirm that the mouse works correctly.
Pairing button
Installing / Replacing the Battery
1
Before using this product, install two AAA battery in the mouse body.
Remove the battery cover.
Insert the battery adjusting to the
indication of the Battery removal
sheet.
Make sure that the
y
polarity is correct.
Install the battery cover as before.
Replacing the Battery
Remove the battery cover.
Remove the battery using the battery
removal sheet.
Insert the battery.
Do not mix different types
y
of batteries or use old
batteries with new batteries
to avoid battery leakage
and failure.
Install the battery cover as before.
Turning on the mouse
2
When using this product, turn the mouse body power on.
Slide the power switch to the ON position.
When not using this product, turn the mouse
body off to save battery power.
Slide the power switch to the OFF position.
Restoring from sleep state
Move the mouse.
To reduce battery drain, the mouse enters sleep mode automatically
if it is left without being operated for a certain period of time with
the power or switch turned on.
Battery removal sheet
Battery removal sheet