background image

Part No. PR10351001

Issue C   07/07

Technical Manual

Technical Manual

Including Spare Parts Information

Instant, Freshbrew & B

2

C (Espresso) Machines

Summary of Contents for B2C/Teapot

Page 1: ...Part No PR10351001 Issue C 07 07 Technical Manual Technical Manual Including Spare Parts Information Instant Freshbrew B2C Espresso Machines...

Page 2: ...ecking for any damage or missing incorrect parts Any discrepancy must be reported to Crane Merchandising Systems in writing within three working days In accordance with the food hygiene regulations an...

Page 3: ...Electricity Supply 14 2 4 Commissioning Procedure 15 Section 3 Programming Mode 19 3 1 Drink Selection Keypad 19 3 2 Menu Display 19 3 3 Accessing the Programming Mode 20 Section 4 Engineers Program 2...

Page 4: ...nt Dispense 78 7 4 Mixing System 78 7 5 Moving Dispense Head 78 7 6 Cup Dispense Unit 79 7 7 Waste Level Probes 80 7 8 Brewer Unit Freshbrew Machines 80 7 9 CoEx Brewer B2C Machines 81 7 10 Teapot 81...

Page 5: ...0 10 15 b Power Circuit 230V System 111 10 16 Heater Circuit 112 Section 11 Dispense Pipe Lengths 114 11 1 Instant Option 1 Machines 114 11 2 Instant Option 2 Machines 115 11 3 Freshbrew Machines 116...

Page 6: ...Assembly 175 Brewer Motor Assembly Freshbrew Machines 177 Brewer Assembly Zuma 179 CoEx Brewer Motor Assembly B2C Machines 185 Teapot Assembly B2C Teapot Machines 187 Water Inlet Pressure Valve Assemb...

Page 7: ...no circumstances should this be dismantled other than by a fully trained engineer 6 Never immerse the machine in water or any other liquid This machine must not be installed in an area where a water j...

Page 8: ...Width 540 mm 540 mm 540 mm Weight 70 kg 70 kg 70 kg Cup Capacity 220 220 220 Number of Canisters 7 Instant 6 Freshbrew 5 bean container 6 bean container Electrical Requirements i Voltage ii Current i...

Page 9: ...ical Manual 1 4 External Features Key 2 3 4 6 5 7 8 9 10 1 1 Coin Entry 2 Coin Reject Button 3 LCD Display 4 Drink Selection Keypad 5 Selection Decals 6 Coin Return 7 Foot 8 Door Lock 9 Graphic Panel...

Page 10: ...4 5 6 7 8 9 10 11 13 14 12 1 Instant Ingredient Canister 2 Freshbrew Tea Canister 3 Main Loom 4 Freshbrew Coffee Canister 5 Paperless Dual Brewer 6 Brewer Waste Bucket 7 Waste Tray 8 Waste Tray Grille...

Page 11: ...fee 7 Instant Decaf Coffee Option 2 7 Canisters 1 Milk 2 Sugar 3 Cappuccino Topping 4 Chocolate 5 Instant Tea 6 Instant Coffee 7 Soup Genesis Instant Option 1 Drink Selections Option 1 7 Canisters Opt...

Page 12: ...t Decaf Coffee 4 Chocolate 5 Freshbrew Tea 6 Freshbrew Coffee Option 1 All speciality drinks made with freshbrew coffee Cappuccino made with cappuccino topping Option 2 Cappuccino made with coffee mil...

Page 13: ...g 4 Chocolate 5 Freshbrew Coffee 6 Coffee Beans Espresso All speciality drinks made with freshly ground coffee beans and cappuccino topping Drink Selections B2C 6 Canisters Fresh Ground Coffee Freshbr...

Page 14: ...Freshbrew Tea 6 Freshbrew Coffee 7 Coffee Beans Espresso All speciality drinks made with freshly ground coffee beans and cappuccino topping Drink Selections B2C Teapot 7 Canisters Fresh Ground Coffee...

Page 15: ...e to its location ensure that there is sufficient access space available via passageways stairs lifts etc and that the table counter where the machine is to be located is strong enough to safely suppo...

Page 16: ...brewer must be connected to the water supply via a water filter This filter must be of food grade quality and able to remove temporary hardness scale heavy metals lead copper iron cadmium chlorine an...

Page 17: ...and coffee ingredient and refit to machine B2C Machines Release the clips securing the bean container cover as shown in the photograph Carefully lift the cover from the container DO NOT place the cov...

Page 18: ...e system which will be heated to operating temperature Ensure that a suitable container is placed under the dispense head Remove the container and empty the contents before proceeding Important Should...

Page 19: ...clean the brewer These instructions perform the same tablet clean procedure as initiated by button 11 on the Service Keypad d When the cleaning cycle is complete exit the engineers program and power...

Page 20: ...tended position as shown in the photograph Ensure that the brewer waste container is fitted correctly beneath the CoEx brewer unit 18 If fitted check that the coin mechanism and cash box operate corre...

Page 21: ...avigating the programming menu structure easy and intuitive It is used to display programming information and will change according to the type of data being updated 1 The top line of the screen is th...

Page 22: ...be issued with your own personalised code 3 Press the Edit key Providing the engineer has entered the code correctly the LCD will display the screen as shown opposite Press the Edit key to access the...

Page 23: ...tiple days of the week on which a specific function will take place 9 Using the up or down keys scroll through until the required day is highlighted as shown Pressing the Edit key will select the day...

Page 24: ...ata from the machines memory 4 1 1 Non Resettable Sales Data This menu allows the engineer to view and record monetary and sales values This data cannot be reset and will remain intact for the service...

Page 25: ...machines 3 Scroll through the list displayed using the up or down keys on the front panel and record the audit data When complete press the X Exit key on the drink selection keypad to return to the No...

Page 26: ...arameters as described for Non Resettable Sales Data Additionally the menu allows the engineer to delete all resettable data via the Clear Data menu 2 To view the Overall Totals screen press the Edit...

Page 27: ...period format Press the X Exit key to return to the Timed Events menu 3 Press the down key to highlight Last Data Clear Last Vend and Last Clock Set Information for these events is displayed along th...

Page 28: ...nt Data This menu displays the data that can be extracted from the machine when a printer is connected and the corresponding keypad number which needs to be pressed to send the data to the printer For...

Page 29: ...with the dispense valves fitted to the heater tank Auger This sub menu allows the engineer to test for correct operation of each individual ingredient motor fitted to the machine Press the Edit key t...

Page 30: ...hich indicates the number of valves fitted to the tank The dispense head will also move to its fully extended position N B Water will be dispensed from the heater tank during the test sequence Place a...

Page 31: ...ead Position Idle indicating that the test has been completed successfully Press the X Exit key to return to the main test menu screen 4 3 4 Switches Sensors This sub menu displays the switches sensor...

Page 32: ...l efficiency of the SureVend sensor 1 Highlight Mug Sensor Average from the Switches Sensors menu and press the Edit key The LCD will display the screen as shown The value displayed represents the ave...

Page 33: ...under the grinder outlet to catch any coffee grounds before starting the test sequence 1 Highlight Grinder Test in the main Test menu and press the Edit key The LCD will display the screen as shown op...

Page 34: ...g the START key on the drink selection keypad will display the screen as shown opposite 3 Press the X Exit key to return to the Keypad Test menu screen Use the down key to highlight Service Keypad and...

Page 35: ...e displays in the status line along the bottom of the display Use the up or down keys to highlight further selections 4 4 2 Entire Machine This sub menu allows the engineer to set a single price for a...

Page 36: ...g if a mug discount is set at 2p but the lowest coin available from the coin mechanism is 5p the machine will not return the discount to the customer 1 Highlight the Mug Discount sub menu from within...

Page 37: ...chines where water values are displayed in millilitres ml and fresh coffee values in grams g 1 Highlight Selection Timers then press the Edit key to access the menu The menu contains all of the drink...

Page 38: ...s Press the Edit key to access the menu The status line at the bottom of the screen shows the current value of the highlighted timer In the example shown the Hot Water value is configured to deliver 8...

Page 39: ...s desired These recipes also contain menus for Milk and Sugar timers If necessary adjust the timings for these ingredients Once all timings have been entered and verified vend the selection to ensure...

Page 40: ...any drink selections that have been disabled indicating to the customer that the drink choice is un available 4 5 4 SureVend This menu enables the SureVend cup delivery sensor to be turned on or off...

Page 41: ...ted by the filled radio button 3 Press the Edit key to confirm the selection and return to the SureVend screen Verify that the status line at the bottom of the screen displays Off when SureVend is hig...

Page 42: ...nsation Each drink type has water level compensation enabling tuning of the freshbrew and espresso drink types available from the machine To adjust the water compensation values proceed as follows 1 F...

Page 43: ...rew coffee no sugar selection Carefully measure the amount of water dispensed If the dispensed amount is less or more than 160ml return to the Water Compensation menu as described above and enter the...

Page 44: ...used for the first time when the type of beans dispensed is changed before adjusting the water compensation or after the grinder mechanism has been removed repaired Important Before commencing the fol...

Page 45: ...te the auger settings stored in the machines memory to the type of coffee dispensed and converts gram settings to run times seconds This procedure must always be carried out by the engineer before the...

Page 46: ...s NOT changed to disable the brewer cleaning routine To do so has an adverse effect on the qualitity of the drink and on the brewer Last Co Ex Clean This displays the time and date of the last success...

Page 47: ...e will suspend vending if the water in the heater tank falls below a certain value This value is factory set to 75 C as displayed in the status line at the bottom of the screen when Minimum Vend Tempe...

Page 48: ...on keypad Press the Edit key to store the new value N B The program is set to allow a maximum value of 200 to be entered as shown 3 From the Brewer Waste Management menu press the down key and highlig...

Page 49: ...rn off any Monetary devices see page 50 4 7 Coins In Out N B Coins In Out will only be displayed on machines fitted with an MDB coin mech The Coins In Out menu emulates the coin mechanism from the fro...

Page 50: ...via the machines keypad 1 From the Systems Settings menu highlight Machine Information and press the Edit key The LCD will display the screen as shown opposite To update create a Machine ID press the...

Page 51: ...tion keypad N B The text Press 0 9 to Edit Value displayed in the status line at the bottom of the screen will alternate with the text Press Start To Change Mode Pressing the START key on the drink se...

Page 52: ...ttom of the screen Press the X Exit key to return to the main menu 4 8 3 Language Setup From this menu the engineer can specify the language that the machine will use to display messages programming i...

Page 53: ...icated by the filled radio button 2 Press the Edit key to save the selection and return to the Monetary menu Verify that the chosen coin mechanism option is displayed in the status line at the bottom...

Page 54: ...lowing description is for information only The Bill Stack Option specifies how the machine accepts notes and returns change The engineer can set one of two options i Escrow If Low Change Change will b...

Page 55: ...nu Verify that the chosen option is displayed in the status line at the bottom of the display Configure Change Without Purchase Value N B This option is only applicable when an MDB coin mechanism is f...

Page 56: ...configure this value 1 From the Monetary menu press the down key and highlight Low Change Message and press the Edit key Enter the required value e g press 0 1 0 0 using the drink selection keypad to...

Page 57: ...lable when an MDB coin mechanism is fitted and configured from within the Coin Mechanism menu This option specifies how the machine will react when a vend fails The engineer can set one of two options...

Page 58: ...y when Coin Set is highlighted DTS Entry into this menu allows the engineer to configure the machine in order to send audit data relating to sales and events stored in the machines memory to a data ca...

Page 59: ...croll down and highlight DTS Audit Data Press the Edit key to access the menu The LCD will display the screen as shown All data and events fields within a vending machine are assigned a unique code de...

Page 60: ...irmware The operating system and default factory machine set up data Default Data The default factory machine set up data eg canister and button layout default run times etc Configuration Data Any mac...

Page 61: ...he Edit key to save the data to the key The LCD will display the screen as shown before exiting to standby mode Disconnect the machine from the power supply and open the door Unplug the data key and r...

Page 62: ...y the screen as shown Press the Edit key to restore the backed up data After a few seconds the machine will beep once and the Initialising screen will be displayed before the machine returns to standb...

Page 63: ...Screen Options This menu allows the engineer to configure the LCD so that it displays either the time or the time and water temperature with the standby message when idle To configure the idle screen...

Page 64: ...safe place 3 Highlight Operators Program and follow the above procedure to change the operator code Ensure that all operators who use the machine are given the new code 4 10 Timed Events Menu 4 10 1...

Page 65: ...at which the free vend period will start Press the sequence 1 0 3 0 using the drink selection keypad to set the time If necessary use the up or down key until AM appears in the dotted box 6 Press the...

Page 66: ...uired days selections quickly press the START key to check all boxes then using the down key scroll and highlight the days selections not required and press the Edit key to remove the X from the corre...

Page 67: ...s the Edit key 2 Once in the Timed Events menu press the down key to highlight Sanitation Events Menu then press the Edit key The LCD will display the screen as shown The following example describes h...

Page 68: ...ill take place To select everyday Monday Sunday press the START key on the drink selection keypad The program automatically places an X in every box indicating that each day is selected N B To select...

Page 69: ...s set to On 4 Press the down key to highlight Event Type By default the event is set to Timed as indicated by the text displayed in the status line at the bottom of the screen Therefore it is not nece...

Page 70: ...hen press the Edit key The LCD will display the screen as shown 3 Press the Edit key to access the 1 Backup Data sub menu The LCD will change and display the screen as shown By default the current Sta...

Page 71: ...ink selection keypad The program automatically places an X in every box indicating that each day is selected N B To select individual days scroll through the menu using the up or down keys until the r...

Page 72: ...and enables the operator to remove the brewer chambers wipe arms assembly for cleaning purposes Press and release the button and then press and hold to index the brewer to the fully open position 5 3...

Page 73: ...ry into this menu allows the operator to view Non Resettable and Resettable Sales Data view data relating to Timed Events and Identification Numbers of installed components and if feature enabled view...

Page 74: ...s selected This button should also be used to purge any water left in the system after the machine has been moved or shut down for any length of time 5 10 Button 10 Machine Cool Down B2C Machines This...

Page 75: ...d upon how full the change tubes are For more information please refer to the manual supplied with the Change giver The coin set accepted by the coin mechanism is also displayed This is pre set in the...

Page 76: ...esses the milk button a second time A third press will display the No Milk selection Pressing the milk button again will revert to the Milk selection 5 If the customer requires sugar it is necessary t...

Page 77: ...e LCD will display the message Thank You and the machine will beep once The message on the display will change to read Please remove cup The drink can then be carefully removed from the dispense area...

Page 78: ...arefully remove the previous price decals from the drink selection decals Update the prices where necessary using new self adhesive decals Refer to Spare Parts Section 13 for part numbers 3 Updating d...

Page 79: ...troller board operates the mains water inlet valve until the required water level is restored 3 A series of 24v DC control valves are mounted on the outside of the heater tank These supply heated wate...

Page 80: ...es Coffee beans are stored in a bean container which is fitted with a sealable lid to keep the beans fresh and are dispensed into the CoEx Brewer via a grinder located under the bean container outlet...

Page 81: ...t as required 2 When a selection is made the Main Controller checks that the cups are not sold out a 230v AC solenoid is energised and a cup is dispensed 3 The cups are separated and dropped by a cup...

Page 82: ...motor will timeout after 60 secs if the home switch is not seen Coffee Brewing 1 Water and coffee grounds are dispensed into the coffee brewing chamber The motor drives the piston up and mixes the co...

Page 83: ...econds to allow all the liquid to exit the brewer At this point the brewer rotates twice dumping the used tealeafs into the brewer waste container 7 11 Power Supply Unit 1 The power supply unit PSU pr...

Page 84: ...rface It will validate a coin and if accepted send a signal to the vending machine controller indicating the total amount of money which has been tendered since the last vend 2 Once sufficient credit...

Page 85: ...water through the system and into the brewer 4 Whilst water is passing through the system a water flow meter will send pulses back to the main controller and the espresso selection will be delivered i...

Page 86: ...ower coupling Heated water exits the boiler through the top coupling A resettable temperature cut out set to operate at 120 C is mounted externally near the top of the boiler and acts as a safety feat...

Page 87: ...e brewer unit is capable of receiving between 5 and 9 grams of ground coffee Once the coffee has been ground and dispensed into the brewer unit the 24V dc brewer motor drives the brewer to the vend po...

Page 88: ...UMPS 4 FLOW METER 5 PRESSURE BOILER 6 ESPRESSO VALVE 3 WAY 7 PRESSURE VALVE 2 WAY 8 RELIEF VALVE 3 BAR 9 SAFETY VALVE 12 BAR 10 3 WAY VALVE 11 THERMAL CUT OUT 12 ELEMENT 13 THERMISTER NOTE System show...

Page 89: ...0 50 Hot Water Coffee Ingredient 1 Ingredient 2 Ingredient 3 Product Delay Hot Water Milk Ingredient 1 Ingredient 2 Product Delay Whipper Time Whipper Delay Hot Water Sugar Ingredient 1 Ingredient 2...

Page 90: ...ient 1 Ingredient 2 Ingredient 3 Product Delay Whipper Time Whipper Delay Hot Water Milk Ingredient 1 Ingredient 2 Product Delay Whipper Time Whipper Delay Hot Water Sugar Ingredient 1 Ingredient 2 Pr...

Page 91: ...2 30 0 50 1 50 1 00 1 00 2 00 0 50 Hot Water Coffee Ingredient Product Delay Whipper Time Whipper Delay Hot Water Sugar Ingredient 1 Ingredient 2 Product Delay Whipper Time Whipper Delay 3 25 1 50 1 0...

Page 92: ...ay Hot Water Coffee Ingredient Product Delay Brewer Delay 1 Brewer Delay 2 Brewer Delay 3 Brewer Delay 4 2 50 1 50 1 00 3 00 0 50 1 25 0 50 0 75 1 00 1 75 0 50 3 75 2 00 1 00 0 00 0 00 0 00 0 00 F B L...

Page 93: ...Product Delay Whipper Time Whipper Delay 4 00 2 50 3 50 1 90 1 00 0 00 0 00 0 00 0 00 2 00 0 75 1 10 1 00 0 00 0 00 2 00 0 50 1 00 1 00 0 00 0 00 Hot Water Tea Ingredient 1 Ingredient 2 Ingredient 3 P...

Page 94: ...00 5 00 0 50 2 00 1 00 1 50 1 00 2 50 0 50 Hot Water Choc Ingredient Product Delay Whipper Time Whipper Delay Hot Water Milk Ingredient Product Delay Whipper Time Whipper Delay Hot Water Coffee Ingred...

Page 95: ...edient 1 Ingredient 2 Product Delay Whipper Time Whipper Delay Hot Water Coffee Ingredient Product Delay End of Vend Delay 80ml 2 00 1 00 5 50 1 00 30ml 1 00 1 50 1 00 3 50 0 50 50ml 7 5g 0 00 0 00 Ca...

Page 96: ...Water Sugar Ingredient 1 Ingredient 2 Product Delay Whipper Time Whipper Delay End of Vend Delay 80ml 9 0g 0 00 20ml 0 50 1 00 1 00 2 50 0 50 0 00 Hot Water Choc Ingredient Product Delay Whipper Time...

Page 97: ...are common to all machines except where stated 10 1 Console Board Service Keypad J5 8 5 6 7 3 4 1 2 BLA CK WHITE PURPLE GREEN JUG KE Y SWITCH BLA CK WHITE WHITE GRE Y FREE VE ND SWITCH LCD SERVICE KEY...

Page 98: ...the door behind the monetary cover To gain access to the board 1 Switch off the power to the machine and open the front door Unscrew and remove the two knurled thumbscrews securing the monetary cover...

Page 99: ...B2C machines thermistor LED 2 POWER J6 J10 CONSOLE CONSOLE IrDA MAIN CONTROLLER BOARD J5 HEATER T A NK PRESSURE BOILER LED 1 COMMUNIC ATIONS THERMIST O R WHITE BLACK BLUE RED BLACK BLUE RED BLACK RED...

Page 100: ...ntrol Board Connections 2 The diagram below illustrates the connections between the control board and the input output board coin mechanism communications and the switch mode power supply Technical Ma...

Page 101: ...ENOID SOLID STA TE RELAY TURRET MOT OR INLET VAL VE MOTORS VAL VES WHIPPERS DISPENSE HEAD MOT OR SWITCH MODE POWER SUPPL Y CDU CUP SENSOR DISPENSE HEAD OPTO SENSOR CAROUSEL POSITION SWITCH DISPENSE HE...

Page 102: ...OTOR 31 34 36 35 32 33 28 30 29 27 26 2 25 23 24 22 21 20 19 18 17 14 15 16 8 13 12 11 J10 10 9 5 7 6 4 3 1 24V 24V 24V 24V 24V 24V INPUT OUTPUT BOARD BLA CK PINK RED WHITE PINK BLA CK RED RED WHITE O...

Page 103: ...OTORS VAL VE S WHIPPER S DIS PE NSE HEAD MOT OR CDU CUP S ENSOR DIS PE NSE HEAD OPTO S ENSOR CAROUS EL POS ITION S WITCH DIS PE NSE HEAD HOMES WITCH BREWER I NDEX HOMES WITCH OUTPUT OUTPUT GND D3 D4 D...

Page 104: ...SEHEAD MOTOR 31 34 36 35 32 33 28 30 29 27 26 2 25 23 24 22 21 20 19 18 17 14 15 16 8 13 12 11 J10 10 9 5 7 6 4 3 1 24V 24V 24V 24V 24V 24V Input Output Board BLA CK PINK RED WHITE RED ORANGE PINK BL...

Page 105: ...8 9 5 6 7 3 4 1 2 5 6 3 4 1 2 CUP SPLITTER SOLENOID GRINDER MOTOR PUMP 1 PUMP 2 DISPENSE HEAD OPTO SENSOR CDU CUP SENSOR FLOW METER SERIAL COMMS CAROUSEL POSITION SWITCH DISPENSE HEAD HOME SWITCH BRE...

Page 106: ...ROUSEL POSITION SWITCH DISPENSE HEAD HOME SWITCH CoEx BREWER HOM POSITION SWITCH SWITCH MODE POWER SUPPLY WASTE PROBE TURRET MOTOR INLETVALVE HOT WATERVALVE PRESSUREVALVE ESPRESSOVALVE MOTORS VALVES W...

Page 107: ...ut Circuit B2C Machines ESPRESSO VALVE DISPENSE HEAD MOTOR CoEx BREWER MOTOR PRESSURE VALVE VALVE 2 HOT WATER J10 J16 RED ORANGE ORANGE BLACK ORANGE PINK WHITE WHIPPER 3 TEAPOT BREWER MOTOR Technical...

Page 108: ...Input Output Board Connections Common The diagram below illustrates the connections between the I O board and the main controller board serial comms link and switch mode power supply Technical Manual...

Page 109: ...d Connections Instant Machines The diagram below illustrates the connections between the I O board and the CDU cup sensor dispense head opto sensor carousel position switch and dispense head home swit...

Page 110: ...Freshbrew Machines The diagram below illustrates the connections between the I O board and the CDU cup sensor dispense head opto sensor carousel position switch dispense head home switch and brewer in...

Page 111: ...ad opto sensor carousel position switch dispense head home switch brewer index home switch and the water flow meter WASTE PROBE DISPENSE HEAD OPTO SENSOR FLOW METER CDU CUP SENSOR INPUT OUTPUT BOARD B...

Page 112: ...10 15 a Power Circuit 230V System Pre serial numbers up to starting 1634 ELEMENT J14 Technical Manual 110...

Page 113: ...t 230V System Post serial numbers from starting 1634 J14 HEATER TANK PRESSURE BOILER ELEMENT AUX FUSE 4A J15 1 2 3 J17 1 2 3 J19 1 2 3 J18 1 2 3 M P P GRINDER MOTOR PUMP 1 PUMP 2 ONLY ON B2C MACHINES...

Page 114: ...water and continuously senses the water temperature The resistance of the thermistor is interpreted by the controller as a temperature reading N B The resistance of the thermistor when at ambient roo...

Page 115: ...s process continues until the water has reached the temperature which has been set in the temperature configuration program 4 Instant Freshbrew Machines If the water in the tank should overheat and bo...

Page 116: ...tion 1 Machines H 1 2 3 4 5 Pipe No Diameter Length 1 6 mm I D x 10 mm O D 170 mm 2 6 mm I D x 10 mm O D 160 mm 3 6 mm I D x 10 mm O D 170 mm 4 6 mm I D x 10 mm O D 210 mm 5 6 mm I D x 10 mm O D 300 m...

Page 117: ...Length 1 6 mm I D x 10 mm O D 170 mm 2 6 mm I D x 10 mm O D 160 mm 3 6 mm I D x 10 mm O D 170 mm 4 6 mm I D x 10 mm O D 210 mm 5 6 mm I D x 10 mm O D 270 mm 6 6 mm I D x 10 mm O D 340 mm H Hot Water D...

Page 118: ...2 3 4 5 Pipe No Diameter Length 1 6 mm I D x 10 mm O D 170 mm 2 6 mm I D x 10 mm O D 160 mm 3 6 mm I D x 10 mm O D 170 mm 4 8 mm I D x 13 mm O D 250 mm 5 8 mm I D x 13 mm O D 280 mm H Hot Water Dispen...

Page 119: ...Machines H 1 2 3 4 Pipe No Diameter Length 1 6 mm I D x 10 mm O D 170 mm 2 6 mm I D x 10 mm O D 160 mm 3 6 mm I D x 10 mm O D 170 mm 4 8 mm I D x 13 mm O D 360 mm H Hot Water Dispense Pipe Technical M...

Page 120: ...ot Machines H 1 2 3 4 Pipe No Diameter Length 1 6 mm I D x 10 mm O D 170 mm 2 6 mm I D x 10 mm O D 160 mm 3 6 mm I D x 10 mm O D 190 mm 4 8 mm I D x 13 mm O D 360 mm H Hot Water Dispense Pipe Technica...

Page 121: ...ups Please Insert Mug Cup turret no cups no cups Unable to find cup stack Cup turret has timed out on initialisation Sorry Out of Service No Cups No cups and mug sensor failure Machine is out of cups...

Page 122: ...Brewer Jam Brewer jam Brewer has not moved from its home position and may be jammed Sorry Out of Service Brewer Not Homed Brewer not homed Brewer has not returned to its home position and may be jamme...

Page 123: ...n tube Tube indicates full but coin count is zero Temporarily Out Of Service Card reader comm Fatal error Cannot communicate with the card reader Temporarily Out Of Service Single card reader error Tr...

Page 124: ...and allow the heater tank to fill and to heat up Drain and fill one more time The machine is now ready to be put back in service 12 3 Brewer Maintenance Freshbrew Machines Freshbrew machines are fitt...

Page 125: ...Removing the tea filter mesh Using a small flat bladed screwdriver or similar insert the tool up through the tea outlet and carefully push the filter assembly up and out of its location 5 If necessar...

Page 126: ...creen assembly during a brew cycle it may be necessary to adjust the brew chamber tension arm The leaking is an indication that the brew chamber is not closing correctly Proceed as follows 1 Open the...

Page 127: ...e as previously described Important Only fully trained engineers are to proceed with the following adjustments If the brewer is damaged as a result of non trained engineers proceeding with these adjus...

Page 128: ...up Test button 7 and check that a cup is ejected correctly Repeat this test several times to confirm that the mechanism is functioning correctly 5 Refit the transparent cup sleeves to the cup drop mec...

Page 129: ...the contents before re fitting to the machine 3 Remove the safety key from the door switch to turn off the power to the machine 4 Close the fresh beans outlet slide and remove the fresh beans contain...

Page 130: ...nance B2C Machines Espresso machines are fitted with the unique CoEx brewer unit which produces both fresh coffee and espresso based drinks from ground beans and freshbrew pre ground coffee from the s...

Page 131: ...turn the green locking ring anti clockwise to its open position indicated by the two arrows Carefully remove the old filter unit down and out of the CoEx brewer unit Discard the used filter unit 4 Usi...

Page 132: ...uct 7 Take the new lower piston and cylinder assembly from the service kit Before assembling the unit to the swing arms filter holder assembly ensure that the lower piston a is at the top of its strok...

Page 133: ...he brewer drive coupling to the input shaft ensuring that the raised pip b lines up with its locating dimple c on the input shaft Ensure that the captive lock nut is retained in the plastic drive coup...

Page 134: ...he bean canister shut off to close the fresh beans outlet Carefully remove the fresh beans canister from the machine and place it to one side Pull up and remove the grinder adjusting wheel assembly b...

Page 135: ...bly to the grinder unit 19 Refit the fresh beans container to the machine Pull the bean canister shut off to its fully extended position 20 Turn on the electricity supply to the machine Important Befo...

Page 136: ...Technical Manual 134...

Page 137: ...lable for the Genesis Use of these genuine components when servicing or repairing the machine will significantly increase the working life of the machine For all spare parts sales and enquiries Teleph...

Page 138: ...2 3 4 5 6 7 8 9 1 10 11 12 13 Exterior View Technical Manual 136...

Page 139: ...3250 Coin Return Plate Coin Return Plate Jug Key Blank Plate Free Vend Blank Plate Free Vend Jug Key Fage Giotto Mounting Plate Girovend Sapphire Mounting Plate Mars Smartcard Mounting Plate VMC Mount...

Page 140: ...1 2 3 4 5 6 2 7 8 9 10 11 12 13 14 16 15 17 18 19 Door Interior Technical Manual 138...

Page 141: ...MT10177000 Cup Chute Mounting Bracket 11 MT10172000 Cashbox 12 a b c ME01859000 MT06635000 ME03333000 Cashbox Lock Cashbox Lock Cam Cashbox Key No 300245B 13 PL10006000 Coin Return Bowl Moulding 14 MT...

Page 142: ...1 2 3 4 5 6 7 8 9 10 11 12 13 14 15 16 Console Assembly Technical Manual 140...

Page 143: ...om Console To MPU PCB 8 FA10222000 PCB Stand Of 9 PL10031000 Milk Selection Button 10 PL10032000 Start Button 11 PL10033000 Sugar Selection Button 12 PL10012000 Selection Button 13 a b FA10223000 FA01...

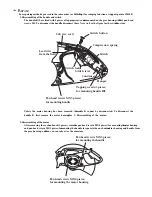
Page 144: ...1 2 3 4 5 6 7 8 9 11 10 Interior View Instant Machines Technical Manual 142...

Page 145: ...ay Five Whippers Extract Tray Six Whippers 3 Mixing System see page 173 4 MT10078000 Cover Panel Lower 5 FA10255000 Washer M10 6 FA07112000 Spacer M10 x 20 7 ME05281001 Foot M10 x 45 8 SI01171960 Sili...

Page 146: ...1 2 3 4 5 6 7 8 9 10 11 12 13 14 15 Interior View Instant Machines Covers Removed Technical Manual 144...

Page 147: ...m 240v Power obsolete from serial no starting 1634 8 a b c d EL01154000 EL10193000 EL10194000 MT10106000 Mains Filter the following three parts are obsolete from serial no starting 1634 Connector Bloc...

Page 148: ...1 2 3 4 5 6 7 8 9 10 11 12 13 14 15 16 Interior View Freshbrew Machines Technical Manual 146...

Page 149: ...000 Freshbrew Waste Container 7 FA07112000 Spacer M10 x 20 8 ME05281001 Foot M10 x 45 9 FA10255000 Washer M10 10 Dispense Head Assembly see page 169 11 PL06334000 Service Key 12 Mixing System see page...

Page 150: ...1 2 3 4 5 6 8 7 9 10 11 12 13 14 15 16 17 18 Interior View Freshbrew Machines Covers Removed Technical Manual 148...

Page 151: ...3083000 Hose Adaptor 9 HO01139000 Hose 10 a b FA05209000 ME05208000 Grommet Red Silicone Float Detector Spring 11 a b c d EL01154000 EL10193000 EL10194000 MT10106000 Mains Filter the following three p...

Page 152: ...1 2 3 11 4 12 13 21 17 18 19 14 15 16 20 22 6 10 7 8 9 5 Interior View B2C Machines Technical Manual 150...

Page 153: ...osi Pan Head Screw M4 x 16 7 ME10988000 Bobbin Mount M F M4 8 FA03197000 Washer Shake Proof External 9 FA01506000 Nut Full M4 10 FA01502000 Posi Pan Head Screw M4 x 6 11 FA07111000 Knurled Thumbscrew...

Page 154: ...1 3 4 5 6 6 2 2 8 8 10 11 12 13 14 15 16 17 18 7 2 2 19 9 Interior View B2C Machines Covers Removed Technical Manual 152...

Page 155: ...tor 24v DC 90 rpm obsolete from serial no starting 1634 all motors are now the 130 rpm motors Ingredient Motor 24v DC 130 rpm 11 VA10043000 Pressure Relief Valve 12 Bar 12 ME10209000 Coupling Male Sta...

Page 156: ...Interior View B2C Teapot Machines 19 20 18 21 22 23 24 1 2 4 11 12 13 14 15 6 10 7 8 9 5 16 17 3 Technical Manual 154...

Page 157: ...l M4 10 FA01502000 Posi Pan Head Screw M4 x 6 11 FA07111000 Knurled Thumbscrew M4 x 10 12 PL10540000 Coffee Chute Moulding 13 MT10131000 Waste Chute 14 CoEx Brewer Assembly see page 185 15 PL10550000...

Page 158: ...Interior View B2C Teapot Machines Covers Removed 13 12 14 15 11 16 17 2 1 3 18 2 5 2 8 7 9 10 12 6 Technical Manual 156...

Page 159: ...ssure Relief Valve 3 Bar 8 ME10211000 Coupling Female 9 EL01157000 Door Interlock Switch 10 MO10152000 Ingredient Motor 24v DC 130 rpm 11 VA10043000 Pressure Relief Valve 12 Bar 12 ME10209000 Coupling...

Page 160: ...1 2 3 4 5 6 7 8 9 10 10 11 12 13 14 15 16 17 18 19 20 21 22 23 24 25 26 27 Cup Drop Unit Assembly Technical Manual 158...

Page 161: ...0 Spirol Pin M4 x 14 mm 10 FA10205000 Screw M3 x 10 11 ME05208000 Spring 12 FA03217000 Screw M4 x 10 13 ME10201000 Spacer 14 FA01554000 Shakeproof Washer M4 15 FA01506000 Locknut M4 16 MT10066000 Brac...

Page 162: ...1 11 8 4 9 10 7 6 3 2 4 5 Tall Canister Assembly Technical Manual 160...

Page 163: ...ister Lid Canister Lid Narrow 2 a b PL10390000 PL11637000 Canister Base Canister Base Narrow 3 PL10358000 Flange Rear 4 PL10356000 End Cap 5 PL02711000 Canister Drive 6 PL01442000 Canister Chute RH Lo...

Page 164: ...6 1 4 6 7 8 9 3 2 4 5 Short Canister Assembly Technical Manual 162...

Page 165: ...ster Base Canister Base Wide 3 PL10358000 Flange Rear 4 PL10356000 End Cap 5 PL02711000 Canister Drive 6 a b c PL10297000 PL01441000 PL11129000 Extended Chute Tea Canister Canister Chute Coffee Canist...

Page 166: ...8 1 3 2 4 5 4 6 7 Coffee Canister Assembly Freshbrew Machines Technical Manual 164...

Page 167: ...0156000 Freshbrew Canister Assembly 1 PL07137000 Canister Lid 2 PL01128000 Canister Chute Central 3 PL02709000 Flange Front 4 SI04697000 O Ring 5 ME10386000 Auger c w O Ring 6 PL02710000 Flange Rear 7...

Page 168: ...1 2 3 4 5 6 7 8 9 10 11 Dispense Head Assembly Technical Manual 166...

Page 169: ...Opto Sensor 3 MT10099000 Cover Plate 4 MO10150000 Motor 24v DC 50rpm c w Drive Pinion 5 MT10098000 Motor Bracket 6 MT10101000 Decoder Bracket 7 PL10035000 Rack Moulding 8 FA01416000 Knurled Thumb Nut...

Page 170: ...1 2 3 4 5 6 7 8 9 10 Dispense Head Assembly Technical Manual 168...

Page 171: ...Dispense Head Opto Sensor 3 MT10099000 Cover Plate 4 MO10794000 Motor 24v DC 50rpm c w Drive Pinion 5 MT10101000 Decoder Bracket 6 PL10035000 Rack Moulding 7 FA01416000 Knurled Thumb Nut M5 8 PL054960...

Page 172: ...1 2 3 4 5 6 7 8 9 10 11 12 13 14 15 16 17 18 19 18 21 20 22 23 Boiler Assembly Instant Freshbrew Machines Technical Manual 170...

Page 173: ...24v DC 9 VA01141000 Level Probe Seal 10 ME04550000 Level Probe 11 SI06340000 Thermistor Seal 12 PH03112000 Thermistor Assembly 13 FA01185000 Snapper Clip 30 14 SI01171960 Silicone Pipe 8mm i d 15 PL0...

Page 174: ...1 2 3 4 5 6 7 8 9 10 1 2 3 4 5 6 7 8 9 10 Mixing System Hygiene Kit Technical Manual 172...

Page 175: ...Plate Whipper Motor 1GHYG INSTANT 1GHYG FBREW 1GHYG BEAN2CUP Hygiene Kit Instant Freshbrew B2C not illustrated Post serial numbers from starting 1634 Ref No Part No Item Description 1 MO10991000 Whipp...

Page 176: ...1 2 3 4 5 6 7 8 10 10 10 9 Power Supply Assembly Technical Manual 174...

Page 177: ...ply Chassis Power Supply Chassis B2C B2C teapot machines only 3 EL10193000 Connector Block 4 EL10194000 End Plate 5 EL01815000 Thermal Pad Items 3 4 5 are obsolete from serial no 1634 6 EL01152000 EL0...

Page 178: ...2 3 5 4 1 6 7 8 9 Brewer Motor Assembly Freshbrew Machines Technical Manual 176...

Page 179: ...embly includes items 1 2 3 1 PL03297000 Drive Dog 2 ME08734000 Roll Pin 36 x 3mm 3 MO10023000 Freshbrew Motor 4 ME00979000 Cam c w Grub Screw 5 EL01148000 Micro Switch 6 ME04926001 Brewer Retaining Pi...

Page 180: ...3 52 51 50 4 49 48 47 46 44 45 44 43 39 38 36 37 35 22 33 32 34 31 30 29 28 27 25 26 17 16 15 8 20 21 23 22 18 16 24 19 9 7 6 5 4 3 2 64 4 63 62 11 10 1 12 13 4 14 42 41 40 61 4 69 Brewer Assembly Zum...

Page 181: ...07456000 Unwipe Arm 12 FA07669000 Screw 8 32 x 3 4 13 ME07457000 Support Bracket Rear 14 ME07458000 Support Plate 15 ME07459000 Mainframe 16 FA07670000 Retaining Ring 17 ME03955000 Spring Pin 3 16 x 1...

Page 182: ...3 52 51 50 4 49 48 47 46 44 45 44 43 39 38 36 37 35 22 33 32 34 31 30 29 28 27 25 26 17 16 15 8 20 21 23 22 18 16 24 19 9 7 6 5 4 3 2 64 4 63 62 11 10 1 12 13 4 14 42 41 40 61 4 69 Brewer Assembly Zum...

Page 183: ...ide 47 a b c SI07150000 SI10373000 SI10372000 Brewer Seal Single Brewer Coffee Seal Dual Brewer Tea Seal Dual Brewer 48 a b PL07677000 PL10375000 Brewer Chamber Single Brewer Brewer Chamber Dual Brewe...

Page 184: ...3 52 51 50 4 49 48 47 46 44 45 44 43 39 38 36 37 35 22 33 32 34 31 30 29 28 27 25 26 17 16 15 8 20 21 23 22 18 16 24 19 9 7 6 5 4 3 2 64 4 63 62 11 10 1 12 13 4 14 42 41 40 61 4 69 Brewer Assembly Zum...

Page 185: ...07479000 Latch Block RH 65 ME10497000 Tea Funnel Assy Dual Brewer includes item 66 67 66 PL10376000 Funnel Tea 67 ME10380000 Tea Filter Assembly Dual Brewer includes seals and mesh filter 68 ME1049600...

Page 186: ...8 7 11 1 2 9 10 12 18 17 5 4 6 3 CoEx Brewer Motor Assembly B2C Machines Technical Manual 184...

Page 187: ...0 EL10587000 Lever Microswitch 11 ME10763000 Water Inlet Connection 12 ME10597000 Drive Wheel 13 PH10820000 Service Kit includes items 5 7 14 15 14 ME10592000 Lower Piston and Cylinder Assembly 15 ME0...

Page 188: ...Teapot Assembly B2C Teapot Machines 1 2 3 4 5 6 7 8 6 6 6 9 12 10 11 13 14 15 16 17 18 Technical Manual 186...

Page 189: ...0977000 Teapot Assembly c w Mesh 7 SI01669000 O Ring 8 PL10975000 Filter Mesh 9 FA01855000 M8 Thumb Screw 10 ME00598000 Slider Block 11 ME00596000 Pivot Guide Pillar 12 ME05426000 Pivot Plate 13 ME005...

Page 190: ...3 2 1 4 Water Inlet Pressure Valve Assembly B2C Machines Technical Manual 188...

Page 191: ...umbers up to starting 1634 Ref No Part No Item Description 1 VA10147000 Inlet Valve 24v DC 2 VA10048000 Valve Pressure Reducing 3 Boiler Assembly see page 193 4 SI10538000 Silicone Tubing 4mm i d MT10...

Page 192: ...3 2 1 4 5 6 7 Water Inlet Pressure Valve Assembly B2C Machines Technical Manual 190...

Page 193: ...scription 1 VA10147000 Inlet Valve 24v DC 2 VA10048000 Valve Pressure Reducing 3 Boiler Assembly see page 193 4 SI10538000 Silicone Tubing 4mm i d 5 ME10834000 Flow Meter 6 FA05209000 Grommet Red Sili...

Page 194: ...2 4 4 3 5 10 1 7 8 11 9 6 4 2 6 3 4 1 7 5 6 Pressure Boiler Assembly B2C Machines Technical Manual 192...

Page 195: ...ve Coil 3 Way 7 ME10211000 Coupling Female 8 ME10049000 Flow Meter 9 ME10217000 Coupling Elbow 10 HO10245000 Tube 11 MT10463000 Bracket Flow Meter Post serial numbers from starting 1634 Ref No Part No...

Page 196: ...1 2 4 3 Fresh Bean Container B2C Machines Technical Manual 194...

Page 197: ...tainer B2C Machines Ref No Part No Item Description 1 PL10027000 Bean Container Lid 2 SI10548000 Bean Container Lid Seal 3 PL10026000 Fresh Beans Container 4 PL10028000 Bean Container Shut Off Technic...

Page 198: ...3 2 1 Water Filter Assembly Brita Aquaquell Technical Manual 196...

Page 199: ...Water Filter Assembly Brita Aquaquell Ref No Part No Item Description 1 BRITA GENESIS Filter Kit 1 WF04910000 Filter 2 WF04911000 Filter Head Small 3 HO04446000 Hose Technical Manual 197...

Page 200: ...1 3 4 2 Water Filter Assembly Brita 06B Technical Manual 198...

Page 201: ...Part No Item Description 1BRITA06BFILTER Filter Kit Aquavend 0 6B 1 WF07310000 Filter Cartridge 2 WF07309000 Filter Head Assembly includes mounting bracket and screws 3 HO07498000 Hose Inlet 4 HO0749...

Page 202: ...2 3 3 4 1 Water Filter Assembly Everpure Technical Manual 200...

Page 203: ...e Ref No Part No Item Description 1 EPURECARTKIT Filter Kit 1 WF03273000 Filter Cartridge 2 WF03116000 Filter Head Assembly includes mounting bracket and screws 3 HO04074000 Hose Inlet 4 HO4075000 Hos...

Page 204: ...5 11 2 10 12 4 3 10 15 16 8 17 18 14 9 23 20 22 21 Base Cabinet Waste Equipment Technical Manual 202...

Page 205: ...0 WO07022000 Hinge 11 ME10533000 Foot 12 MT05484000 Kick Plate 13 3 GE BASE PLB Plumb Kit includes all parts for the base cabinet waste system items 14 to 18 14 PL01172000 Bucket 10 litre 15 PL0517700...

Page 206: ...Technical Manual 204...

Page 207: ...0 Freevend M C 2 1 GE FV Jug 01 Payvend M C 3 4 GE NFM 531 Platinum Coin Kit 4 4 GE WFM 531 Freevend to Payvend Kit converts a freevend to a payment system 5 ME10267000 Transformer used with the Execu...

Page 208: ...Notes Technical Manual 206...

Page 209: ......

Page 210: ...Chippenham Wiltshire SN14 6NQ Tel 44 0 1249 444807 Fax 44 0 1249 444819 Email sales cranems co uk Website www cranems co uk Visit the Tech Zone on our website to find this and other manuals and techni...

Reviews: