quickstartguide
chartplotting receiver
GPSMAP 176C/176
Page 1: ...quick start guide chartplotting receiver GPSMAP 176C 176...
Page 2: ...176 16 color Transflective Display with Backlight 176C Backlit Keypad for easy night operation GPS Antenna External Power and Computer Data Port Battery Compartment Port for optional Data Storage Card...
Page 3: ...ut batteries To remove the battery lid rotate the D ring 1 4 turn counterclockwise and pull away To reinstall the battery lid place the locking pin into the slot and rotate the D ring 1 4 turn clockwi...
Page 4: ...to accept the selected value s It also marks the current location of a waypoint when pressed and held for more than one second The MENU key displays a menu of available options for the current page P...
Page 5: ...b As the unit powers on a Warning Info Page will be displayed To acknowledge that you have read and understand the warning press the ENTER key Backlight and Contrast Adjustment You may need to adjust...
Page 6: ...nserve battery power but the unit cannot be used for actual navigation in simulator mode NOTE Do not try to navigate using the Simulator Mode While in the Simulator Mode the GPS receiver is turned off...
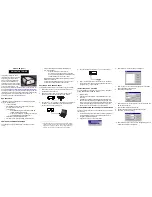
Page 7: ...PAD to select individual fields on the display Moving the cursor to a given location allows you to begin data entry or scroll through a list Default A system selected format built into the operating s...
Page 8: ...o long to display on a single page a scroll bar will appear along the right side of the list see example at left The position of the scroll bar indicates which portion of the list is currently being d...
Page 9: ...cenic Area symbol then press the ENTER key Changing the waypoint name 1 Using the ARROW KEYPAD highlight the Name field then press the ENTER key The Name field will become active and the first zero wi...
Page 10: ...key until you have finished entering the data Remember use the ARROW KEYPAD to move to the next placeholder You should now have enough knowledge to look through the main pages and enter data into you...
Page 11: ...he current GPS location Press the OUT key until the Zoom Scale reads 800ft Now that we have a destination navigating to it is just a step away Going to a waypoint 1 Press the NAV key 2 Highlight Go To...
Page 12: ...o the right The Pointer should now be pointing toward the left side of the dis play This is exactly what will happen during actual navigation when you move off course Press the ARROW KEYPAD to the lef...
Page 13: ...at your current location Name this waypoint HOME assign the Residence symbol and save the waypoint see pages 9 10 Before beginning any trip you should clear the Track Log The Track Log is the bread cr...
Page 14: ...ith the Goto Button highlighted press the ENTER key Start walking As you move you will see that the Pointer is pointed at your destination As soon as you are able turn toward the Pointer until it is a...
Page 15: ......
Page 16: ...ARMIN Europe Ltd Unit 5 The Quadrangle Abbey Park Industrial Estate Romsey SO51 9AQ U K GARMIN Corporation No 68 Jangshu 2nd Road Shijr Taipei County Taiwan www garmin com Part Number 190 00185 02 Rev...