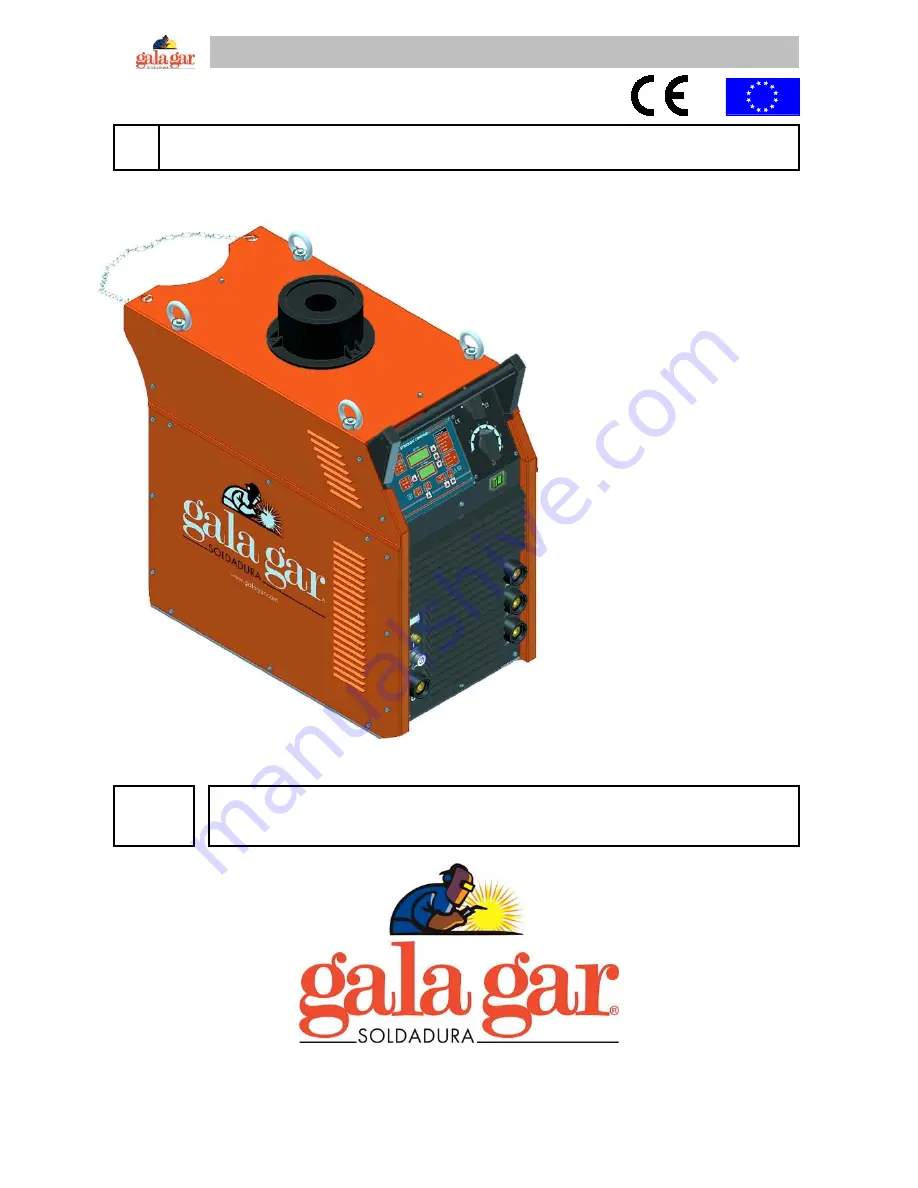
background image

GALA  SYNERGIC 5000

GB


TECHNICAL INSTRUCTIONS MANUAL. POWER SOURCES.

  INDUSTRIAL MIG/MAG WELDING EQUIPMENT OF SYNERGIC CONTROL.


GALA Synergic

5000

(3Ph - 230/400V 50/60 Hz)

Ref. 432.00.000


GB

THIS EQUIPMENT MUST BE USED BY PROFESSIONALS.

TO HELP YOU IN YOUR WORK CAREFULLY READ THIS MANUAL.

Jaime Ferrán 19 50014 ZARAGOZA (Spain)

TLF.-34/976473410  FAX.-34/976472450

Ref. 43217545/Ed0

Summary of Contents for GALA SYNERGIC 5000

Page 1: ...AG WELDING EQUIPMENT OF SYNERGIC CONTROL GALA Synergic 5000 3Ph 230 400V 50 60 Hz Ref 432 00 000 GB THIS EQUIPMENT MUST BE USED BY PROFESSIONALS TO HELP YOU IN YOUR WORK CAREFULLY READ THIS MANUAL Jaime Ferrán 19 50014 ZARAGOZA Spain TLF 34 976473410 FAX 34 976472450 Ref 43217545 Ed0 ...

Page 2: ...E FEED SETTING PROCESS 11 3 3 2 COOLING SYSTEM SETTING PROCESS 12 3 4 WELDING MODE BY MEANS OF SYNERGIC PROGRAM 12 3 5 WELDING MODE BY MEANS OF MANUAL PROGRAM 14 3 6 SETTING MODE OF CYCLE PARAMETERS 15 3 6 1 OPERATING OF CYCLE PARAMETERS SETTINGS MENU 15 3 6 2 VARIABLES OF CYCLE PARAMETER SETTING MENU 15 3 7 WELDING MODE BY MEANS OF USER PROGRAMMES JOB 17 3 7 1 USER PROGRAM RECORDING 17 3 7 2 USER...

Page 3: ...elding gun 1 5 Bottle support 1 6 Auxiliary elements Pressure reducing valve for gas bottle gas economiser 1 1 POWER SOURCES GALA SYNERGIC 5000 MODULAR SYSTEM TECHNICAL CHARACTERISTICS GALA SYNERGIC 5000 Ref 432 00 00 INPUT VOLTAGE U1 THREE PHASE 50 60 Hz 1 230 400 V MAXIMUM INPUT INTENSITY I1max 47 A 27 A EFFECTIVE MAXIMUM INTENSITY I1eff 36 A 21 A POWER FACTOR Cosphi 0 95 CONTINUOUS ADJUSTMENT M...

Page 4: ...led 350 A 60 CO2 320 A 60 Mix 1 4 COOLING MODULE WCS 510 Ref 634 00 000 WCS 510 Modular cooling system adapted to bottle support Ref 432 12 080 It can be installed with any power source Refer to the instructions manual of WCS for more detailed information The electrical connection of the equipment is carried out directly to the power source 1 5 RECOMMENDED ACCESSORIES Pressure reducing valve for A...

Page 5: ...th a crane To assemble the modular system follow the assembly instructions enclosed with the transport trolley or bottle support The assembly will be carried out by suspending the equipment as shown in figure 2 DO NOT LIFT EQUIPMENT WITH GAS BOTTLE MOUNTED ASSEMBLY PLAN FOR GALA SYNERGIC 5000 EQUIPMENT 8 TUERCAS M10 8 GROWERS M10 8 ARANDELAS PLANAS n10 4 TORNILLOS M8 4 GROWERS M8 4 ARANDELAS PLANA...

Page 6: ...act with electrical parts under voltage The differential circuit breaker is selected with a superior gauge to ID PE L1 L 2 L3 3 L 1 L L 2 PE The connection to the mains is made from the intake hose The Figure on the left shows the connection of the intake hose to the two most common types of standardised plug IEC 309 2 In this figure L1 L2 and L3 show the phase cables and PE represents the earth p...

Page 7: ... to power source F Pressure reducing valve of gas flow control A Connection extension lead without cooling B CONTROL hose C Shielding GAS D POSITIVE supply pole Installation of welding circuit elements G Welding torch H Reactance taps J Welding earth clamp Extension connection to power source Extension connection to wire feed unit Earth cable connection J to reactance taps H C GAS B CONTROL D WELD...

Page 8: ...B CONTROL hose C Shielding GAS D POSITIVE supply pole O Cold water pipe BLUE I Hot water pipe RED Installation of welding circuit elements G Cooled welding torch H Reactance taps J Welding earth clamp WCS cooling module connection M Electrical connection cable of cooling module O I Hot RED and cold BLUE water pipes Extension connection to power source Extension connection to wire feed unit Earth c...

Page 9: ...nstructions manual 6 Depending on the wire diameter fit the groove of the correct driving roller 7 Fit the wire into the driving system Do not force the wire pressure handle as if this is too tight the motor remains on overload and does not reach the maximum speed and if the handle is too slack the wire could slip Once the wire has been fitted we can then hook up the G torch 3 2 OPERATION CONTROLS...

Page 10: ...ynergic program The special synergic program will show the program Nº selected LD14 LD16 Indicator led of recommended reactance tap in synergic program L1 L2 or L3 LD17 Indicator led of GLOBULAR transfer type in synergic program 2S 4S Settings mode and welding mode continuous spots or intermittent P4 Welding mode selection pushbutton CONTINUOUS SPORTS INTERMITTENT LD18 Indicator led of spot workin...

Page 11: ... If we keep P7 pressed when the power source is on the JOBs will be deleted P1 P2 Program user selection pushbutton JOB Nº selection D2 Indicator display of user program Nº JOB selected with P1 P2 D1 Switches control indicator display in user program mode JOB 3 3 FIRST START UP STARTING SETTINGS 3 3 1 WIRE FEED SETTING PROCESS The adjustment and setting of the D 24C wire feed must only be carried ...

Page 12: ...ed torch The cooling works permanently after the first welding process starts COOLING OFF It permits working with torches without water cooling The cooling is deactivated the protection against lack of water pressure is disabled 3 4 WELDING MODE BY MEANS OF SYNERGIC PROGRAM The welding mode in synergic mode is the most convenient working option for the welder as by telling the equipment what we wa...

Page 13: ...ID FE 0 8 1 0 1 2 1 6 Ar 90 CO2 5 O 5 3rd SELECT INDICATIVE VARIABLE 6th ADJUST THE WELDING POWER D2 D1 LD11 LD13 LD14 LD16 LD17 P3 V U With pushbutton P3 we will determine the indicative variable that will guide us display D1 to adjust the desired power we have three possibilities LD11 Wire speed m min LD12 Thickness in mm of piece to be welded in plane LD13 Expected welding intensity With contro...

Page 14: ... you must carry out the following process 1st DETERMINE THE MANUAL WELDING PROGRAM LD1 LD6 P1 1st By means of P1 we will select MANUAL program LED LD1 comes on 2nd SELECT THE WIRE SPEED AS INDICATIVE VARIABLE D2 D1 LD11 P3 2nd By means of P3 we will select the wire speed as indicative variable m min LED LD11 will come on Display D1 It will indicate the real welding voltage Display D2 It will indic...

Page 15: ...ft one with P1 we can increase the preflow time value tPrF from 0 30 to 0 80 3 6 2 VARIABLES OF CYCLE PARAMETER SETTING MENU The table below sums up the variables of the setting mode menu The Factory value corresponds to the value of the variable when it leaves the factory PARAMETER DESCRIPTION ADJUSTABLE VALUE FACTORY VALUE Welding time sport intermittent welding operation 0 2 5 0 s 2 s Stop time...

Page 16: ... by the torch after finishing the welding operation Factory value 0 5 s By pressing P1 we increase the value máximum 5 0 s By pressing P2 we decrease the value minimum 0 0 s P1 P2 FdC Wire approach speed LIFT ARC control This permits defining the approach speed expressing it in a percentage over the rated welding speed We determine the lift arc goodness with the approach speed control Factory valu...

Page 17: ...5 lights up this tells us that we are in JOB mode the program no will correspond to the one previously recorded Under these conditions we can enter the parameter setting mode and personalise the variables that we wish for this JOB see section 3 6 RECORDING OF A SYNERGIC WELDING PROGRAM See section 3 4 Firstly select the working mode continuous spot or intermittent and the pulse mode 2S 4S 1 From w...

Page 18: ...assign the appropriate wire speed for the user program no JOB selected Depending on the welding conditions this wire speed can be adjusted very accurately Wire speed regulation indicated by means of the INNER dial Intermediate position 0 Speed recorded in JOB Rotation to the RIGHT of position 0 Percentage INCREASE of synergic speed Rotation to the LEFT of position 0 Percentage DECREASE of synergic...

Page 19: ...y means of the INNER dial Central position 0 Synergic speed Rotation to the RIGHT of position 0 Percentage INCREASE of synergic speed Rotation to the LEFT of position 0 Percentage DECREASE of synergic speed In order to carry out a correct operation please read the wire feed units instructions manual 3 9 WCS COOLING MODULE The cooling mode setting is defined in section 3 3 2 of this manual In AUT O...

Page 20: ...d if we are in globular transfer mode or transition arc These welding spots are characterised by an unstable arc with very thick spots Insofar as possible avoid this welding zone The transition zone is situated between the arc zone in short circuit lower power regulations and the spray zone higher power regulations SOFT AND WEAKLY ALLOYED STEELS WELDING We recommend using a gas mixture of Argon CO...

Page 21: ...HE MACHINE IF IT IS HOT If you have finished the work do not disconnect the machine immediately wait until the inner cooling system has totally cooled it KEEP THE WELDING GUN IN GOOD CONDITIONS FOR USE A damaged or worn gun can cause inefficient welding WHEN FINISHING THE WELDING OPERATION MAKE SURE THAT THE TORCH CATCH IS UNLOCKED If mechanical lock guns are used RECOMMENDATIONS FOR REDUCING ELEC...

Page 22: ...lt comes from the electronic board or if it is an electrical connection fault Check that the contactor coils or and solenoid valve are not open There is impurity in the inside chamber of the solenoid valve which prevents the piston from closing completely Dismantle and clean the electrovalve WHEN THE SHIELDING GAS IS RELEASED IT CONTINUES FLOWING The configurated value of post flow is very high Ch...

Page 23: ...there is no pressure in the torch cooling circuit 1 Check the operation of the cooling pump If necessary unblock the pump see cooling manual 2 Check that the level of the cooling liquid is sufficient in the cooling tank 3 If you wish to work without cooling you must set cooling mode OFF see section 3 3 2 Disconnect and connect the equipment again with the on off switch N Out E03 It is detected tha...

Page 24: ...th those materials which have some kind of surface coating zinc plated galvanised etc Avoid inhaling the fumes given off in the process at all times Protect yourself from the fumes and metal dust which can be given off Use quality approved anti fume goggles Work with this equipment must be carried out in places or working posts where there is suitable air renewal If welding processes are carried o...

Page 25: ...al charge unless the damage caused to the product is the result of accidents improper use negligence inappropriate accessories unauthorized servicing or modifications to product not carried out by GALA GAR The decision to repair or replace parts or supply a new appliance will depend on the criterion of GALA GAR All replaced parts and products will be the property of GALA GAR In order for the guara...

Page 26: ... ELECTRIC WELDING APPLIANCES AND ELECTROMECHANICAL CONSTRUCTIONS CENTRAL HEAD OFFICE Jaime Ferrán 19 Nave 30 PO Box 5058 50080 ZARAGOZA Spain Tel 00 34 976473 410 Fax 00 34 472 450 E mail comercial galagar com Internet http www galagar com ...

Reviews: