Discover what’s possible
™
…www
.fish
er-p
rice
.co
m
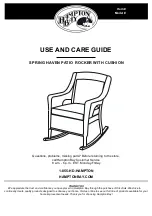
Bouncer
Classical Chorus
™
Model Number: B0772
Please keep this instruction sheet for future reference,
as it contains important information.
Adult assembly is required. Tool required for assembly:
Phillips Screwdriver (not included).
Requires three “C” (LR14)
alkaline
batteries (not included).