GREAT BRITAIN - CUSTOMER SERVICE
contact number: 020 8247 9300 e-mail: [email protected] internet: www.clasohlson.co.uk
English
1
2
3
4
Ver
. 20160119
CO
WiFi Repeater
Art.no 38-6814
Model WRE6505
Please read the entire instruction manual before using the product and
then save it for future reference. We reserve the right for any errors in
text or images and any necessary changes made to technical data.
In the event of technical problems or other queries, please contact our
Customer Services.
Note:
The repeater can either be used as a range extender
or
an access
point. This quick guide only describes the repeater function. If you wish to
use the repeater as an access point, read the manual on the included CD
or visit the manufacturer’s homepage (
www.zyxel.com
) for information.
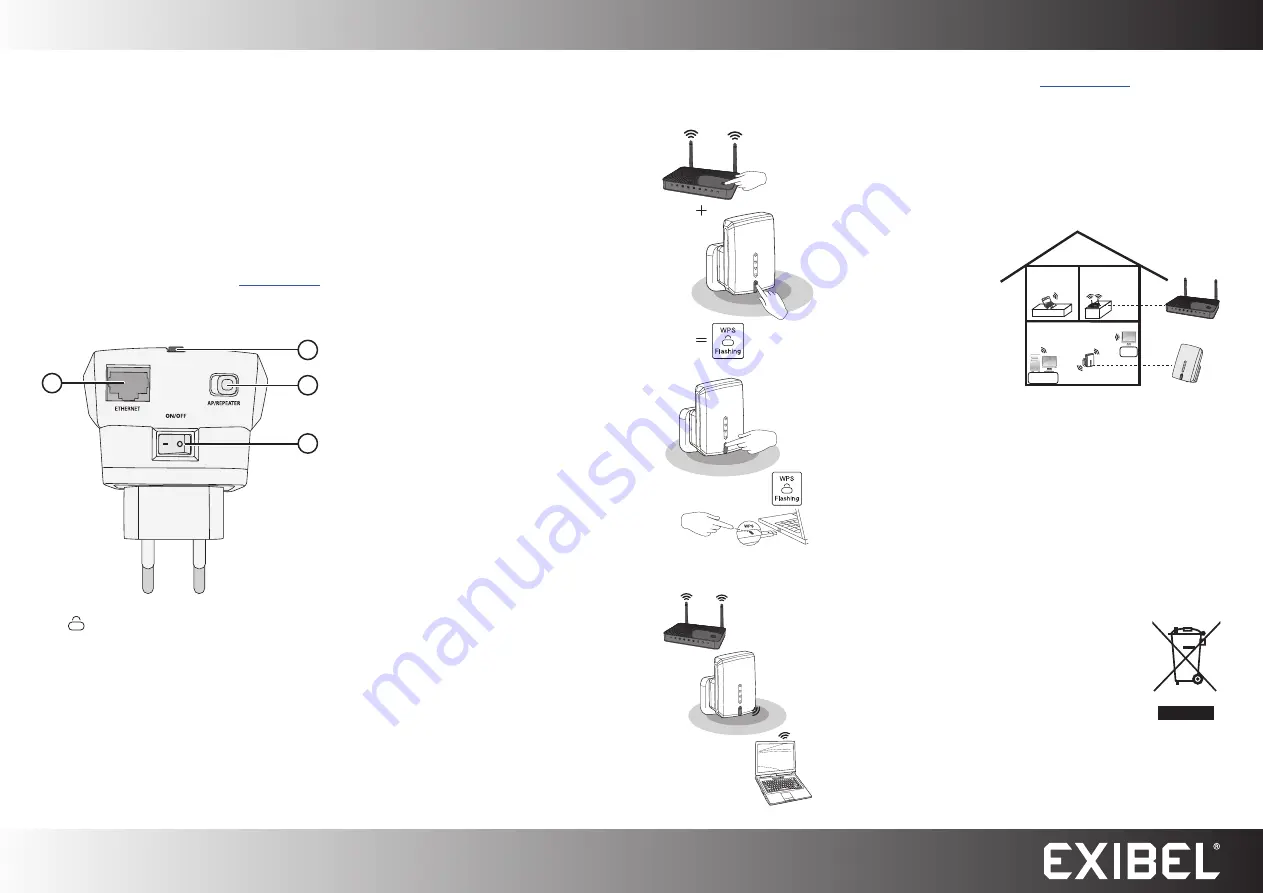
Buttons and functions
WPS connection
Connect the repeater to your router/access point
6. Open you web browser. Go to:
http://zyxelsetup/
7. Write
admin
in the “Username” field and
1234
in the “Password” field.
8. Open the list of available networks in the device which you wish to
connect to the repeater.
9. Select your network or enter the SSID and password.
Follow the on-screen instructions to complete the connection.
Connecting to the new network which the repeater
has created
1. LAN port for connecting a network cable
2. [
] WPS button (WiFi Protected Setup)
3. [ AP/REPEATER ] Access point / Repeater selector switch
4. [ l/0 ] On/off switch
1. Set the [ l/0 ] switch (4) on
the underside of the repeater to
ON
.
2. Connect the repeater to
an electrical socket.
3. Wait about 1 minute until the green
LED indicator on the front of
the repeater comes on.
4. Activate the WPS function on your
router or access point.
5. Hold in the WPS button (2) on
the receiver for 2 seconds.
6. Wait about 2 minutes until
the WPS indicators on the devices
have stopped flashing (the devices
are connected).
Connecting a wireless device
to the repeater
1. Press the WPS button (2) on
the receiver twice in quick
succession.
2. Activate the WPS function on
your device.
3. The device will now be connected
to the repeater.
1. The repeater creates
a new network which
uses the original
network name
plus the suffix
“ _2.4GEXT” or
“ _5GEXT”
2. Open the list of
available networks
in the device that
you wish to connect
the repeater to.
3. Connect to the new network using the same password that you
used for the original network.
Care and maintenance
• Use a dry cloth to wipe the repeater clean when needed.
• The repeater should be unplugged from the wall socket if it is not
to be used for a long time.
• If you need to reset the repeater to its default factory settings,
hold in the WPS button (2) for 5–10 seconds until the LED
indicator starts to flash.
Responsible disposal
Non-WPS connection
1. Set the [ l/0 ] switch (4) on
the underside of the repeater to
ON
.
2. Connect the repeater to
an electrical socket.
3. Wait about 1 minute until the green
LED indicator on the front of
the repeater comes on.
4. Note the SSID and password of
your wireless network.
5. Connect your computer to one
of the pre-configured router
networks: SSID: Zyxe_2.4GEXT or
SSID: Zyxe_5GEXT.
This symbol indicates that this product should not
be disposed of with general household waste. This
applies throughout the entire EU. In order to prevent any
harm to the environment or health hazards caused by
incorrect waste disposal, the product must be handed
in for recycling so that the material can be disposed of
in a responsible manner. When recycling your product,
take it to your local collection facility or contact the place
of purchase. They will ensure that the product is
disposed of in an environmentally sound manner.
Specifications
Power supply
100–240 V, 50/60 Hz
Transfer rate
750 Mbit/s
Dual band
2.4/5 GHz
LAN port
WPS support
IP address
192.168.1.2


