


Quick Setup
IMPORTANT:
Before using this product, make sure you read these instructions
and the safety instructions in the online User’s Guide.
Note:
Your product may differ from the illustrations on this sheet, but the
instructions are the same. Availability of products, product features, or
accessories varies by region.
Contents
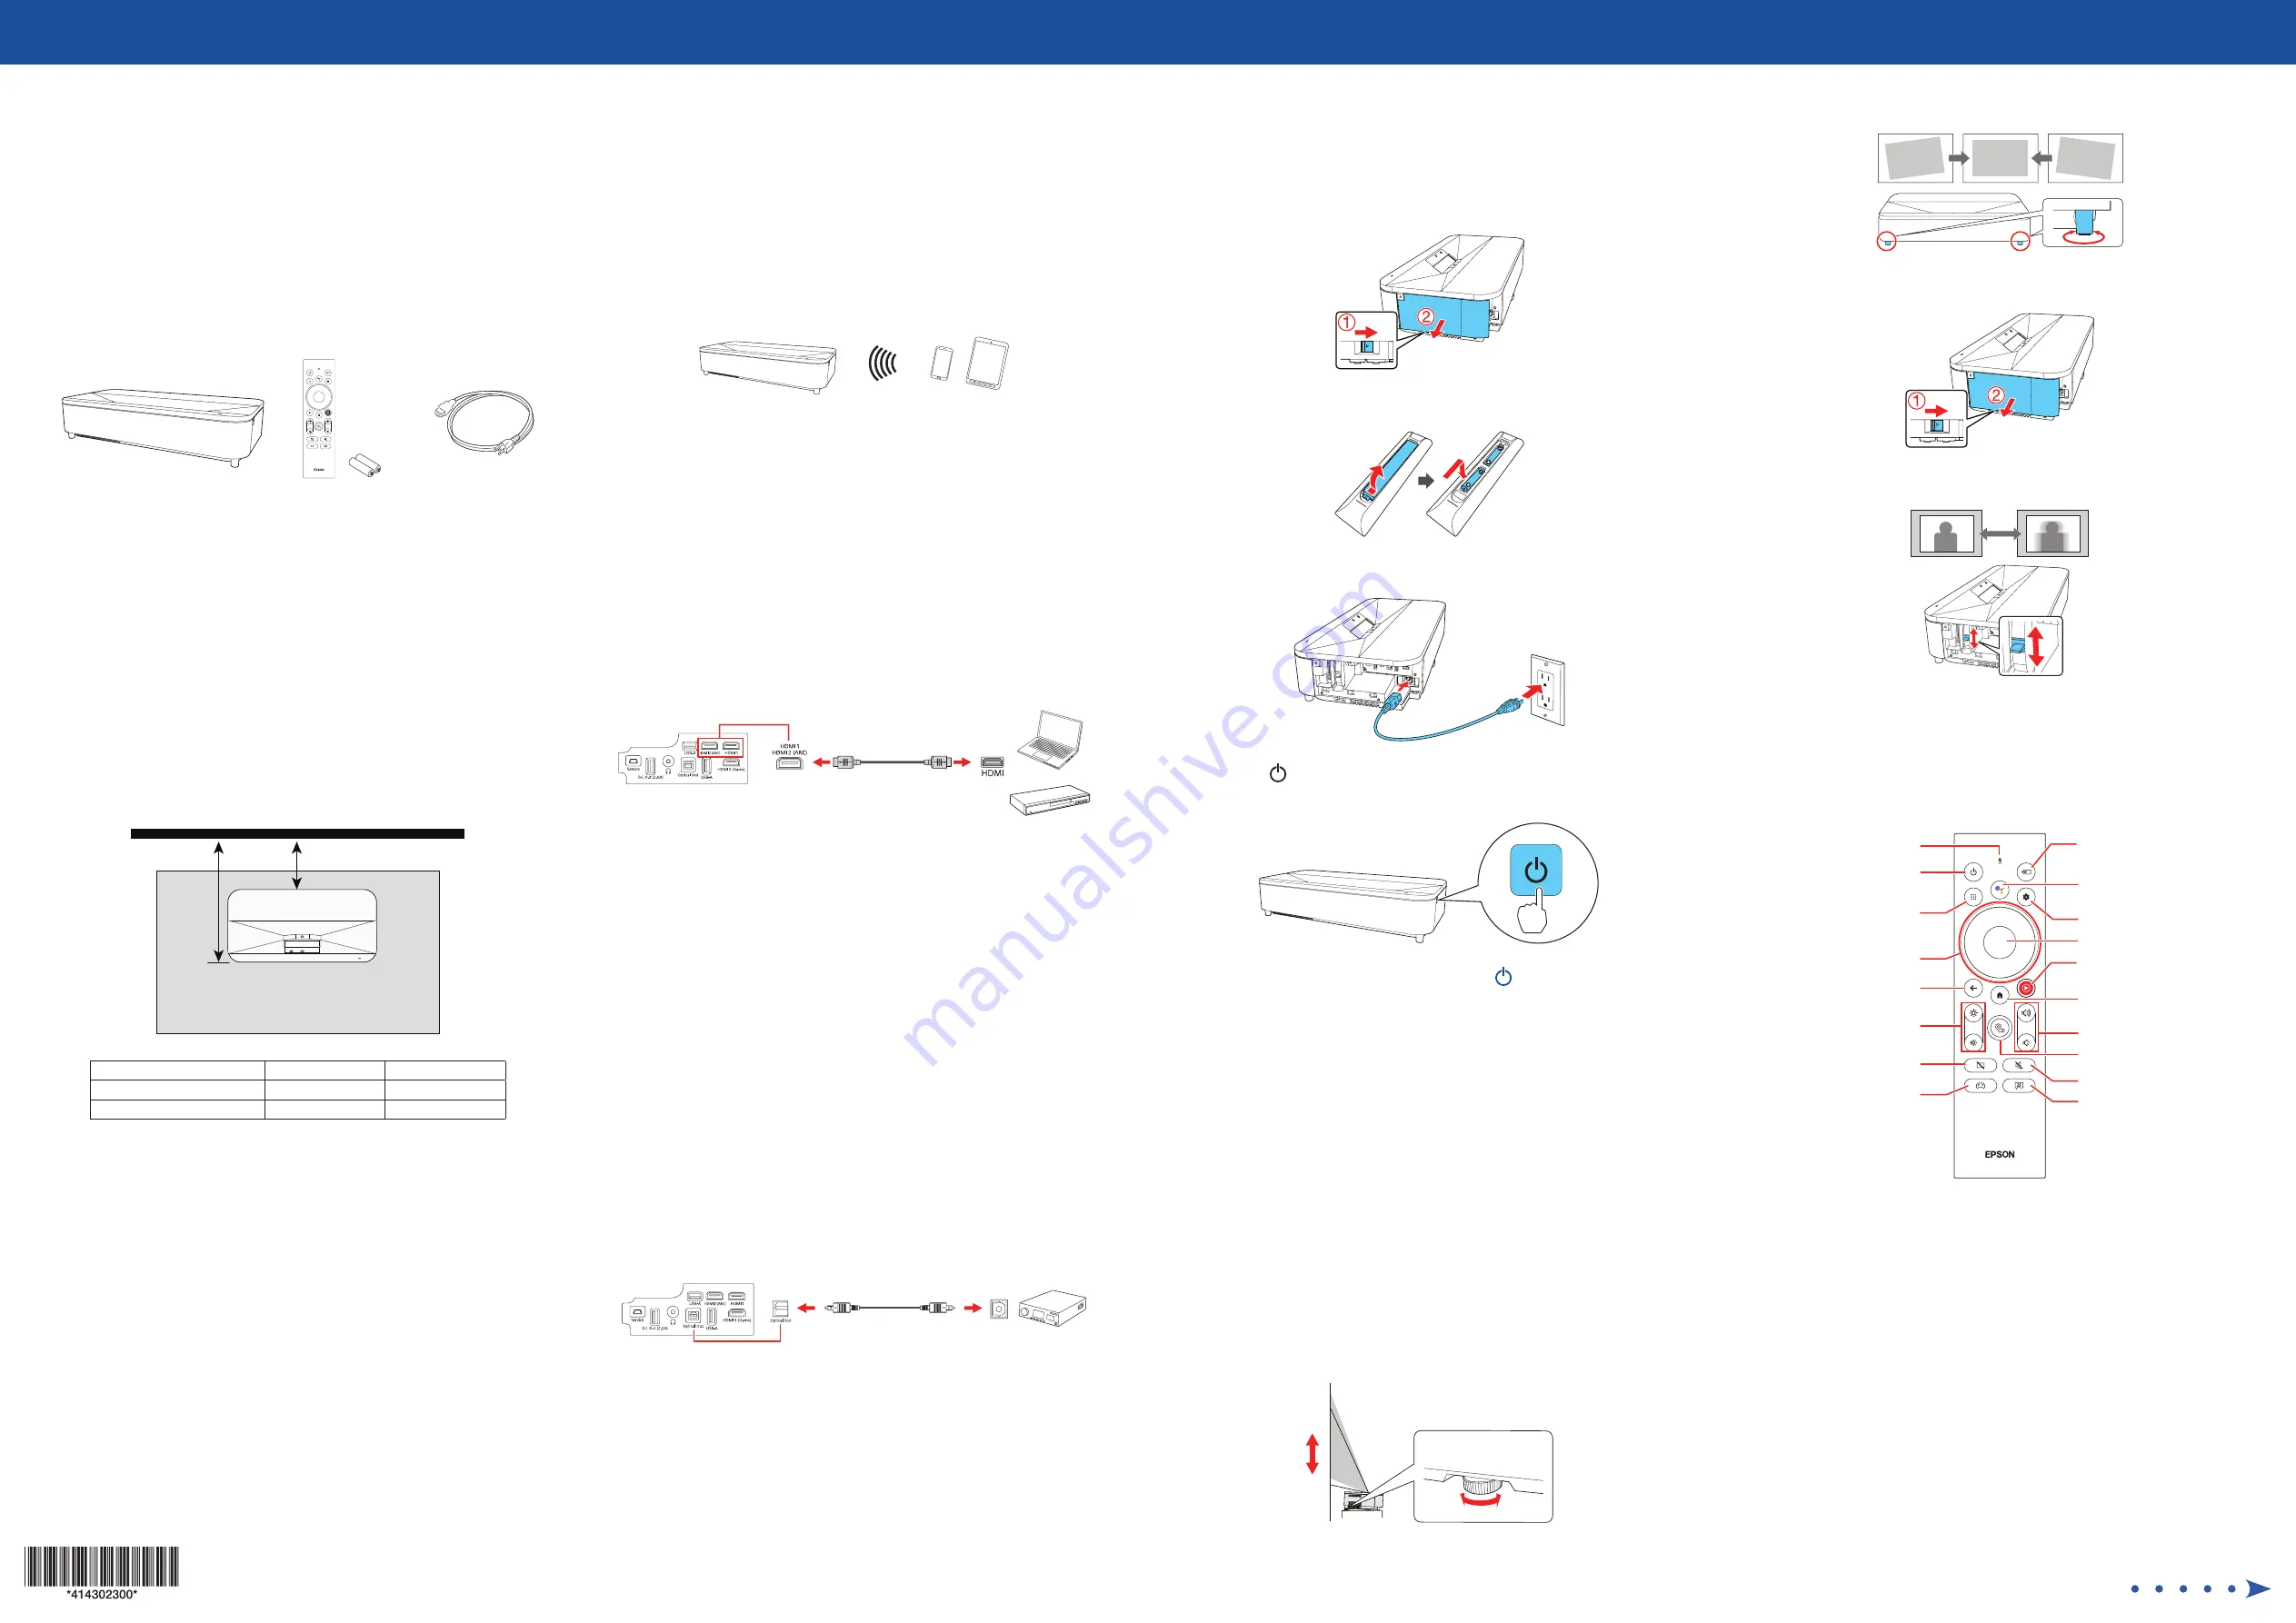
Make sure your projector box includes all of these parts:
You can place the projector on almost any flat surface. See the online User’s
Guide for more information.
Placing the projector
Before proceeding with setup, move the furniture you will place the projector
on to its final location. This will give the furniture time to settle into the floor
as needed, which is especially important for softer surfaces like carpets and
rugs.
Note:
The distance from the top of the projector to the bottom of the
projected image is 5.9 inches (14.9 cm) for a 100-inch image and 7.5 inches
(19 cm) for a 120-inch image.
1
Place the furniture based on the distance measurements indicated below.
B
Furniture
Wall or screen
A
Distance from wall or screen to:
100-inch image
120-inch image
A - Front of projector
17.3 inches (43.9 cm)
20.2 inches (51.4 cm)
B - Rear of projector
3.8 inches (9.8 cm)
6.8 inches (17.3 cm)
2
If your furniture has adjustable feet, use them to level the furniture (allow
time for settling as needed).
3
Place the projector on top of your furniture and align it with the expected
center of the wall or screen you will project onto.
Connect the projector
Android TV
®
Your projector includes built-in Android TV with apps that can be launched
when the remote control is paired to the projector. To stream content, make
sure you have a wireless Internet connection and active streaming account and
log in as necessary for each app.
Chromecast built-in
TM
You can stream content from devices using Chromecast™-compatible apps. See
the online User’s Guide for details.
Google Assistant
TM
You can send voice commands to the projector using the remote control. See
the online User’s Guide for details.
Note:
This feature may not be available in all regions.
Video device or computer
You can connect video equipment or a computer. Remove the side cover and
connect one end of an HDMI
®
cable (not included) to one of the projector’s
HDMI
ports and the other end to an HDMI port on your video device or
computer. See the online User’s Guide for details.
Caution:
Do not turn on the video source before connecting it to the projector;
you may damage the projector.
HDMI cable
Note:
•
Some external video sources may require an optional HDMI adapter cable.
•
If you are connecting an external audio/video receiver to the projector, use
the projector’s HDMI2 (ARC) port. If you are connecting a video game console
to the projector, use the projector’s HDMI3 (Game) port. See the online User’s
Guide for more information.
•
For more information on connecting the projector to your computer or other
devices (camera, USB flash drive, etc.), see the online User’s Guide.
Connect audio
Built-in speakers
The projector has built-in speakers that can play audio from the video source
you are viewing.
You can also use the projector’s speakers to play sound from a device connected
via Bluetooth
®
. See the online User’s Guide for details.
Optical Out audio port
You can connect the projector to an amplifier or speakers through the
Optical
Out
port. See the online User’s Guide for more information.
Optical cable
Turn on your projector
Note:
If you are projecting from an external video device or a computer, make
sure it is connected to the projector first and turn it on after the projector is
turned on.
1
Remove the side cover, if necessary.
2
Install the batteries in the remote control.
3
Plug in the projector.
4
Press the
power button on the projector or remote control. The status
light flashes blue and then stays on.
Note:
To shut down the projector, press the
power button on the
projector or the remote control.
5
Follow the on-screen instructions to pair the remote control and projector,
select your language, connect to your wireless network, and sign in to
your Google Account. You only need to pair the remote the first time you
use it.
Install your screen
If you purchased an Epson
®
SilverFlex
®
100-inch (ELPSC35) or 120-inch (ELPSC36)
screen, see your screen documentation for installation instructions. Otherwise,
see “Adjust the image.”
Adjust the image
1
To adjust the image position, move the projector while keeping it level
and parallel to the screen. To adjust the image height, rotate the rear
foot to extend or retract it.
2
To adjust a tilted image when the projector is set on a flat surface, adjust
the front feet so both sides are level.
3
Remove the side cover, if necessary.
4
Move the focus lever up or down to adjust the image sharpness.
5
Replace the side cover.
Note:
For more detailed adjustment methods, see the online User’s Guide.
Using the remote control
Go back to previous
function
Adjust projected image
size and position
Turn off audio temporarily
Access projector menus
Microphone/light
Turn projector
on or off
Turn off video temporarily
Display Android TV
application list
Navigate menus
Access Android TV menus
Use voice commands
with Google Assistant
Display YouTube Music
Display Android TV
home screen
Choose input source
Turn volume up or down
Enter a selection
Display HDMI3
(Game) source
Adjust brightness
Note:
You must first pair the remote control to the projector to use Android TV
and video-on-demand features. See the online User’s Guide for more
information.
LS800BATV/LS800WATV


