1. Checking connections
a)
Coaxial connection (F-type) to the antenna unit.
b)
Coaxial connection (F-type) to the receiver.
c)
DC connection (12...20 V) for additionally powering the
control unit. (Only for usage in the USA!)
d)
Connection for serial communication with a PC.
e)
Power consumption is 20-40 VA. Please use a power sup-
ply that is capable to provide minimum 50 VA continuous
output power (voltage 14-32 V DC).
2. Legend of the buttons
q
Power key: Turning on power or entering standby mode.
q
Browse key: Browsing between available menus and set-
ups or cancelling the current process
a
Select key: Selecting or confirming display messages.
Hint! In Standby mode: Hold the Select (
a
) key while using
the Browse (
q
) key to scroll through available data: serial
number, counter operation time and software versions (see
point 6.2 in the antenna manual).
3. Entering the setup menu
The control unit is turned on by pressing the Power (
q
) key.
Wait until the display shows
Setup
(flashing), then press
the Browse (
q
) key. You are now in the setup menu, the dis-
play shows
Tracking
.
4. Adding new satellites
Searching and storing new satellites must be done in the har-
bour in calm waters! For every satellite at least one program
must be preprogrammed in the receiver to verify the satellite
position of the antenna unit by means of the TV picture qual-
ity. Make sure the pre-programmed TV station for the desired
satellite is turned on at the receiver, as the system stops at
each receivable satellite. The satellite can be identified by the
quality of the TV picture.
1. Press
q
repeatedly until
New Sat
appears. Press
a
to
select.
New Sat
only appears in the display if free satel-
lite storage positions are available. If all storage positions are
occupied, the less required ones have to be deleted first (see
point 5 in this guide).
2. After pressing
a
the display shows
Search ?
for a
brief moment followed by a list of all pre-programmed satel-
lites. Navigate through the list using
q
for Channel-Tracking
Mode. If you want to enter Band-Tracking Mode navigate to
Sat X
and press
a
. For adding new satellites, press
a
on
one of the pre-programmed satellites.
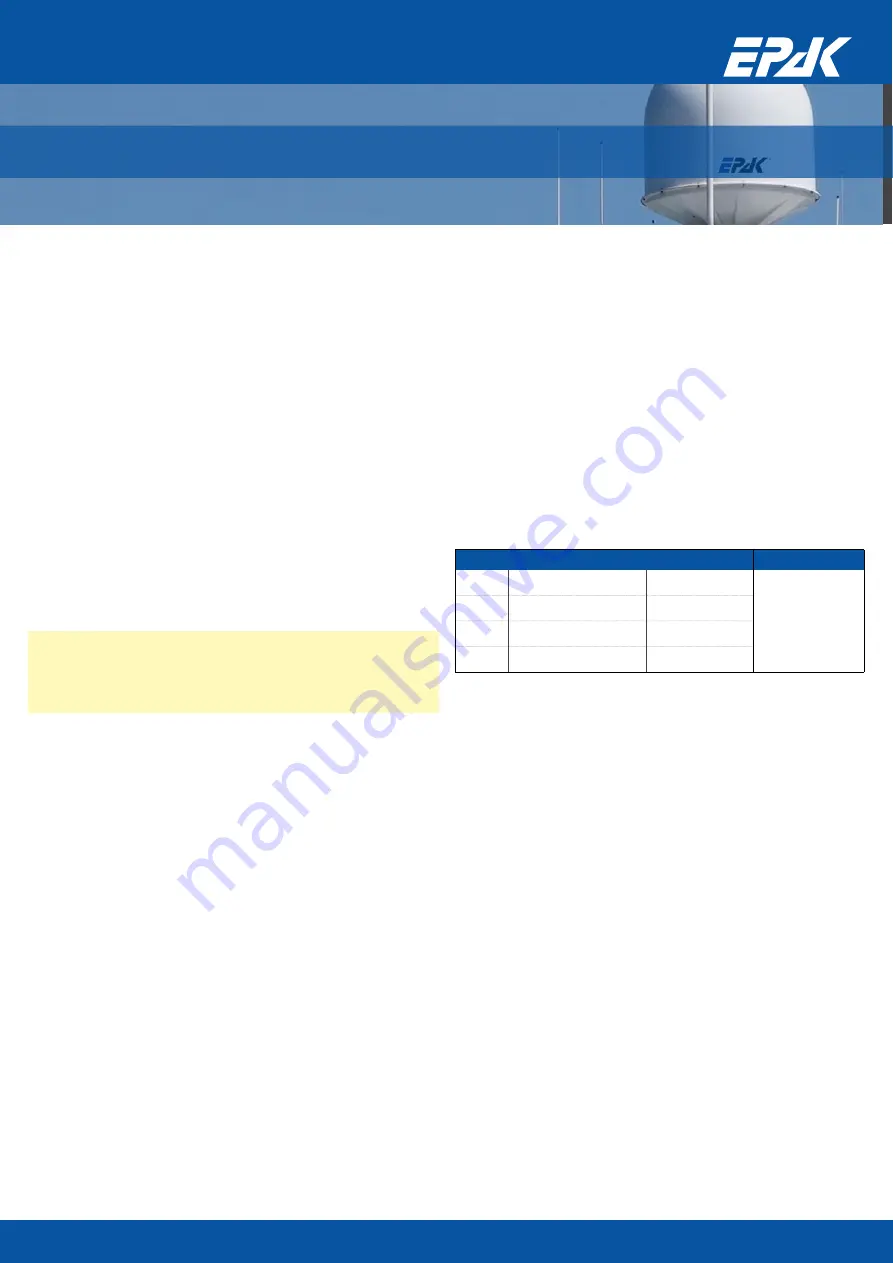
3. The display will show
ScnBand?
for two seconds.
After that, use the
q
key to switch between Band 1 to Band
4 and select the band of the desired satellite. Confirm your
choice with
a
.
Band
LO Frequency (MHz)
Polarisation
Recommended
1
10700 – 11700
Vertical low
Astra 1 = Band 3
Hotbird = Band 3
Astra 2 = Band 3
Sirius = Band 3
US = Band 2
2
10700 – 11700
Horizontal low
3
11700 – 12750
Vertical high
4
11700 – 12750
Horizontal high
4. The display interchanges between
New Sat
and
Search?
. Confirm with
a
or cancel with
q
.
5. If you choose Cancel (
q
), the display will briefly show
cancel
and then return to the setup menu e.g.
New Sat
, continue from point 2. If you choose Confirm
(
a
), the search mode is activated and the display shows
scanning
(flashing). The search mode can be interrupted
at any time by pressing
q
, which brings you back to the main
menu. The display shows
Setup
(flashing).
6. If the tracking system has scanned the whole area with-
out locating a satellite, the display shows
scanning
in-
terchanging with
complete
. Confirm with
a
. You are
back in the main menu with
Setup
(flashing). Before re-
starting the search mode (see point 4.1 in this guide), check
if there is a clear view to the satellite, if the selected program
on the receiver is OK (possibly change to another program)
and if the respective satellite can be received in this area!
If no satellite is found, repeat the search in another band (see
point 4.3 in this guide). Before you restart the search mode,
make sure that no superstructures obstruct the view to the
satellite!
EPAK TVRO Systems
QUICKSTART