

oneConcept Bluetooth Radiowecker
10027093
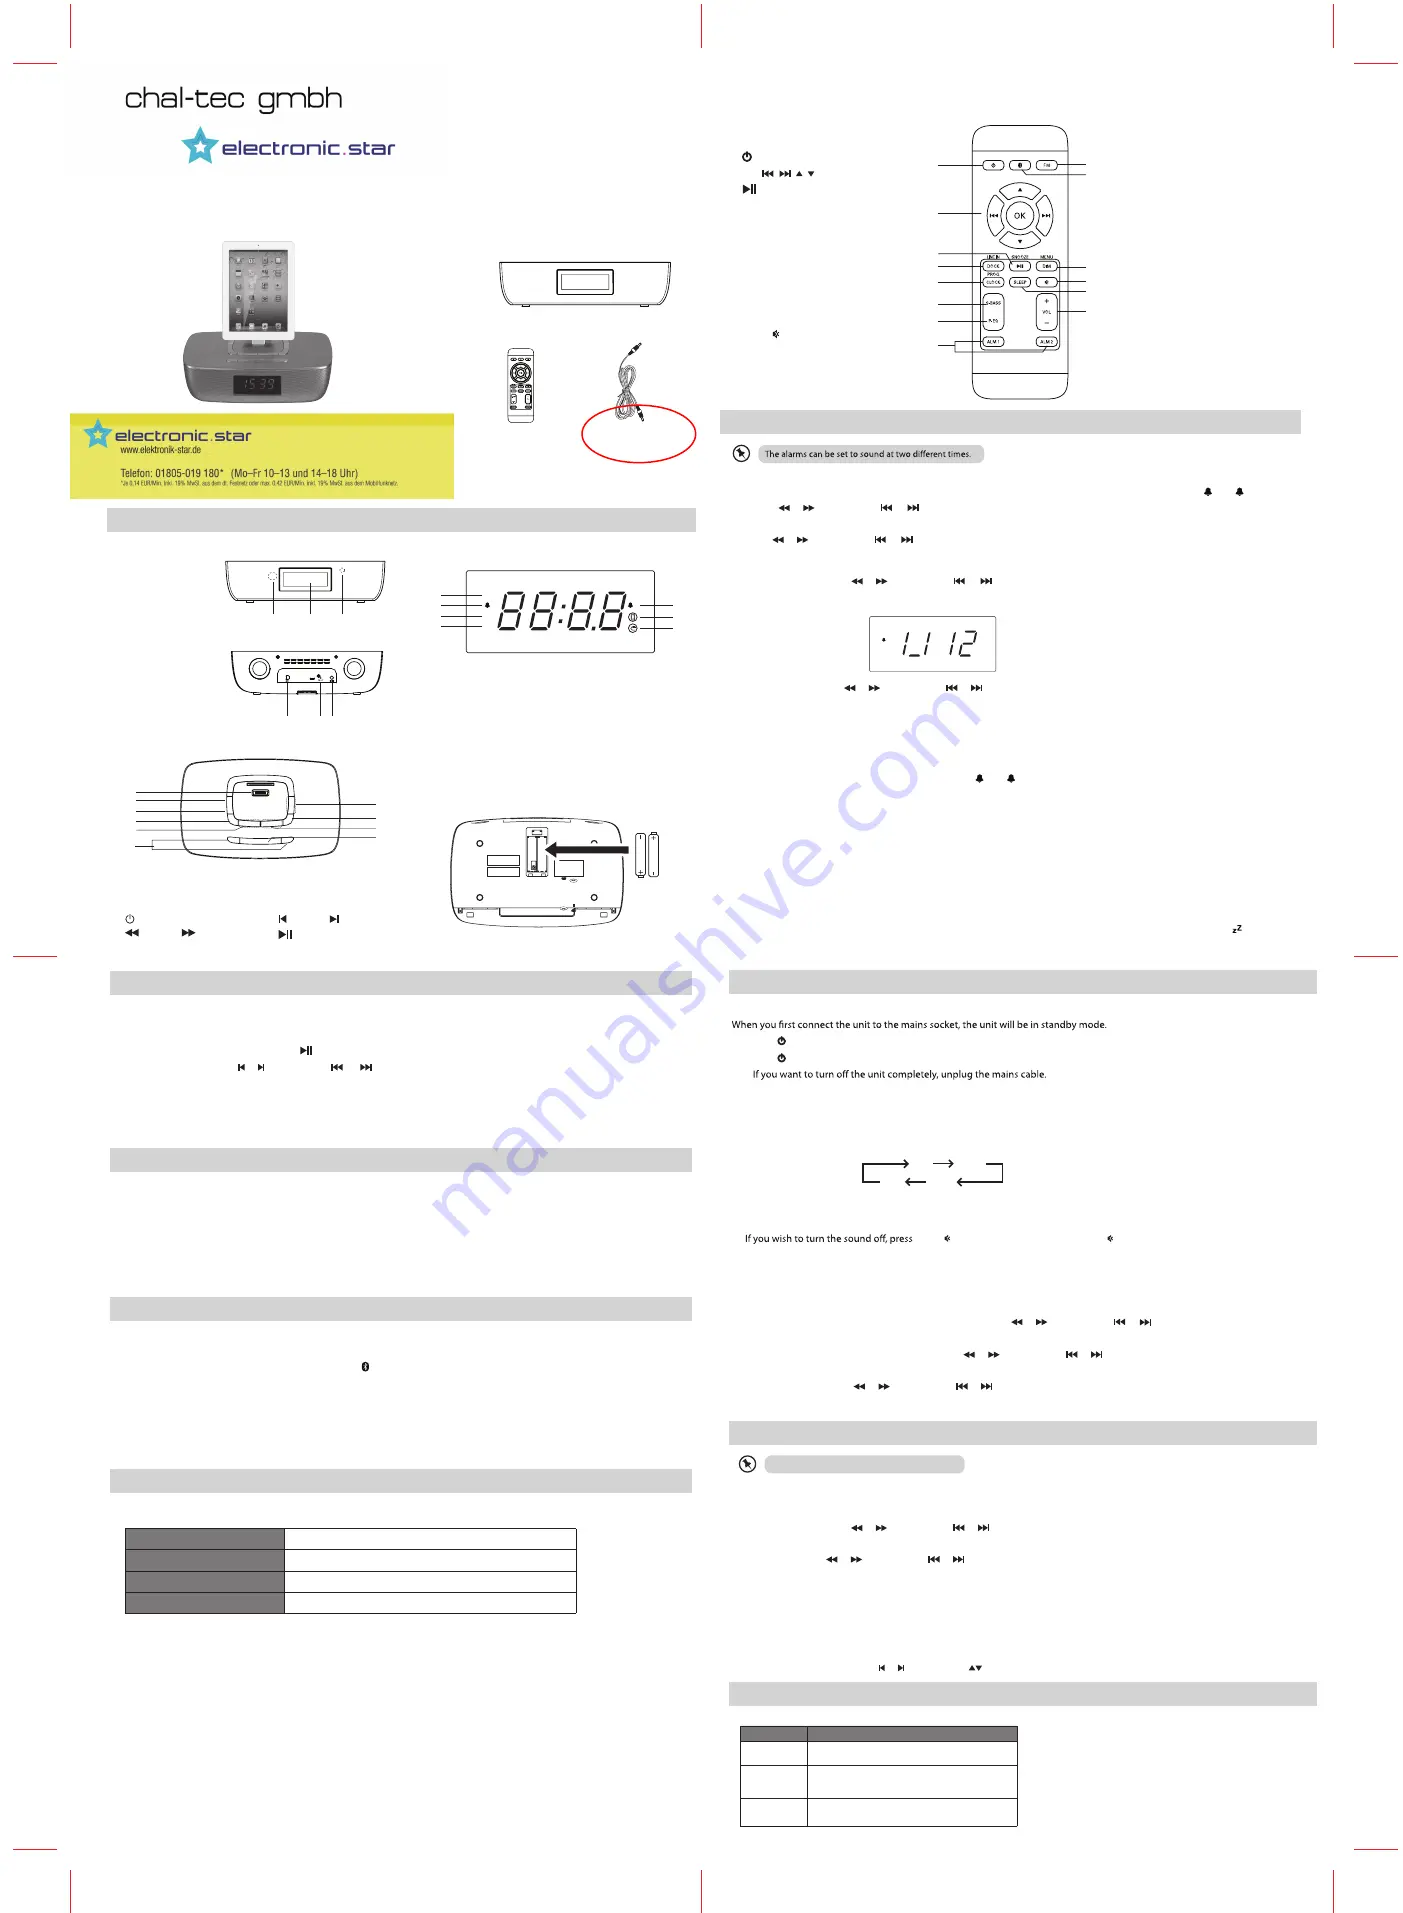
The following items are included:
The Main Unit
AUX-IN cable
Remote Control
1. iPod / iPhone / iPad Dock
2. SLEEP Button
3. CLOCK Button
4. STANDBY Button
5.
TUNING
Buttons
6. ALARM 1 / ALARM 2 Buttons
7. + VOLUME - Buttons
8. SOURCE Button
9.
PRESET Button
10.
/SNOOZE Button
3
4
6
5
7
8
10
9
2
1
bottom view
top view
You can only use the AC adapter for the power supply.
Batteries (not supplied) are used to remember the clock
setting if the mains power is interrupted.
1. IR Sensor
2. LCD Display
3. BT Indicator
1. Mains Power Cable
2. FM ANT
3. LINE IN
front view
LCD display window
back view
2 3
1
1
2
3
1. SLEEP Indicator
2. ALARM 1 Indicator
3. PM Indicator
4. FM Radio Indicator
5. ALARM 2 Indicator
6. iPod / iPhone / iPad Indicator
7. LINE IN / AUX IN Indicator
1
2
3
4
5
6
7
z Z
PM
1
FM
2
product overview
9.
FM
Button
10.
BT
Button
11.
MENU/DIM
Button
12.
MUTE
Button
13.
SLEEP
Button
14.
/ -
Buttons
remote control
1.
STANDBY
Button
Buttons
2.
OK/
/
/ /
3.
/SNOOZE
Button
4.
DOCK/LINE IN
5.
CLOCK/PROG
Button
6.
S-BASS
Button
7.
P-EQ
Button
8.
ALM 1 / ALM 2
Buttons
4
5
6
7
2
1
3
8
9
11
12
14
10
13
basic operation
powering ON/OFF
1. Press
STANDBY
on the unit or the remote control to switch on the unit. The LCD display will show the Clock.
2. Press
STANDBY
to switch the unit back to standby mode.
3.
selecting modes
•
Ensure the unit is in Standby mode before selecting a function.
•
Use either
SOURCE
on the unit, or
DOCK/LINE IN
,
FM
,
BT
on the remote control to select a function. The functions will cycle
through the following sequence:
FM
BT
iPod
LINE
adjusting the volume
•
Press
/ –
to adjust the volume.
•
MUTE
on the remote control. Press
MUTE
again or press
/ –
to resume
normal listening.
setting the clock
1. In Standby mode, press and hold
CLOCK
on the unit or
CLOCK/PROG
on the remote control until 24H on the LCD display
2. You can choose between a 12 hour or 24 hour clock. Press or
on the unit, or
or on the remote control.
3. Press
CLOCK
on the unit or
CLOCK/PROG
on the remote control to confirm the clock format.
4.
or
on the unit, or
When the HOUR digits flash, set the hour using
or on the remote control.
5. Press
CLOCK
on the unit or
CLOCK/PROG
on the remote control to start the MINUTE digits flashing.
6. Set the minutes using or
on the unit, or
or on the remote control.
7. Press
CLOCK
on the unit or
CLOCK/PROG
on the remote control to confirm the Clock setting.
starts flashing.
setting the alarms
1. Ensure that the clock is set correctly.
2. Press and hold
ALARM 1
or
ALARM 2
on the unit or press
ALM 1
or
ALM 2
on the remote control until
1
or
2
blinks.
3. Press or
on the unit, or
or on the
remote control to the select alarm source for both alarms.
4. Then press
ALARM 1
or
ALARM 2
on the unit or
ALM 1
or
ALM 2
on the remote control.
5. Use or
on the unit, or
or on the remote control repeatedly to set the hour.
6. Press
ALARM 1
or
ALARM 2
on the unit or
ALM 1
or
ALM 2
on the remote control to confirm. The minute digits will then
7. Set the minutes using or
on the unit, or
or on the remote control.
begin to blink.
8. Press
ALARM 1
or
ALARM 2
on the unit or
ALM 1
or
ALM 2
on the remote control to confirm. The display will show Volume level.
9. To set volume, press or
on the unit, or
or on the remote control.
blinking automatically.
10. Press
ALARM 1
or
ALARM 2
on the unit or
ALM 1
or
ALM 2
on the remote control to confirm. Alternatively, the display will stop
activate/ deactivate alarm timer
1. Press
ALARM 1
or
ALARM 2
on the unit or
ALM 1
or
ALM 2
on the remote control to view the alarm settings.
2. Repeat step (1) to activate or deactivate the timer.
1
or
2
will appear if the timer is
ON
and will disappear if it is
OFF
.
•
To stop the alarm, press either
ALARM 1
or
ALARM 2
on the unit or
ALM 1
or
ALM 2
on the remote control.
•
The alarm will continue to repeat daily if it is not deactivated.
snooze alarm
When the alarm(s) sound, press
SNOOZE
if you want to stop the alarm temporarily. The alarm will resume 5 minutes later.
To turn off the Snooze fcuntion, press
ALARM 1
or
ALARM 2
on the unit or press
ALM 1
or
ALM 2
on the remote control.
set sleep timer
The clock radio will switch to standby mode automatically after a preset period.
•
To activate the timer, press
SLEEP
repeatedly to select the time period (in minutes). When the timer is activated, appears.
•
To deactivate the timer, press
SLEEP
repeatedly until
OFF
appears.
1
radio operation
This unit only receives
FM
radio station signals.
tuning into stations
1. Press
FM
on the unit or the remote control to select the FM tuner.
2. Then press and hold or
on the unit, or
or on the remote control until
Srch
is displayed.
3. The radio will then tune into a station with strong reception automatically.
4. Press and hold or
on the unit, or
or on the remote control to tune more stations.
storing stations automatically
You can store up to 20 of your favourite stations to preset stations. This will enable you to access your favourrite stations quickly
and easily.
In FM mode, press and hold
CLOCK/PROG
on the remote control to store the stations.
Features and specifications are subject to change without prior notice.
selecting preset stations
Select FM mode and then press
or
on the unit or
on the remote control to select a preset number.
iPod / iPhone / iPad operation
The unit can support the following iPod / iPhone / iPad models.
Type
Support Model
iPhone
•
iPhone
3G/3GS
•
iPhone
4/4S
iPod
(with 30-pin dock
connectors)
•
iPod
touch 1
st
/2
nd
/3
rd
/4
th
Generation
•
iPod
nano 1
st
/2
nd
/3
rd
/4
th
/5
th
/6
th
Generation
iPad
•
iPad
•
iPad2
•
iPad
3
rd
Generation
listening to iPod / iPhone / iPad
1. Press
SOURCE
on the unit and select
DOCK
or press
DOCK/LINE IN
on the remote
control.
2. Place the iPod / iPhone / iPad in the dock on the unit.
3. To start / pause/ resume play, press
on the unit or on the remote control.
4. To skip a track, press
or
on the unit or
or
on the remote control.
charging the iPod / iPhone / iPad
When the unit is connected to a switched on mains power supply, the docked iPod / iPhone
/ iPad will being charging automatically.
AUX operation
The unit supports listening to an external audio device.
1. Press
SOURCE
on the unit and then select
LINE IN
or press
DOCK/LINE IN
on the
remote control for the same function.
2. Connect the cable to the
LINE IN
socket at the rear of the unit and the
AUDIO OUT
jack to the external device.
3. You can now playback track on the external audio device.
BT operation
Specifications
You can listen to tracks from a media device if it is connected to the unit via BT.
To connect your device to the unit via BT, follow the steps below:
1. Press
SOURCE
on the unit to select “bt” or press on the remote control. The blue LED next to the display will blink
once a second.
2. Turn on the BT function on your device.
3. Search for other BT devices, then select “iCRIPBT12” in the pairing list.
4. Enter default password “0000”. Some BT devices may not require password pairing.
5. On successful pairing, the unit will beep and the blue LED will light up solidly.
power supply
100-240V ~ 50/60 Hz
power consumption
20W
radio frequency range
FM 87.5 – 108 MHz
dimensions
270 mm (W) x 75 mm (H) x 170 mm (D)
English


