background image


“Easy Gentleman” Door Operator Installation Instructions 


SAFETY 

THE EASY GENTLEMAN IS A LOW ENERGY DOOR OPENER. PROPERLY ADJUSTED, THIS OPENER SHOULD EASILY BE STOPPED BY HAND.  

EXCESSIVE OPENING SPEED OR POWER WILL DAMAGE THE “EASY GENTLEMAN" AND THE DOOR COMPONENTS.  THESE ADJUSTMENTS 

CANNOT BE MADE AT THE FACTORY AND ARE YOUR RESPONSIBILITY TO MAINTAIN SAFE OPERATION. 

NOTE:

 BEFORE INSTALLING THE OPENER, THE DOOR MUST FUNCTION MANUALLY WITHOUT ANY BINDING, 

SAGGING, LOOSE OR DAMAGED HINGES. REPAIR ANY PROBLEMS BEFORE CONTINUING WITH THIS INSTALLATION!


WE ALSO RECOMMEND: 


INSTALL A MANUAL DEADBOLT ON THE DOOR FOR ADDED SECURITY. 


SHUT OFF AIR SUPPLY AND UNPLUG THE REMOTE MODULE WHEN YOU WILL BE AWAY FROM THE HOUSE FOR AN EXTENDED 

PERIOD OF TIME.  


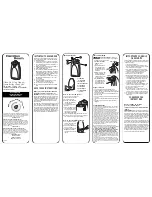
NOTE: PHOTOS ARE OF AN ORIGINAL GENTLEMAN; THE MOUNTING INFORMATION STILL APPLIES TO YOUR EASY GENTLEMAN. 


Figure 1 


Summary of Contents for Easy Gentleman

Page 1: ...RESPONSIBILITY TO MAINTAIN SAFE OPERATION NOTE BEFORE INSTALLING THE OPENER THE DOOR MUST FUNCTION MANUALLY WITHOUT ANY BINDING SAGGING LOOSE OR DAMAGED HINGES REPAIR ANY PROBLEMS BEFORE CONTINUING WITH THIS INSTALLATION WE ALSO RECOMMEND INSTALL A MANUAL DEADBOLT ON THE DOOR FOR ADDED SECURITY SHUT OFF AIR SUPPLY AND UNPLUG THE REMOTE MODULE WHEN YOU WILL BE AWAY FROM THE HOUSE FOR AN EXTENDED PE...

Page 2: ...2 Figure 2 Left Hand Example ...

Page 3: ...not utilizing the Latch Release option 4 INSTALL DOOR STOP CAUTION IF THE DOOR IS ALLOWED TO SWING PAST 90 DEGREES THE OPENING CYLINDER WILL BE DAMAGED If the door meets a perpendicular wall and stops with a bumper before 90 degrees no further action is needed Otherwise a hinge pin mounted door stop is included Install the door stop and adjust to stop the door at slightly less than 90 degrees 5 IN...

Page 4: ...ylinder installed on pivot end bracket Fully retract cylinder rod retracted into cylinder then expose the smooth portion Figure 8 of the cylinder rod slightly 3 8 for clearance with the door fully closed otherwise the cylinder will bind before the door is closed Position the cylinder parallel to the door jamb header Figure 8 While holding the clevis brackets against the face of the door mark the l...

Page 5: ...Figure 10 To measure the pressures you must activate the control box with both gauges in each port We offer a gauge set designed specifically for this purpose please call to order CAUTION DO NOT ACTIVATE OPERATOR UNLESS BOTH AIR LINES ARE CONNECTED TO THE CYLINDER Follow the directions below carefully to understand how the unit works and make adjustments as needed ADJUSTMENT There are a total of f...

Page 6: ... Repeat step 5 if necessary NOTE In this new model the opening pressure has been increased 5 psi to 36 psi and the closing pressure has also been increased 5 psi to 25 psi Notice that we have the same differential of 11 psi needed to open the door At the point where the door stops the latching force this differential is now 15 psi the 25 psi closing pressure minus the same 10 psi required to opera...

Page 7: ...rners of the outline and deep enough to accommodate the strike release BOX 7 Using a Sharp Wood Chisel slowly cut out and remove the wood between the holes to leave a rectangular opening of sufficient depth to accommodate the strike release BOX 8 Drill another 5 8 inch hole in the CENTER of the newly cut rectangular opening The pneumatic cylinder mounted to the strike release BOX will recess into ...

Page 8: ...g strike plate where the latch currently enters it This alignment will be critical for proper operation Remove the existing strike plate 2 Locate the Latch Release behind the existing strike plate and align it with marks made prior to removing it You will mount the latch release to the back of the existing strike plate 3 Mark the mounting holes on the Latch Release onto the back of the strike plat...

Page 9: ... sizes are 2 3 8 and 2 3 4 inches If you need to replace the existing latch it must be with one of not only the same manufacturer but also of the correct size or backset Please note that some modern latches are of the adjustable type and can be used as either 2 3 8 or 2 3 4 inch sizes If you understand the previous information and you know the manufacturer of the existing lockset you can probably ...

Reviews: