


Series SAH SMART Air Hood
™
Balancing Instrument -
PredictAir
™
Application Software
Specifications - Installation and Operating Instructions
Bulletin TE-SAH-SW
The
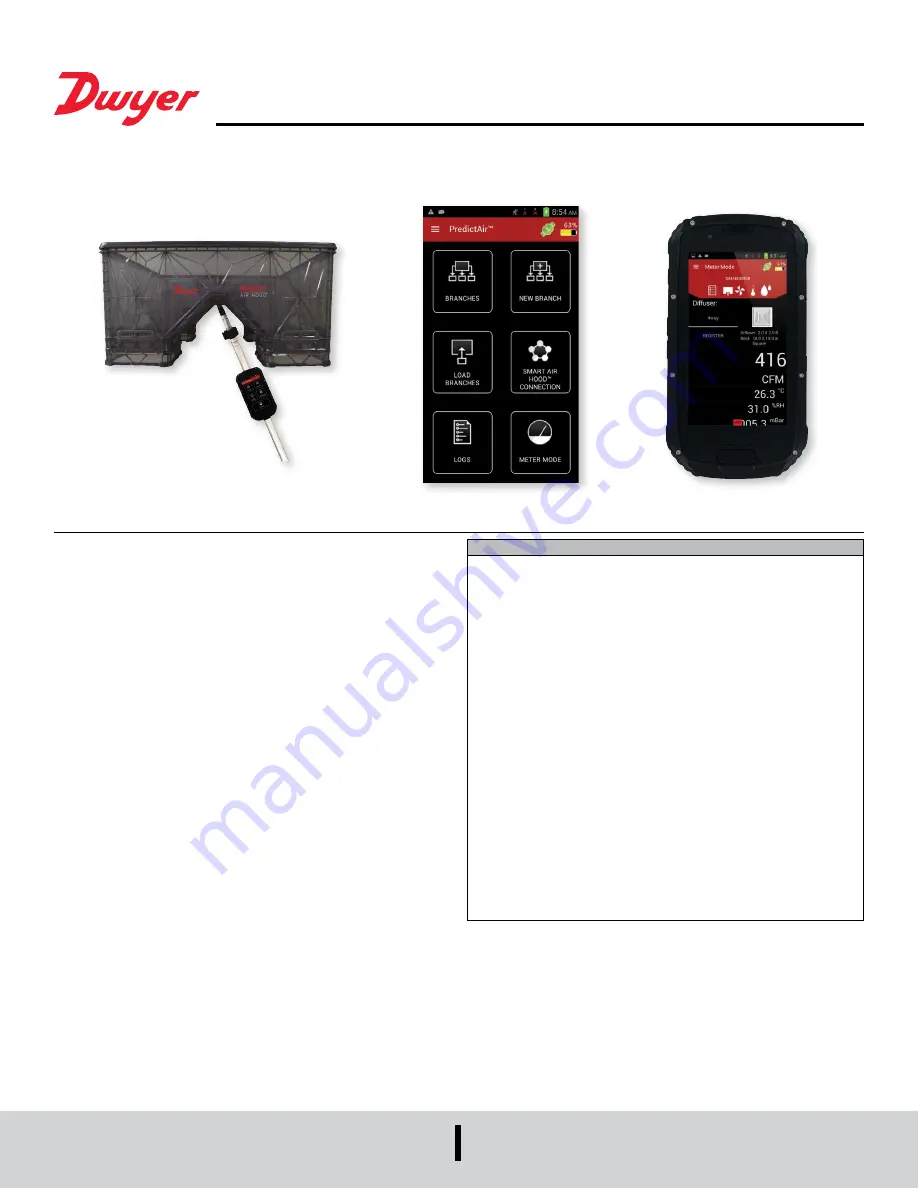
SERIES SAH
SMART Air Hood
™
Balancing Instrument is the most accurate and
easy to operate air flow hood on the market. By using the included hood stand and
wireless communications to the handheld, a single operator can balance a branch in
less time than traditional balancing teams. Besides being lighter than most traditional
capture hoods, the ergonomic design makes the Series SAH easy to maneuver, with
less physical stress. The rugged polypropylene base hood features patented Quad
Flow Design Technology for controlling air flow and minimizing back pressure, which
yields superior measurement accuracy. The Wi-Fi direct communication gives reliable
communication with a distance of up to 200 yards between the hood and the handheld
test instrument. The SMART Air Hood
™
Balancing Instrument includes the PredictAir
™
Application Software which reduces the number of steps in the air flow balancing
process using Predictive Balancing’s Express Balance mode. Predictive Balancing
is a method of predicting the optimal flow set point for each register and the order in
which they should be adjusted.
Please see Bulletin TE-SAH for general installation instructions.
TABLE OF CONTENTS
Setup . . . . . . . . . . . . . . . . . . . . . . . . . . . . . . . . . . . . . . . . . . . . . . . . . . . . . . . . . . . .2
Connecting to a Wi-Fi Network. . . . . . . . . . . . . . . . . . . . . . . . . . . . . . . . . . . . . .2
Setting up a Google Account . . . . . . . . . . . . . . . . . . . . . . . . . . . . . . . . . . . . . . .3
Updating the PredictAir
™
Application Software. . . . . . . . . . . . . . . . . . . . . . . . . .4
Application Preferences . . . . . . . . . . . . . . . . . . . . . . . . . . . . . . . . . . . . . . . . . . .4
Connecting to the Hood . . . . . . . . . . . . . . . . . . . . . . . . . . . . . . . . . . . . . . . . . . .4
Importing a Diffuser . . . . . . . . . . . . . . . . . . . . . . . . . . . . . . . . . . . . . . . . . . . . . .6
Meter Mode . . . . . . . . . . . . . . . . . . . . . . . . . . . . . . . . . . . . . . . . . . . . . . . . . . . . . . .7
Zeroing the Hood . . . . . . . . . . . . . . . . . . . . . . . . . . . . . . . . . . . . . . . . . . . . . . . .7
Selecting the Diffuser . . . . . . . . . . . . . . . . . . . . . . . . . . . . . . . . . . . . . . . . . . . . .8
Manual K-Factor. . . . . . . . . . . . . . . . . . . . . . . . . . . . . . . . . . . . . . . . . . . . . .8
Preferences . . . . . . . . . . . . . . . . . . . . . . . . . . . . . . . . . . . . . . . . . . . . . . . . . . . .9
Logging Preferences . . . . . . . . . . . . . . . . . . . . . . . . . . . . . . . . . . . . . . . . . .9
Hood Information Preferences . . . . . . . . . . . . . . . . . . . . . . . . . . . . . . . . . . .9
Volume Airflow Preferences . . . . . . . . . . . . . . . . . . . . . . . . . . . . . . . . . . . . .9
Temperature Preferences. . . . . . . . . . . . . . . . . . . . . . . . . . . . . . . . . . . . . . .9
Humidity Preferences . . . . . . . . . . . . . . . . . . . . . . . . . . . . . . . . . . . . . . . . .10
Barometer Preferences . . . . . . . . . . . . . . . . . . . . . . . . . . . . . . . . . . . . . . .10
Overall Preferences . . . . . . . . . . . . . . . . . . . . . . . . . . . . . . . . . . . . . . . . . .10
Logging. . . . . . . . . . . . . . . . . . . . . . . . . . . . . . . . . . . . . . . . . . . . . . . . . . . . . . .10
Predictive Balancing. . . . . . . . . . . . . . . . . . . . . . . . . . . . . . . . . . . . . . . . . . . . . . . .12
Branches . . . . . . . . . . . . . . . . . . . . . . . . . . . . . . . . . . . . . . . . . . . . . . . . . . . . .12
Branches Menu . . . . . . . . . . . . . . . . . . . . . . . . . . . . . . . . . . . . . . . . . . . . .13
Add Registers . . . . . . . . . . . . . . . . . . . . . . . . . . . . . . . . . . . . . . . . . . . . . . . . . .14
Balancing Procedure . . . . . . . . . . . . . . . . . . . . . . . . . . . . . . . . . . . . . . . . . . . .16
Final Results Menu. . . . . . . . . . . . . . . . . . . . . . . . . . . . . . . . . . . . . . . . . . .18
FCC/Industry Canada Notice . . . . . . . . . . . . . . . . . . . . . . . . . . . . . . . . . . . . . . . . .19
1
DWYER INSTRUMENTS, INC.
P.O. BOX 373 • MICHIGAN CITY, INDIANA 46360, U.S.A.
Phone: 219/879-8000
Fax: 219/872-9057
www.dwyer-inst.com
e-mail: [email protected]
®


