Duratuf Kiwi MK1, Assembly Instructions Manual
The Duratuf Kiwi MK1 is a versatile and durable product perfect for all your DIY projects. Ensure a smooth assembly process by downloading the free Assembly Instructions Manual from manualshive.com. This comprehensive manual will guide you through every step, ensuring a hassle-free experience. Get your manual today and get building!
Share
Download


Reviews:
No comments
Related manuals for Kiwi MK1

SKYLINE
Brand: Santa & Cole Urbidermis Pages: 3

FlashPen "Piko"
Brand: Hama Pages: 8

Tenus FlashPen USB 3.0
Brand: Hama Pages: 4

DSN-3200 - xStack Storage Area Network Array Hard...
Brand: D-Link Pages: 7

GABLE
Brand: Backyard Discovery Pages: 72

Impress 4
Brand: Advance acoustic Pages: 47

P3074
Brand: Bestway Pages: 12

HYDRIAN
Brand: A&B Home Pages: 3

Fairmont Garden Shed
Brand: YardCraft Pages: 29

VOL-046
Brand: Harrod Pages: 2

GSI-311
Brand: Sunnydaze Decor Pages: 2

Lumantix LTX K Series
Brand: Trilux Pages: 17

30082SK-PTX
Brand: ABSCO SHEDS Pages: 18

71 601
Brand: BEGA Pages: 2

TREK MATE 65+5L
Brand: Salewa Pages: 7

CANOPIA RUBICON
Brand: Palram Pages: 71

FCL028
Brand: Jeco Pages: 3
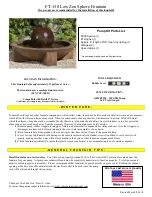
FT-150
Brand: Campania International Pages: 2


