background image


- 1 -


DUAL Docking Station 


User 

Manual 

DA-70544 

Introduction


DA-70544 is an USB2.0/E-SATA to dual SATA HDD docking station that 
allows direct data exchanging between SATA II 3.0G and High-speed 
USB. It supports Offline Clone, which is able to copy data and system 
files from Source HDD to Target HDD completely via finger touch.
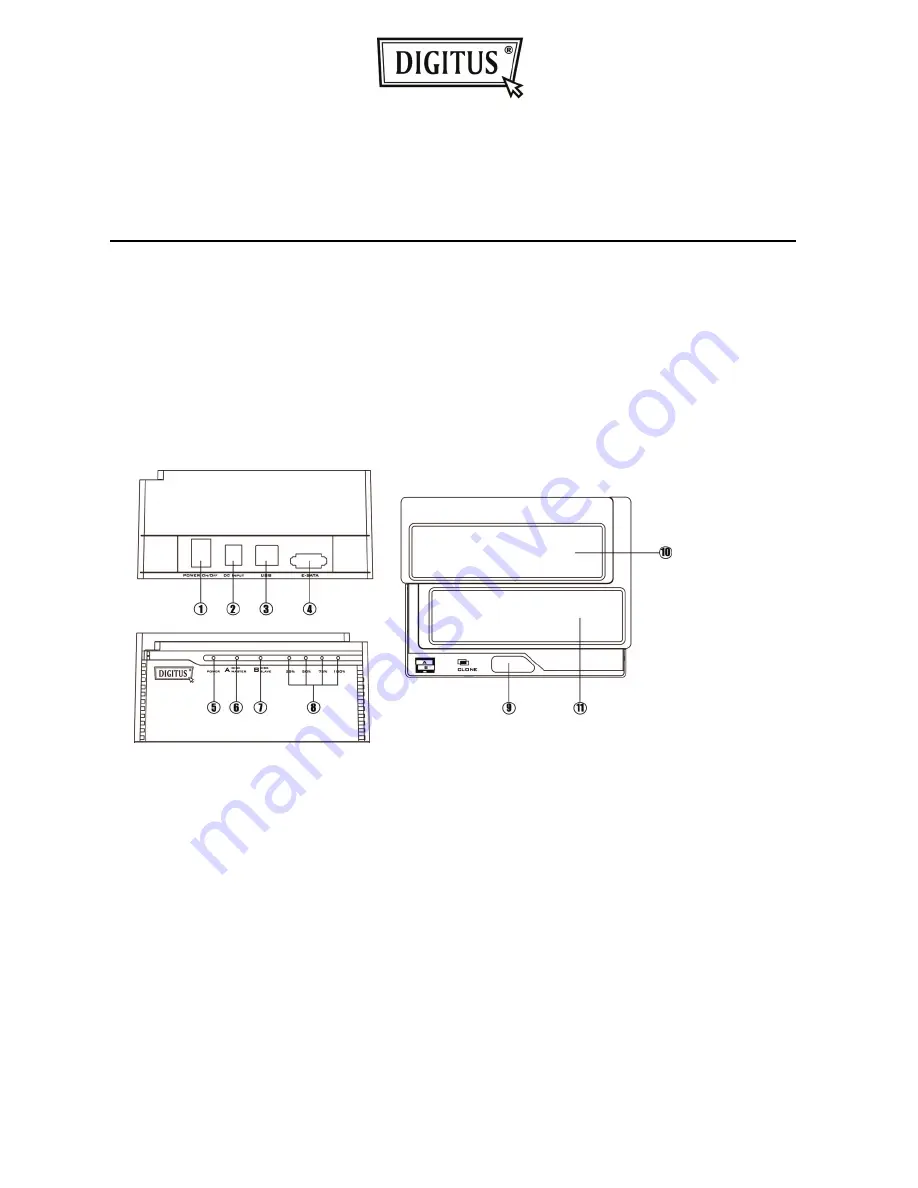


Function Chart


1

Power switch (ON/OFF)   2

DC input   3

USB interface 

4

E-SATA    interface                5

Power indicator     

6

Bay ‘A’    indicator                  7

Bay ‘B’ indicator   

8

Clone processing indicator      9

Clone button 


Summary of Contents for DA-70544

Page 1: ...ing between SATA II 3 0G and High speed USB It supports Offline Clone which is able to copy data and system files from Source HDD to Target HDD completely via finger touch Function Chart 1 Power switch ON OFF 2 DC input 3 USB interface 4 E SATA interface 5 Power indicator 6 Bay A indicator 7 Bay B indicator 8 Clone processing indicator 9 Clone button ...

Page 2: ...Supports SATA Hot swap Supports SATA Host Device controller configuration Complies with USB 2 0 electrical specification Supports USB 2 0 High Speed and Full Speed Complies with USB Mass Storage Class Bulk Only Transport Specification Supports clone function Supports Win 98 ME 2000 XP VISTA WIN7 Mac OS 9 X 10 X Linux CLONE Please note the below conditions before clone Bay A SOURCE HDD Bay B TARGET...

Page 3: ...ll information from the SOURCE HDD will be covered into TARGET HDD Once the docking is connected to USB interface the offline Clone will be invalid Offline clone a Insert source HDD to Bay A target HDD to Bay B and then turn on the power b Once the Bays indicators are on that means DA 70544 is ready for clone ...

Page 4: ... the clone button for 3 seconds until the indicator light is on press the button once more for Clone confirmation Offline clone is starting to process d Clone progress indicator flashes and shows the progress 25 50 75 100 ...

Page 5: ...e is finished all progress indicators will light up f Turn off power and take out the HDD carefully HDD Partition a Open Disk management and select the unallocated area b Right click New partition for further action ...

Page 6: ... 6 c Next ...

Page 7: ... 7 d Base on your need and click Next e Please enter the new partition capacity and click Next for further action ...

Page 8: ... 8 f Assign the drive letter and Next g Select quick format to format the new partition ...

Page 9: ... 9 h Click finish i Partition completed the new partition can be found ...

Reviews: