DigiTech qc3247, User Manual
The DigiTech qc3247 User Manual is available for free download from manualshive.com. This comprehensive manual provides detailed instructions on how to use the product effectively. Get your copy now and unleash the full potential of your DigiTech qc3247.
Share
Download


Reviews:
No comments
Related manuals for qc3247

3025-2
Brand: Accu-Scope Pages: 2

IM-5 Series
Brand: Optika Italy Pages: 62

XDS-3FL
Brand: Optika Pages: 20

LabZZ M101
Brand: Levenhuk Pages: 24

SMZ-10A
Brand: Nikon Pages: 19

Anyty
Brand: 3R Pages: 51

Axioplan Universal microscope
Brand: Zeiss Pages: 32

TCS SP5 X
Brand: Leica Pages: 50

CE210T
Brand: Lanoptik Pages: 21

86000
Brand: FINO Pages: 10

CE2927NR
Brand: Samsung Pages: 36

FFMV162L B
Brand: Frigidaire Pages: 5

FFMV162L B
Brand: Frigidaire Pages: 2
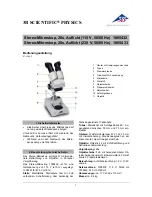
1005432
Brand: 3B SCIENTIFIC PHYSICS Pages: 12

SMZ-2
Brand: Nikon Pages: 2

DKGK030
Brand: Discovery Kids Pages: 27

Levenhuk 1ST
Brand: Zoom&Joy Pages: 20

TIM5
Brand: Vision Engineering Pages: 21


