background image

User’s Manual


Ver. 

07

/21

Before installing and using the camera, please read this manual carefully. 
Be sure to keep it handy for future reference.
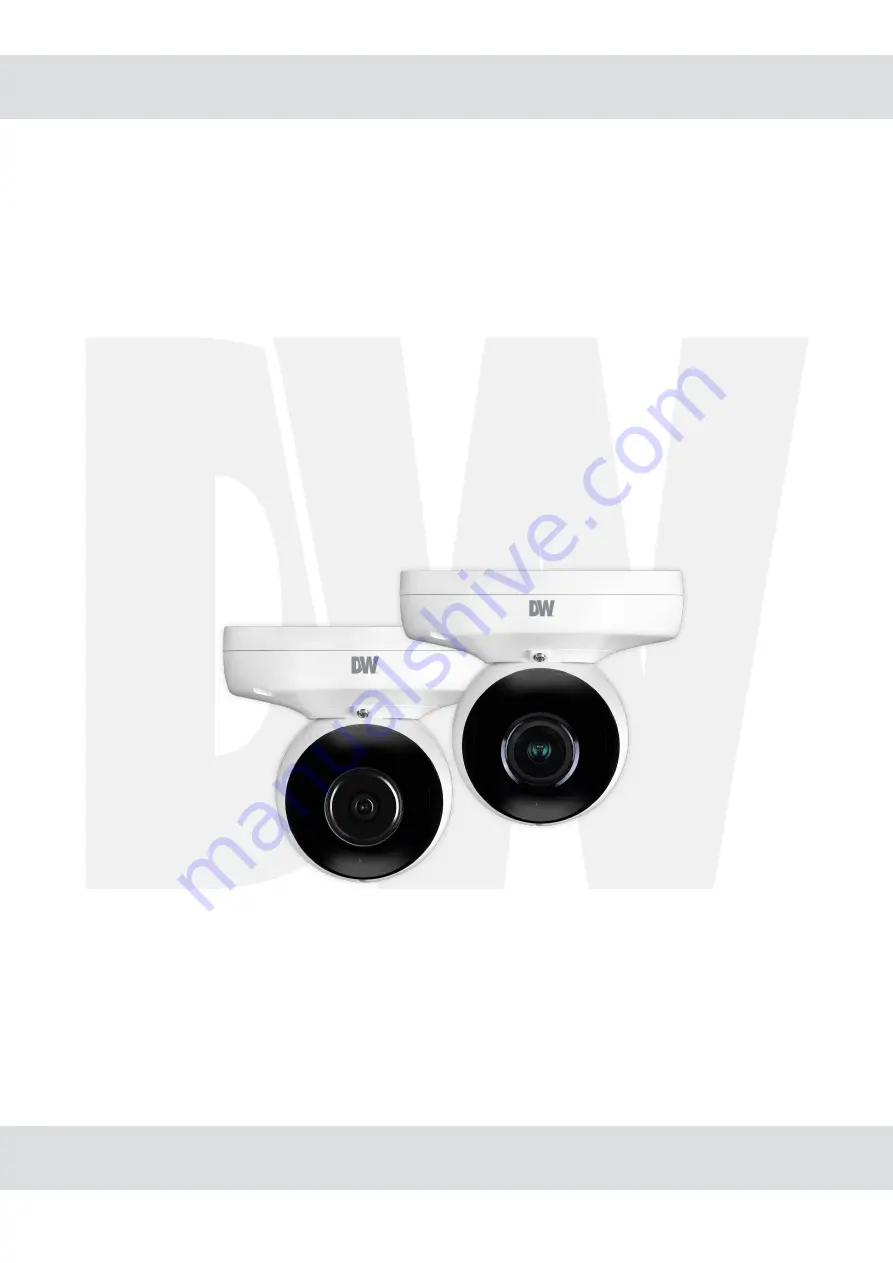
MEGApix

®


IVA

TM


4K


Galaxy Ball

 IP

 Camera 

DWC-MVD8WiATW

 - IVA license


pre-loaded

vari-focal lens

DWC-MVD8Wi28TW - IVA license pre-loaded, 

fixed lens

DWC-MPVD8WiATW - IVA+ license pre-loaded, 

vari-focal lens

DWC-MPVD8Wi28TW - IVA+ license pre-loaded, 

fixed lens

Summary of Contents for MEGApix IVA DWC-MPVD8Wi28TW

Page 1: ...lly Be sure to keep it handy for future reference MEGApix IVATM 4K Galaxy Ball IP Camera DWC MVD8WiATW IVA license pre loaded vari focal lens DWC MVD8Wi28TW IVA license pre loaded fixed lens DWC MPVD8WiATW IVA license pre loaded vari focal lens DWC MPVD8Wi28TW IVA license pre loaded fixed lens ...

Page 2: ...fy this product in any way 10 When cleaning do not spray water directly onto parts of the product Doing so may cause fire or electric shock Precaution Operating Before using make sure the power supply and all other parts are properly connected While operating if any abnormal condition or malfunction is observed stop using the camera immediately and contact your dealer Handling Do not disassemble or...

Page 3: ...ptacles and the point where they exit from the apparatus 11 Only use attachments accessories specified by the manufacturer 12 Use only with cart stand tripod bracket or table specified by the manufacturer or sold with the apparatus When a cart is used use caution when moving the cart apparatus combination to avoid injury from tip over 13 Unplug this apparatus during lightning storms or when unused...

Page 4: ...25 Settings Camera Setup Image Enhancement Settings 26 Settings Camera Setup Video Enhancement Settings 27 Settings Network Setup 28 Settings Trigger Action Setup 38 Settings Event Setup 42 Settings Record Setup 47 Settings Security Setup 53 Settings System Setup System Information 60 Settings System Setup Firmware 62 Settings System Setup Date and Time 63 Settings System Setup DST 64 Settings Sys...

Page 5: ...rproof cap Gasket Hexagonal Wrench HEX1 5 For fixing camera rotation Hexagonal Wrench HEX2 5 For fixing camera tilt tightening OSD Cover Screw Plastic Anchor 2pcs Quick Manual Template Sheet Test Video Cable Mount Bolt Nut Screw For installing the bracket ...

Page 6: ...5 Introduction Part Name Lens IR LED Camera Tilt Pan Screw Photodiode Camera Rotation Screw Alarm In Out Audio In Out RJ 45 Connector DC Power Jack Waterproof cap 2nd Video Reset Button SD Card Slot ...

Page 7: ...will lose all setting data If needed please make a note for further installation Installation Disassemble the camera Before installing your camera you have to read the following cautions 1 You have to check whether the location can bear five times of the weight of your camera 2 Don t let the cable to be caught in improper place or the electric line cover to be damaged Otherwise it may cause a brea...

Page 8: ...n Cabling for details Put the Lan cable into a then b will be assembled to a tightly As a final step c need to be assembled to b without making any space 3 Fix the camera on the wall ceiling by screw provided Loosen the Pan Tilt Rotate screw a little before fixing the camera 4 After adjusting the view angle tighten the Pan Tilt Rotate screw 5 Remove the protective film from the camera to complete ...

Page 9: ...tion Installation Disassemble the camera for details 2 Using the template sheet make the cabling holes on the ceiling panel 3 Insert the 2 mount bolts into bottom case of camera Installation Installation Using Mount Bolt Nut Template Sheet ...

Page 10: ... 1 Insert the mount bolts into template holes after connecting the cable 2 Fix the bottom case by tightening mount nuts to mount bolts on the ceiling panel Installation Installation Using Mount Bolt Nut ...

Page 11: ...Installation Adjusting the Camera angle 10 Panning 140 Rotation 300 Tilt 80 ...

Page 12: ...w the illustration below to connect the camera to a PoE enabled switch using an Ethernet cable 2 Using a Non PoE Switch If a PoE enabled switch is not used use a power adaptor for power transmission and non PoE switch for data transmission Follow the illustrations below to connect the camera without a PoE enabled Switch Two Options Use a PoE enabled switch to connect data and power through a singl...

Page 13: ...n port of the speaker If the speaker without the amplifier is connected to the audio out port it doesn t work properly Therefore the speaker with the amplifier or the separate amplifier is needed Audio out is available via the RTSP backchannel 4 Audio input Connect the audio in port of the camera to the microphone directly or line out port of the amplifier connected with a microphone If the microp...

Page 14: ... on the first use 1 Inserting an SD Memory Card Insert the SD card in the arrow direction Don t insert the SD memory card while it s upside down by force Otherwise it may damage the SD memory card 2 Removing an SD Memory Card Removing an SD Memory Card Gently press down on the exposed end of the memory card as shown in the diagram to eject the memory card from the slot Pressing too hard on the SD ...

Page 15: ...words must have a minimum of 8 characters with at least 4 combinations of uppercase letters lowercase letters numbers and special characters Passwords cannot contain the user ID d Click change to apply all changes 6 Select a camera from the list by double clicking on the camera s image or clicking on the Click button under the IP Conf column The pop up window will show the camera s current network...

Page 16: ...rd login again by pressing the RE LOGIN button Internet Explorer After three failed attempts or the cancel button is clicked you will experience a login fail Other Browsers After the Cancel button is clicked you will experience a login fail Password Hint Page If you need help remembering the password for your user input the username in the username field and press the hint button If you added a hi...

Page 17: ...d image frames will display live images depending on the set buffer time Users will see the delayed images based on the set delay time 4 Channel Select button Select a stream produced from the camera between Stream 1 3 to display it in the live view screen Refer the Setup Video Audio Video to setup the Video Stream 5 Below Menu is supported per model 6 Motion Shows the motion event status Event Al...

Page 18: ...RMATION Trigger Action ACTION RULES IMAGE TRANSFER RELAY OUT Events EVENT RULES MOTION TEMPERATURE ALARM INPUT Record MANAGEMENT RECORD LIST STORAGE IVA See the MEGApix IVA user manual for more information on this section ENABLE RULES COUNTERS CALIBRATION CLASSIFICATION BURNT IN ANNOTATION TCP NOTIFICATION HTTP NOTIFICATION TAMPER ADVANCED LICENSE Security IP ADDRESS FILTER RTSP AUTHENTICATION IEE...

Page 19: ...nged accordingly 3 Description Input the additional description of the selected channel Max 30 alphanumeric characters may be used including spaces 4 Resolution Select video resolution Available Frame Rate may differ even if the same codecs are in use Resolution of Video Format 5 Frame Rate Select the maximum Frame Rate Available Frame Rate can be different although the same codecs were set up Setu...

Page 20: ...lower number of P frames for this setting 7 Profile The profile defines the subset of bitstream features in H 264 H 265 HEVC stream including color reproduction and additional video compression H 264 Main High H 265 HEVC Main 8 Bitrate Mode Select the bit rate control scheme of video compression from CBR Constant Bit Rate or VBR Variable Bit Rate This category will not appear if you select the codec ...

Page 21: ...r VBR control mode The Target Quality of the video can be setup 11 Smart Core Off Smart RC 12 Extension Option 13 Click Apply to save all settings Off You cannot use the Extension Option SVC T On The H 264 H 265 HEVC SVC Scalable Video Coding is a video compression algorithm that enables effective and efficient transmission of video files over low bandwidth networks ...

Page 22: ...etup Video and Audio Setup OSD Configuration 1 2 3 1 Date Time Display the current time 2 User Text Output the TEXT entered by the user Support a maximum of 30 characters 3 Click Apply to save all settings ...

Page 23: ... the qualities of movement in the scene without compromising the bandwidth 1 Stream Select the Stream Currently supports only H 264 H 265 HEVC The function is not supported in the MJPEG codec 2 Activation Enable or disable the region of interest function 3 Quality Set the quality of the set area 4 Click Save to save all settings Click Cancel to return to the previous setting ...

Page 24: ...ation 1 2 3 4 1 Codec Select the Audio Codec Currently the camera supports codec G 711 2 Volume Select the Audio Volume from 0 to 10 3 Sample Rate Select the Audio Sample Rate Currently the camera supports 8000 Hz 4 Click Save to save all changes ...

Page 25: ... hide on screen to protect privacy 1 Activation Enable or disable the privacy mask function 2 Area Select Area1 Area16 then draw the privacy mask in the video display 3 Click Save to save all settings Click Cancel to return to the previous setting Click Clear Area to delete the selected Area1 Area16 1 2 3 ...

Page 26: ...l appear 3 Contrast The higher the number the stronger the contrast between colors in the image will appear 4 Saturation The higher the number the more saturated the colors in the image will appear 5 Hue The higher the number the stronger the hue in the image will appear 6 Click Save to save all settings Click Cancel to return to the previous setting Click Default to settings to the factory defaul...

Page 27: ...ter Speed If this speed is faster the moving object can be photographed without the ghost effect However the picture can be dark if the lighting is insufficient 5 Slow Shutter Level Slow shutter Level lets you adjust the amount of light striking the sensor and essentially determines when the video sensor sends out its batch of data for processing 6 Gain Limit Adjusts image gain The lower the value...

Page 28: ...d time 2 Color Level This level determines when the camera will change from Night mode B W to Day mode color while set to Auto The lower that this value is set the lower the lighting threshold requirement will be for the transition 3 B W Level This level determines when the camera will change from Day mode color to Night mode B W while set to Auto The lower that this value is set the lower the lig...

Page 29: ...namic Range Enable or disable the feature 2 WDR Level Set the WDR level from the available options Select from normal low or high 3 Click Save to save all changes Click Cancel to return to the previous setting Click Default to change the settings back to their factory defaults Setup Camera Setup Camera Backlight Settings 1 2 3 ...

Page 30: ...era s view due to high contrast 1 WDR Wide Dynamic Range Enable or disable the feature 2 Click Save to save all changes Click Cancel to return to the previous setting Click Default to change the settings back to their factory defaults Setup Camera Setup Camera Backlight Settings 1 2 ...

Page 31: ...nction 2 White Balance Mode Select White Balance depending on the lighting conditions 3 RGB Gain The R G B gain can be set only when the White Balance Mode is set to Manual 4 Click Save to save all settings Click Cancel to return to the previous setting Click Default to settings to the factory defaults ...

Page 32: ... Reduce digital noise in low light conditions improving video quality 2 Mirror Reverse the video horizontally 3 Flip Reverse the video vertically 4 Click Save to save all settings Click Cancel to return to the previous setting Click Default to settings to the factory defaults ...

Page 33: ... s image appears to flicker change the Hz values to improve the camera s image 2 Click Save to save the current settings Click Cancel to return to the previous setting Click Default to settings to the factory defaults Setup Camera Setup Video Enhancement 1 2 ...

Page 34: ...33 This menu displays the camera s current network settings To make any changes to the settings you must go to the appropriate network settings tab Setup Network Setup Network Status ...

Page 35: ...ng host within the network the IP address of the router that is most commonly used 5 Preferred DNS Server Address of the decentralized system used to translate alphabetic names into IP addresses 6 Alternate DNS Server Secondary address of the decentralized system used to translate alphabetic names into IP addresses 7 HTTP Port The HTTP port can be set to the default 80 port or any value between 10...

Page 36: ...Network Setup Auto IP Settings 1 3 2 1 General Setting Enable or disable the Auto IP Settings 2 Auto IP Settings Information Display the camera s Unique ID and Auto IP address 3 Click Apply to save all settings ...

Page 37: ...ithout ONVIF authentication WS Usertoken Allow access to the camera with WS User Token of ONVIF authentication WS Usertoken Digest Allow access to the camera with WS User Token and Digest of ONVIF authentication 2 Discovery Mode Enable or disable discovery mode 3 Click Apply to save all settings ...

Page 38: ... 3 1 General Setting Enable or disable the UPNP function 2 Friendly Name Define the friendly name Support a maximum of 30 characters and special characters Do not use Acceptable special characters include _ 3 Click Apply to save all settings ...

Page 39: ... Host Name of the site the setup is completed by entering the username and password registered in that DDNS site If you setup DDNS properly the IP address of your camera will be updated automatically whenever the IP address is changed or the system is rebooted If IP updating to the DDNS site is failed the camera will keep retrying in 1min interval 3 Click Apply to save all settings DDNS Provider D...

Page 40: ...ad Path Define a path in FTP server to store video For the path name English Alphabets numbers and special characters _ can be used 4 FTP Port Define the FTP Server Port If the port is not appropriate it is impossible to access to FTP Server 5 User ID Define User ID to access the FTP Server Fill out the correct User ID registered in the FTP Server 6 Password Define Password to access the FTP Server Fi...

Page 41: ...ill out the correct User ID registered in the SMTP Server 6 Password Define the Password to access the SMTP Server Fill out the correct Password registered in the SMTP Server 7 E Mail Sender Define the e mail address of the E Mail Sender It will be displayed as the sender when the camera sends an E mail 8 E Mail Receiver Define the e mail address of the E Mail Receiver It will be displayed as the Rec...

Page 42: ...ecurity level which allows you to set the Authentication password and the Encryption password 3 Mode Select either Read or Read Write mode 4 Activation Select mode to enable or disable 5 Read Write name Define Read name and Write name 6 Security Level Select one of no auth no priv auth priv 7 Authentication Algorithm Select MD5 or SHA as the authentication method 8 Authentication Password The Authe...

Page 43: ...service to ensure data transfer performance 4 RTP Multicast Check RTP Multicast Start Stop To activate RTP Multicast 1 Click the On button 2 Enter accessible RTP Multicast IP the port for video stream control RTP packet TTL 3 Click the Apply button It is possible to set each RTP Multicast for CH1 3 5 Click Apply to save all settings Click this button when completed setup each channel 6 It shows RT...

Page 44: ...Action rules List It indicates the custom action rule information added to the Action rules list 2 Click Add to add custom action rules Click Modify to modify selected items from the action rules list Click Delete to delete selected items from the action rules list ...

Page 45: ...Modify 1 Name Define the name of the action rules Input text cannot exceed the limit 3 15 characters 2 Action1 Action5 Select the action to take If the event occurs 3 Click Save to save all settings Click Cancel to return to the previous menu 1 2 3 ...

Page 46: ...y setting the image transfer rate and Pre Post alarm duration 2 Click Apply to save all settings Number of Images Pre alarm Duration Post alarm Duration Descriptions Define the number of images transferred per second Define the duration of the image transfer before an event Define the duration of the image transfer after an event ...

Page 47: ...f relay outputs available depends on the camera model 2 Mode Select the monostable bistable for relay mode 3 Idle State Select whether the contact is normally opened or is closed 4 Duration Relay out is operated during the setting time In monostable mode this function must be set up 5 Click Apply to save all changes ...

Page 48: ...ent Rules List It indicates the custom Event Rule information added to the Event Rules list 2 Click Add to add custom event rules Click Modify to modify selected items from the event rules list Click Delete to delete selected items from the event rules list ...

Page 49: ...on network disconnection illegal login detected temperature critical schedule sensor detection Click Cancel to return to the previous setting You need at least one event 3 Rules Select the action rule defined in the Trigger Action Action rule menu 4 Click Save to save the current settings Click Cancel to return to the previous setting ...

Page 50: ...ea Click in the display window to draw the motion area You can set up to four areas 3 Activation Enable or Disable motion detection function 4 Sensitivity Define the sensitivity of motion detection If a high value is selected it will detect very small motion while it becomes relatively insensitive when a low value is selected 5 Click Save to save all settings Click Cancel to return to the previous ...

Page 51: ...mperature 1 3 2 4 1 Mode Select Fahrenheit or Celsius 2 Threshold Define the temperature at which the event trigger occurs 3 Temperature It indicates the current temperature of the IP camera 4 Click Apply to save all settings ...

Page 52: ...Input Device Setup Select input device type from OFF N O N C 2 Click Apply to save all changes OFF NO NC Operation Ignore this input sensor The contact is normally open and closed when activated The contact is normally closed and open when activated ...

Page 53: ... 3 2 4 1 Target Stream Select the channel you want to record video 2 Click Save to save the current settings 3 Recording List Display the information about the recording settings 4 Click Modify to modify the selected item in the recording list ...

Page 54: ...rently the camera supports MP4 file type 4 Storage Select the storage type SD Card Disabled selection is not allowed 5 Continuous If continuous mode is enabled the camera will start recording automatically 6 Pre Duration Define the duration of recording before an event 7 Post Duration Define the duration of image transfer after an event 8 Click Save to save the current settings Click Cancel to ret...

Page 55: ...ist Display the information of the recorded video 5 Click Play to view the selected item in the list of the recorded video results Click Download to download the selected item When you click Download the following window appears When downloading please fill up the purpose of the file download The field is limited to 30 characters This information will be shown on the Log page with the download tim...

Page 56: ...ord Setup 1 2 3 1 Recording Video Viewer Play the recorded video 2 Recording Video Information Display information about the recorded video 3 Click Replay to view the recorded video again Click Back to return to the previous menu ...

Page 57: ...56 Storage Configuration Setup Record Setup Display the SD card information mounted on the device Select an item from the Storage List to configure its related functions ...

Page 58: ... stored images older than the selected time 3 Overwrite If ON is selected once the SD card has less than 8MB storage available new data will start to overwrite the oldest data If OFF is selected once the SD card has less than 8MB available the camera will stop recording to the SD card 4 Unmount Remove the SD card from the device 5 Format Delete all contents stored on the SD card 6 Click Apply to s...

Page 59: ...tion 2 IP Filter Type Select the recording IP filter type 3 Click Apply to save all settings 4 Filter IP Address Display the filtered IP address 5 IP Address Define the IP address you want to apply the IP filter 6 Click Add to add the IP address to the list Click Remove to remove the IP address selected in the list ...

Page 60: ...59 Setup Security Setup RTSP Authentication Configuration 1 2 1 RTSP Authentication Enable or disable the RTSP authentication 2 Click Apply to save all settings ...

Page 61: ...ide TTLS MD5 It does not require a certificate on the client side TLS It relies on client side and server side certificates to perform authentication 3 EAPOL Version Select the EAPOL Version 4 ID Type the ID to identify the client in the IEEE 802 1X authentication server 5 Password Type the Password to identify the client in the IEEE 802 1X authentication server 6 Verify Verify Password 7 CA Certi...

Page 62: ... If you cannot select a certificate please install the certificate from the Security Certificates menu 2 HTTPS connection Policy Select one of HTTP HTTPS HTTP and HTTPS depending on the connected web ONVIF RTSP over HTTP WEB HTTP HTTPS HTTP and HTTPS ONVIF RTSP OVER HTTP HTTP HTTPS HTTP and HTTPS 3 Click Apply to save all settings When HTTPS mode is chosen input https IP Address to connect to the cam...

Page 63: ...selected certificate 4 Delete Delete the selected certificate 5 Create a Certificate signing request This is the encoded data that contains the necessary information for issuing the certificate They must be filled in when creating the CSR Certificate Signing Request 6 Install Certificate Install Certification 7 CA Certificate Shows the installed CA certificates 8 Install CA Certificate Install Certi...

Page 64: ... private key 3 Certificate Name Enter a unique name to identify a certificate 4 Select File Choose the certification file 5 OK Request installing a certificate 6 Cancel Cancel install certificate and then back to certificates configuration Detail for Install CA Certification 7 Certificate Name Enter a unique name to identify CA certificate 8 Select File Choose a CA certification file 9 OK Request installing a ...

Page 65: ...ck Setup Security Setup 1 2 1 Auto Lock Enable or disable the Auto Lock function When enabled the system will lock itself for five 5 minutes after three 3 failed login attempts 2 Click Apply to save all settings ...

Page 66: ...5 Setup System Setup System Information 1 2 3 System Capability information 1 Device Name You can define the device name 2 Location You can define the device s location 3 Click Apply to save all settings ...

Page 67: ...ND EEPROM Audio chip Important file system and NTP Status Warning If the camera is abnormally terminated a download button will appear on the diagnostics page to download a file that allows you to check the error information you can 66 Setup System Setup System Diagnostics 1 ...

Page 68: ... configuration settings from another camera Check the box next to Upload Enter the backup key for the configuration backup Click Select File to locate the configuration backup file and select it on your computer The file name and upload status will appear Click Apply to start the upload A popup window will appear when the configuration upload is complete NOTE The configuration backup download is a...

Page 69: ...s of uploading will be displayed using Progress Bar If you assign the wrong file name an error message will be shown Warning 1 Do not turn off the power to the camera during the firmware update Interrupting the update may cause the system to become unstable Once the update is completed the system will reboot automatically 2 Make sure to check the Notice shown on the screen If the firmware update is ...

Page 70: ...the time format yy mm dd or mm dd yy 3 Current Date and Time Current date and time setting in the Camera 4 Synchronize with my computer Set the date time using those of the PC currently connected 5 Setup manually Set the date time by typing manually 6 Synchronize with time sever Time Zone NTP Choose the time server available to connect to the current camera Date and Time will be updated automatica...

Page 71: ...clocks forward one hour from standard time during the summer months and back again in the fall to make better use of natural daylight 1 General Setting Enable or disable the DST function 2 Date and Time Settings Set the start time and end time that the DST applies 3 Click Apply to save all settings ...

Page 72: ...l to return to the previous menu 3 Modify Modify the information of the user accounts registered For the admin account only the password can be modified 4 Delete Delete the selected user account The admin account cannot be deleted ID Password Retype Password Password Hint User Authority Enter a new user ID Admin already exists Enter the user password Check the password Enter the user password again...

Page 73: ... 1 Filter Select a date time sort or type of log to filter the log 2 Click the Refresh button to refresh the log list Click Filter to view the filtered log Click Backup to back up the filtered log 3 System Log List The filtered log is displayed ...

Page 74: ...factory defaults Return the setup to the factory default 2 Click Apply to save all settings All Reset all Settings to the factory defaults Except Network Settings and User Settings Reset all camera settings to factory default except for the network settings ...

Page 75: ...74 Setup System Setup Restart If you click the RESTART menu a message box will be shown to confirm Click the OK button to restart ...

Page 76: ...75 System Open Source License Setup System Setup This menu shows a list of all the System Open Source License information in the camera including Open Source Name Version License etc ...

Page 77: ...ou may need to remove some plug ins to have enough storage for a new plug in 5 Upload Plug In Once a new plug in file is selected click the UPLOAD PLUG IN button to start the update The Progress Bar will indicate the uploading progress See the MEGApix IVA user manual for more information on the analytics plug ins settings and activation Configuration Show the settings for the selected plug in from...

Page 78: ...ace 7 Install VLC to display live video 8 The camera s IP address settings can be set to STATIC from the DW IP Finder or the camera s web viewer by going to Setup Network Network Settings 9 If the IP camera is connected to a network with a router you must have port forwarding configured on your router to access the camera from outside the network 10 After configuring port forwarding on your router i...

Page 79: ...ite before you configure setup or install the IP Camera Even though your IP is not dynamic you will benefit by registering your device with a DDNS service In this case just remember hostname dyndns com gate1 instead of a complicated series of numbers like http 201 23 4 76 8078 For more details contact our Support Center To use a public DDNS called DynDNS or no IP refer to the detailed information o...

Page 80: ...et a STATIC IP address for the camera 3 Configure your IP Camera s TCP IP settings for network connectivity by selecting Setup from the main interface and selecting TCP IP located on the left of the setup screen 4 If prompted for ID and password use admin for both entries The default web port number is 80 If port 80 is blocked by the ISP use a value between 1025 60000 If TCP port 80 is blocked cont...

Page 81: ...on on how to choose a unique IP and match your network read the FAQ i The IP address you assign must be a private IP For information on how to choose a private IP please read the FAQ i You must use the same subnet mask as the one you noted under Current TCP IP Settings i If you did not receive any IP addresses from your ISP contact the ISP and acquire the IP address of their DNS server i Do not us...

Page 82: ...TCP IP properties 1 Network Type DYNAMIC 2 DDNS Server Use the DDNS server 3 Web Port 80 Camera Gateway or Router at ISP Public Line Internet i To connect the IP Camera directly to a modem power down and reset the modem Leave the modem powered down until the IP camera s setup is completed and the IP camera has been connected to the modem Then power on the modem followed by the IP camera i You need...

Page 83: ...lay Trying to Reconnect If the ACTIVE light on the IP Camera has gone off and is now back on again flashing the IP Camera has rebooted After the system reboots completely remove the power supply from the unit and close Internet Explorer 3 Return your PC Laptop TCP IP properties to their original settings 4 Before installing the IP camera you must perform port forwarding on your router Cases A B You ...

Page 84: ...d web port assigned to the IP camera 6 Access your IP camera via the Internet If you use cases B C 1 Open Internet Explorer 2 Type the address of the IP camera 3 If you use a router enter the routers static IP and the web port number of the IP camera If you use cases A D 1 Open Internet Explorer and go to your DDNS website 2 Register the IP camera 3 Reboot the IP camera 4 Give the DDNS server 10 m...

Page 85: ...ent IP address subnet mask default gateway and DNS servers 7 I can t connect In the case of a connection failure Modem Reboot Modem Reboot Finished Router Reboot Router Reboot Finished IP Camera Reboot IP Camera Reboot Finish Verify DDNS and IP Camera connection if applicable 8 How do I PING an IP address 1 Open an MS DOS or Command prompt 2 At the prompt type ping xxx xxx xxx xxx without the quot...

Page 86: ...85 Specifications Dimension Unit inches mm 4 29 109mm 2 5 1 4 92 125mm 4 4 112mm 3 07 78mm ...

Page 87: ...ing performance H 265 QFHD 1080p 720p VGA D1 CIF H 264 QFHD 1080p 720p VGA D1 CIF MJPEG 1080p 720p 800x600 VGA 768x432 D1 CIF Video bitrate 100kbps 10Mbps Multi rate for Preview and Recording Bitrate control Multistreaming CBR VBR at H 264 H 265 controllable frame rate and bandwidth Edge storage Micro SD micro SDHC micro SDXC card not included GENERAL Language English Power DWC M P VD8WiATW DC12V ...

Page 88: ...in materials and workmanship which arise during normal use This warranty does not cover damages that occurs in shipment or failures which are caused by products not supplied by the Warrantor or failures which result from accident misuse abuse neglect mishandling misapplication alteration modification faulty installation setup adjustments improper antenna inadequate signal pickup maladjustments of ...

Page 89: ...xclusion or limitation of incidental or consequential damages or limitations on how long an implied warranty lasts so the above exclusions or limitations may not apply to you This warranty gives you specific legal rights and you may also have other rights from vary from state to state If the problem is not handled to your satisfaction then write to the following address Digital Watchdog Inc ATTN R...

Page 90: ...house 16220 Bloomfield Ave Cerritos CA USA 90703 PH 866 446 3595 FAX 813 888 9262 www Digital Watchdog com technicalsupport dwcc tv Technical Support PH USA Canada 1 866 446 3595 International 1 813 888 9555 French Canadian 1 904 999 1309 Technical Support Hours Monday Friday 9 a m to 8 p m Eastern Time ...

Reviews: