DETECTION TECHNOLOGY
Thermistor heat sensing element for accuracy, reliability and stability.
SUPERIOR FEATURES
• Battery operated.
• Operating light (LED).
Flashes approximately every 45 seconds for up to 30 days when the battery needs replacing.
• Sensitivity Test Button.
Tests sensitivity, circuitry, battery and horn.
• Loud 85 Decibel Piezo Electric Alarm.
Automatically resets when hazardous condition has passed.
• Easy installation.
Fixings supplied
SPECIAL FEATURES
Alarm Pause – silence your heat alarm by momentarily pressing the test button. Ideal when non-
emergency heat (eg from cooking) causes nuisance alarms. LED flashes every 10 seconds to remind
you that the heat alarm has been silenced. A double beep indicates that the alarm has automatically
reset after approximately 10 minutes.
Interconnectable - can be connected to any combination of 11 other H380i, micro 300i, 440i, or 450i
smoke and heat alarms.
BE PREPARED
Smoke and heat alarms properly installed and maintained are an essential part of a good home safety
programme. Review fire hazards and eliminate dangerous conditions whenever possible. When fire
strikes, a prepared and practised escape plan could prove vital. Your local fire brigade may be willing
to advise you. Call them and ask. Consider and discuss the following hints:
• Ensure everyone is familiarised with the alarm signal.
• Always test doors with your hands before flinging them open. If they feel warm, fire may have walled
up behind them – leave closed and find another escape route.
H E A T A L A R M
• Don’t waste time collecting possessions. Arouse all occupants and leave the building. Your life is
more valuable!
• GET OUT, STAY OUT, GET THE FIRE BRIGADE OUT.
• Keep everyone in a set meeting place after you escape.
• If trapped inside, stay close to the floor, cover your mouth with a cloth and conserve breath as you
crawl to safety.
• Keep all windows and doors closed except for escape purposes.
• Prepare and practice an escape plan before a fire starts.
Draw a floor plan. Have fire drills often. Practise your escape.
WHERE TO LOCATE
1. For best protection heat alarms should be installed as part of a complete fire protection system that
also includes smoke alarms. Heat alarms are best suited to areas such as boiler rooms, kitchens,
laundry rooms and garages where dust, fumes and moisture can cause nuisance alarms in smoke
detectors.
Heat alarms should not be installed in escape routes instead of smoke alarms. They should only be
used in the above applications and must always be interlinked to smoke alarms. (Smoke alarms
should be installed in circulation areas forming part of escape routes and in every room in the
home).
2. When heat alarms are installed in a room, they should be placed on the ceiling, ideally in the centre
of the room. They should be at a distance no greater than 5.3m from the farthest wall no greater that
5.3m from a door to any room in which a fire might start and no greater than 5.3m from the next
heat alarm.
NOTE: Heat alarms should not be wall mounted.
3. Closed doors and other obstructions will interfere with the path of heat to an alarm and may prevent
occupants from hearing an alarm on the other side of a closed door. Install sufficient alarms to
compensate for closed doors and obstacles.
For further help and information on types and location of fire detection alarms refer to BS5839 pt 6
and the Fire Safety guidance given by the Department of Transport, Local Government and the Regions
(DTLR).
CAUTION:
Research indicates that substantial increases in warning time can be obtained with each
properly installed additional alarm, It is strongly recommended that the advice in 1 above be followed
to ensure maximum protection.
IMPORTANT:
These heat alarms are intended primarily for use in single occupancy private dwellings.
For use in other applications the manufacturers advice should be sought.
LOCATIONS TO AVOID
DO NOT locate heat alarms:–
1. In turbulent air from fans, heaters, doors, windows, etc.
2. In high humidity areas such as bathrooms and shower rooms or where the temperature exceeds
39°C (100°F) or falls below 5°C (40°F)
3. At the peak of an ‘A’ frame ceiling – dead air at the top may prevent smoke and
heat from reaching the alarm to provide an early warning.
4. Less than 300mm (12 inches) from a wall when mounted on the ceiling.
5. In very dusty or dirty areas – dirt and excessive dust can impair the performance of the alarm.
6. Within 300mm (12 inches) of a light fitting or room corners.
7. In locations that would make routine testing or maintenance hazardous. (e.g. over a stairwell).
8. On poorly insulated ceilings.
9. Near objects such as ceiling decorations that might impede the path of heat to the alarm.
10. Within 1500mm (5 feet) of a fluorescent light fitting.
Further help and information may be found in BS5839 Part 6.
INSTALLATION
IMPORTANT:
Read previous sections ‘WHERE TO LOCATE’ and ‘LOCATIONS TO AVOID’ before
installing the alarm.
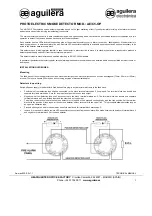
1. Open the cover and handle the unit with care to avoid damage.
2. Locate keyhole slots.
3. Mark hole through the alarm base then remove alarm. Drill two 4.75mm holes. DO NOT drill with
the alarm in position, as this will contaminate the unit with dust.
4. Insert the plastic anchors and screw the alarm base to the mounting surface.
5. Use standard figure of eight twin solid core bell wire to connect the alarms together. Ensure the
connections are made like to like i.e. positive (+) wire to positive (+) connection, negative (–)
wire to negative (–) connection.
OPERATION: HOW TO TEST
1. Connect battery.
WARNING:
Storage in low humidity and certain transportation conditions may cause electrostatic
charges to build up in the alarm system housing. Although harmless they may increase the length
of time that the horn sounds upon battery insertion or test button operation. The condition may be
cleared by wiping the inside and outside of the plastic cover with a clean, damp cloth.
2. Check LED operating light flashes approximately every 45 seconds in standby mode.
3. Depress and hold the test button until alarm sounds. It may be necessary to press the test button
for up to 20 seconds for the alarm to sound. (
NOTE:
Operating the test button will place the alarm
in Pause mode). Alarm is indicated by a loud continuing pulsating sound. Alarm may continue for
up to 10 seconds after the button is released.
After installation.
1. Press test button until the alarm sounds, then release. Repeat test weekly.
WARNING:
The electronic test button provides a full test of the alarms functionality. DO NOT try to
test the alarm with a naked flame, as this might present a fire hazard in itself.
For interconnected units only:
2. Test each alarm separately in the system.
3. Determine that the initiating alarm triggers all other alarms.
BATTERY
Your alarm requires one 9 volt battery. USE ONLY Gold Peak 1604P, 1604S; Ever Ready PP3B, PP3S,
GLF22; Duracell MN1604 or Ultralife U9VL batteries. Other batteries may be inadequate. Under
normal use the battery should last approximately one year.
SIMPLE MAINTENANCE
Vacuum every six months to help keep the unit working efficiently. Open cover and gently vacuum the
interior of the detector. Vacuum exterior. Keep vacuum from touching unit.
Problems are indicated by three events:
1. The alarm does not sound upon pressing the test button.
2. The operating light remains steadily on or off (i.e. does not flash approximately every 45 seconds,
when the unit is not in alarm).
3. The alarm beeps every 45 seconds as a low battery warning.
TRY THE FOLLOWING:
1. Inspect for obvious damage.
2. Check that the unit contains the recommended battery type.
3. Check that the battery is properly connected.
4. Gently vacuum as recommended above.
5. Replace battery.
OWNERS
MANUAL
For further information
please write:
Dicon Safety Products (Europe) Ltd.
Javelin 1, Meteor Business Park
Cheltenham Road East
Gloucester GL2 9QL
COVERS
• Simple Fitting Instructions • Location Guide
• Operating Guide • Basic Fire Safety Tips
• Simple Maintenance Instructions
PLEASE KEEP THIS MANUAL IN A SAFE PLACE
IMPORTANT:
PLEASE READ
AND RETAIN THIS OWNERS MANUAL
B A T T E R Y O P E R A T E D
When installing this alarm for use by others,
please leave this manual or a copy with the end user.
MODEL H380i
HEAT ALARM
2502-A0000