background image

Planning and installation

instructions

EKSV21P
EKSV26P
EKSH26P
Solar assembly packages

DAIKIN Pressurised solar system

Planning and installation instructions

DAIKIN Pressurised solar system

English

Summary of Contents for EKSV21P

Page 1: ...Planning and installation instructions EKSV21P EKSV26P EKSH26P Solar assembly packages DAIKIN Pressurised solar system Planning and installation instructions DAIKIN Pressurised solar system English ...

Page 2: ... all systems 7 3 3 2 System components for roof mounted systems ADM 10 3 3 3 System components for in roof systems IDM 11 3 3 4 System components for flat roof systems FDM 13 4 Installation 16 4 1 Transport and storage 16 4 1 1 Transport 16 4 1 2 Storage 16 4 2 System layouts 17 4 2 1 Parallel connection 17 4 2 2 Series connection 17 4 3 Laying the connecting pipe 18 4 4 Mounting the flat solar pa...

Page 3: ...have experience in the proper installation and maintenance of heating and solar systems due to their technical training and specialist knowledge Please read this manual carefully and thoroughly before proceeding with the installation and start up or modification of the system Comply strictly with warning instructions Relevant documents Documents listed below are part of the technical documentation...

Page 4: ...ccident pre vention regulations as well as the recognised safety related and occupational health rules 2 3 Use as intended The DAIKIN solar system may only be used for the solar supported heating of hot water systems The DAIKIN solar system must be in stalled connected and operated only according to the instructions in this manual Any other use outside the intended use is con sidered as improper T...

Page 5: ...distance that provides full disconnection in accordance with the condi tions of overvoltage category III and a residual current circuit breaker RCD with a reaction time 0 2 s Compare the mains voltage 230 V 50 Hz indicated on the nameplate with the supply voltage before connecting to the mains Before beginning work on live parts disconnect them from the power supply switch off main switch remove f...

Page 6: ...ipe 6 Solar panel array A Hot water zone B Solar zone DSR1 Solar differential temperature control unit MAG Diaphragm expansion vessel PS Solar operating pump EKSRDS2A Solar pressure station TK Solar panel temperature sensor TR Solar return flow temperature sensor TS Solar storage tank temperature sensor VS Scalding protection EHS X H B Solar tank with integrated interior heat pump unit EKHWP Energ...

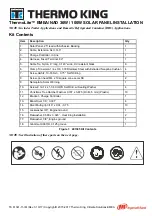
Page 7: ... aspects The parameters required for ease of operation are preset at the factory for selectable hydraulic variants see accompanying in stallation and operating instructions 3 3 System components for pressurised solar systems 3 3 1 System components for all systems High performance flat solar panels EKSV21P H x W x D 2000 x 1006 x 85 mm weight approx 35 kg EKSV26P H x W x D 2000 x 1300 x 85 mm weig...

Page 8: ...els and a pipe length of up to 25 m CON CP pressurised solar connection set CON CP16 For connecting the CON 15P16 pressurised solar pipe CON CP20 For connecting the CON 15P20 pressurised solar pipe CON XP pressurised solar pipe connector CON XP16 For the connection of two pressurised solar system pipes nominal size DN 16 CON XP20 For the connection of two pressurised solar system pipes nominal siz...

Page 9: ... systems up to maximum 3 solar panels MAG S35 for pressurised solar systems up to maximum 5 solar panels 5a Solar panel connecting elbow pressure 5c Sealing plugs 5e g Pipe clamps with hangar bolts 5h Single terminal block with equipotential bonding terminal 5i Single terminal block 5j Cable tie 5k Solar panel temperature sensor 5o Planning and installation instructions 5p Quick instructions 5q Ca...

Page 10: ...ting hook 12b Packing plate 2 mm 12c Packing plate 5 mm 12d Hexagon wood screws M8 x100 12e Quick instructions Fig 3 11 FIX ADDP 12f Roof mounting hook 12g Quick instructions Fig 3 12 FIX ADS 12h Mounting profile beam 12i Quick instructions Fig 3 13 FIX WD 12d 4x 12b 2x 12a 2x 12c 2x 12e 12g 12f 4x 12h 4 x 12i 12j Mounting profile beam 12k Quick instructions Fig 3 14 FIX BD 5a Solar panel connecti...

Page 11: ...10d Left side part 10e Right side part 10f Plug in strip 10g Bottom left drip off sheet 10h Bottom right drip off sheet 10i Bottom left sight guard plate 10k Bottom right sight guard plate 10l Accessory bag 10m Accessory bag 10n Locking plate 10o Nail 10p Holder for drip off sheets 10q Tapping screw 10r Metal screw 10t Foam adhesive strips 10u Quick instructions Fig 3 16 IB V21P IB V26P 10a 10c 10...

Page 12: ...nel row connector CON LCP For connecting two solar panel rows one above the other 5a Solar panel connecting elbow pressure 5c Sealing plugs 5h Single terminal block with equipotential bonding terminal 5i Single terminal block 5v HT Armaflex Ø 22 x 13 UV resistant 1 m 5y Connecting pipe Cu Ø 22 mm 1 m Fig 3 19 CON LCP 5h 5i 3x 5a 5y 5c 2x 5v ...

Page 13: ...ble fitting M40 13c Sealing unit for screwed cable fitting M16 13d Sealing unit for screwed cable fitting M32 Fig 3 20 CON FE 13a 13b 13c 13d GE1 Pre mounted basic element 6a Basic rail EKSV26P 6b Bearing rail EKSV26P 6c Telescopic rail outer EKSV26P 6d Telescope rail inner EKSV26P 6e Cross brace EKSV26P 6f Diagonal brace EKSV26P 6g Accessory bag EKSV26P 6h Terminal M8 6i Hexagon screw M8 6k Hexag...

Page 14: ... Hexagon nut M8 6m Hexagon nut M8 with locking serration 6n Washer 6o Round head screw M8 Fig 3 22 Flat roof frame expansion package FE V26P 7g x 4 7e x 2 x 2 x 4 x 2 x 8 x 8 6h 6n 6k 6i 6m 6o 6 6 c d 6a 6b GE1 GE2 Pre mounted basic element 8a Basic rail EKSH26P 8b Bearing rail EKSH26P 8c Telescopic rail outer EKSH26P 8d Telescope rail inner EKSH26P 8e Cross brace EKSH26P 8f Diagonal brace EKSH26P...

Page 15: ...Basic rail EKSH26P 8b Bearing rail EKSH26P 8c Telescopic rail outer EKSH26P 8d Telescope rail inner EKSH26P 9e Cross brace EKSH26P extension 9f Diagonal brace EKSH26P 8g Accessory bag EKSH26P 6h Terminal M8 6i Hexagon screw M8 6k Hexagon nut M8 6m Hexagon nut M8 with locking serration 6n Washer 6o Round head screw M8 Fig 3 24 Flat roof frame expansion package FE H26P 8 8d c 8b 8a 8g x 2 9f 9e x 4 ...

Page 16: ...y isolated from the power supply before storage switch off fuses and main switches remove cables and must be secured against being restarted inadvertently The components must be stored in such a way that persons are not endangered by them The regulations in the respective documentation for other heating components apply for transport and storage of these products All steps in these instructions ar...

Page 17: ...K 1 Collector connector 2 Mounting rail 2b Solar panel securing clips 4 Solar panel 5 Solar panel connecting elbow return flow 6 Solar panel connecting elbow inflow 7 Sealing plug 8 Solar return flow pipe 9 Solar inflow pipe 10 Solar panel row connector 11 Solar panel array 2x 2 solar panels TK Solar solar panel temperature sensor Tab 4 1 Legend for fig 4 1 to fig 4 3 and fig 4 5 The EKSV21P EKSV2...

Page 18: ...entilating tile into the inside of the roof Guide the connection pipe through the ventilating tile Ensure that the heat insulation hoses are not damaged If no suitable ventilating elements are available for the exist ing roof covering consult a roofer to ensure a permanently sealed roof penetration for the connection pipe With flat roof mounting a Cut off the thermal insulating hoses of the connec...

Page 19: ...on or the roof integration of the DAIKIN Solar flat solar panels are given in the respective quick instructions which accompany the roof mounted assembly packages in roof assembly packages flat roof assembly packages Fix the upper mounting profile in place in such a way that the lateral alignment can still be corrected In the pressurised solar system the installation open ings of the solar panel t...

Page 20: ... c ADM b IDM FDM d a b c d 5h 5i 1 2 Click 3 Click 3a 3c 3a a b c d 3c 3c 2x 3a 2x CAUTION If the connections on the flat solar panel FIX VBP pos 3c are not fitted with extreme caution the seal ring can become damaged This causes leaks in the system Always fit the expansion joints to the flat solar panels with extreme caution Bring the next flat solar panel into alignment with the connection pipes...

Page 21: ...5i These instructions only describe the pipe laying for two way connection with two roof penetrations In principle there is a possibility of having an alternative connection with a single roof penetration In this case it is essential to make sure that the inflow pipe is always installed with the necessary gradient behind the solar panel surface in order to then lay this also on the side of the ret...

Page 22: ...ce 4 Mark and cut off the required length of the inflow top and re turn flow pipes bottom Then deburr the pipe ends 5 Slide the heat insulation hoses onto the connection pipes or solar panel connecting elbows and cut to the required length 6 Connect the inflow and return flow pipes to the cutting ring screw fittings of the solar panel connecting elbows and the connection set 7 Slide the compressed...

Page 23: ... silicone covered cable inside the roof to the connection cable of the solar panel temperature sensor of the control and pump units WARNING The equipotential bonding does not replace a lightning conductor It is only provided for pro tecting the solar panel temperature sensor and the control unit Local lightning strike regulations must also be observed For the roof mounted system ADM the equipotent...

Page 24: ... see chapter 5 2 1 Temporary shutdown Disconnect the DAIKIN solar system from all electrical and water connections WARNING The solar system cannot be started until all hydraulic and electrical connections have been completed An incorrect start up will adversely affect the function and may damage the complete system Installation and start up must therefore must conducted by DAIKIN authorised and tr...

Page 25: ... process the only waste created is that which can be used for material or thermal recycling The materials used that are suitable for recycling can be sorted into individual types The designation of the product means that electrical and electronic products may not be disposed of to gether with unsorted domestic waste Proper disposal in compliance with the respective na tional regulations of the cou...

Page 26: ...to energy label directive 2010 30 EC For correct selection of products for your application contact your dealer Depending on your application and the product selected an additional supplementary heater may have to be installed Tab 6 1 Characteristic data for determining the values for energy efficiency identification Unit Solar flat solar panel EKSV21P EKSV26P EKSH26P General Dimensions L x W x H ...

Page 27: ... 5 Limit data for operation Max operating pressure bar 6 Stagnation temperature C 192 Installation method On roof In roof On roof Flat roof In roof On roof Flat roof The Solar flat solar panel is permanently standstill proof and thermo shock tested Minimum collector yield above 525 kWh m2 per year with 40 cloud coverage location Würzburg with regard to the gross surface area of the solar panel sol...

Page 28: ...spacing of 650 mm a roof gradient of 30 and a building height 10 m 3 For detailed execution information contact DAIKIN Service does not apply to exempted regions stated in EN 1991 1 3 Tab 6 3 Required number of roof hooks WARNING There is a danger of collapse if the load on the roof area is too high Check the permissible roof load before installing the flat roof system If the permissible roof load...

Page 29: ... 54 8 81 4 06 4 77 5 33 5 55 5 73 52 5 60 6 50 7 21 7 48 7 70 3 64 4 23 4 69 4 86 5 00 50 5 11 5 87 6 46 6 68 6 85 3 32 3 82 4 20 4 34 4 45 48 4 72 5 37 5 86 6 04 6 18 3 07 3 49 3 81 3 93 4 01 46 4 41 4 97 5 38 5 53 5 63 2 86 3 23 3 50 3 59 3 66 44 4 15 4 64 4 98 5 10 5 18 2 70 2 01 3 24 3 32 3 37 42 3 93 4 35 4 65 4 74 4 80 2 55 2 83 3 02 3 08 3 12 40 3 74 4 11 4 36 4 43 4 47 2 43 2 67 2 83 2 88 ...

Page 30: ...Planning and installation instructions 30 EKSV21P EKSV26P EKSH26P DAIKIN Solar P SYS 008 1629544_01 12 2016 7 x Notes 7 Notes ...

Page 31: ... pipe 21 Inlet pressure 24 In roof system IDM 11 19 23 Installation 6 Equipotential bonding 23 Roof penetration 18 Solar panel temperature sensor 23 M Mounting profile connector 8 Mounting profile rail 7 O Operating mode 7 P Parallel connection 17 Product description 6 R Residual current circuit breaker RCD 5 Roof penetration 18 Roof mounted system ADM 10 19 23 S Screwed cable fitting 13 18 Sealin...

Page 32: ...008 1629544_01 12 2016 Copyright Daikin ...

Reviews: