

ZUMMESH-KPBATT
Zūm™ Battery-Powered Keypad
Installation Guide
Description
The Crestron® Battery-Powered Wireless Keypad (ZUMMESH-KPBATT) provides
control of one or more Zūm™ load controllers (not included). It is available with a
rocker switch or a combination of pushbuttons. The rocker switch version offers on/
off switching and dimming adjustment, with the ability to save one scene preset. The
pushbutton versions support the same capabilities with additional scene presets.
The ZUMMESH-KPBATT mounts to a standard electrical box, or can be attached
directly to the wall using screws or two-sided adhesive tape. A finished installation
requires a decorator-style faceplate (not included).
Battery-powered Zūm keypads are designed in the following four configurations:
• Single-Rocker Switch – Simple on and off lighting control
• Four-Button Keypad – Two buttons for on and off control and two scene recall
buttons
• Six-Button Keypad – Two buttons for on and off control, two buttons for
dimming up and dimming down, and two scene recall buttons
• Six-Button Keypad with Sensor Control - Two buttons for on and off control,
two buttons for dimming up and dimming down, one button for scene recall, and
one button for disabling the sensors in the room
Additional Resources
Visit the product page on the Crestron website
(
www.crestron.com
) for additional information and the latest
firmware updates. Use a QR reader application on your mobile
device to scan the QR image.
Zūm Overview
A Zūm space consists of one space, such as a board room or conference room, that
is equipped with Zūm mesh devices. The Zūm mesh devices (i.e., dimmers, switches,
keypads, and sensors) in the space provide control and communicate directly with
each other without the need for a centralized gateway or processor.
To expand the functionality of the Zūm space, a ZUMMESH-NETBRIDGE (not
included) can be added which provides centralized control and monitoring from a
Crestron control system (not included).
NOTE:
The ZUMMESH-NETBRIDGE requires a compatible J-box device (not
included) to provide power.
Installation
Mount the ZUMMESH-KPBATT to a single-gang box or directly to a flat surface using
double-sided tape.
NOTE:
Observe the following points.
• Codes: Install in accordance with all local and national electrical codes.
• Temperature: For use where temperatures are between 32° to 104 °F
(0° to 40 °C).
• Electrical Boxes: Several devices can be installed in one electrical box
(multigang). For a smooth appearance, install one-piece multigang
faceplates (not included).
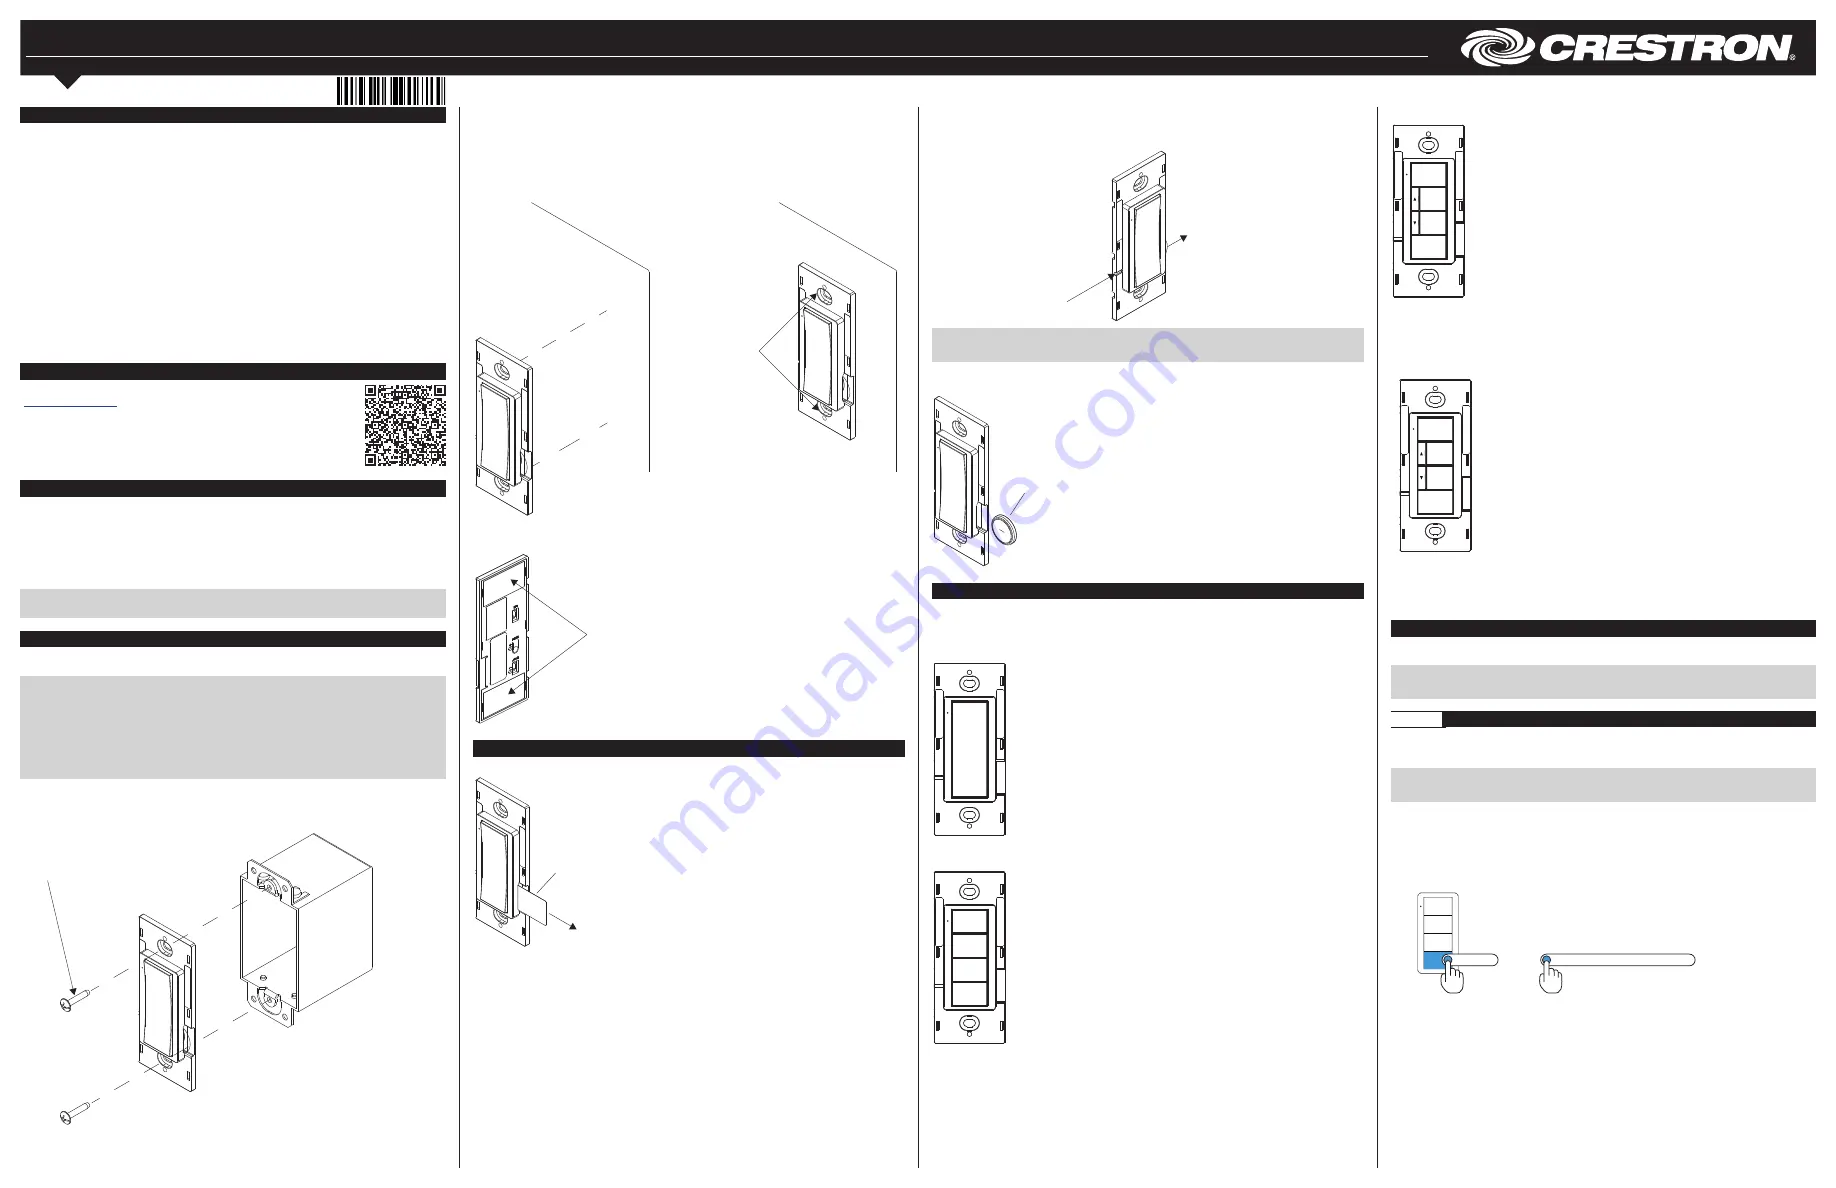
Single-Gang Box Mounting
Secure the ZUMMESH-KPBATT to a single-gang box using the two supplied screws.
Attach a decorator-style faceplate (not included).
Two screws are supplied
for mounting the keypad to
a back box.
Double-Sided Tape Mounting
Secure the ZUMMESH-KPBATT to a flat, clean surface using the supplied double-sided
tape.
1. Clean the mounting surface with a light cleaning agent that does not leave a
residue.
2. Remove the backing of one piece of the double-sided tape and apply it to the back
of the keypad. Repeat for the other piece of double-sided tape.
Press firmly to ensure
proper adhesion.
3. Ensure that the keypad is vertical, and press it against the wall. Press firmly to
ensure that the keypad is properly secured to the wall.
Two pieces of tape are supplied
to mount the keypad without a
backbox.
Battery
Prior to operation, remove the battery tab to turn on the keypad.
Remove the battery tab prior
to operation.
Battery Replacement
To remove the battery, insert a pin or paper clip into the slot on the left side of the
keypad. The battery slides out of the opposite side of the keypad.
To remove the battery,
insert a pin or paper clip
into the hole on the side.
NOTE:
The battery must be inserted properly.
NOTE:
The keypad will not operate if the battery is inserted incorrectly.
To install a new battery, insert the battery into the battery slot. The — terminal faces
away from the wall.
Battery CR2032
(
—
) towards the front of the keypad
Default Button Functions
Crestron offers several ZUMMESH-KPBATT units. The ZUMMESH-KPBATT’s
functionality is based upon its button layout. By default, they control all loads in the
room. If linked to a dimmer, the ZUMMESH-KPBATT controls only its linked loads.
ZUMMESH-KP10ABATT Button Functions
Top Button
Press: Recalls Scene 1
Hold: Raises lights
Bottom Button
Press: Turns lights off
Hold: Lowers lights
ZUMMESH-KP10BBATT Button Functions
ON
SCENE 2
SCENE 3
OFF
On
Press: Recalls Scene 1
Hold: Raises lights
SCENE 2
Press: Recalls Scene 2
Hold 5 Seconds: Saves Scene 2
SCENE 3
Press: Recalls Scene 3
Hold 5 Seconds: Saves Scene 3
OFF
Press: Turns lights off
Hold: Lowers lights
ZUMMESH-KP10CBATT Button Functions
ON
SCENE 2
SCENE 3
OFF
On
Press: Recalls Scene 1
Hold: No action
SCENE 2
Press: Recalls Scene 2
Hold 5 Seconds: Saves Scene 2
SCENE 3
Press: Recalls Scene 3
Hold 5 Seconds: Saves Scene 3
OFF
Press: Turns lights off
3
Hold: Raises lights
4
Hold: Lowers lights
ZUMMESH-KP10DBATT Button Functions
ON
SCENE 2
SENSOR
DISABLE
OFF
On
Press: Recalls Scene 1
Hold: No action
SCENE 2
Press: Recalls Scene 2
Hold 5 Seconds: Saves Scene 2
SENSOR DISABLE
Press: Recalls Scene 3
Hold 5 Seconds: Saves Scene 3
OFF
Press: Turns lights off
3
Hold: Raises lights
4
Hold: Lowers lights
How to Set Up a Zūm Space and Add Zūm Devices
Once all devices are physically installed in a board room or conference space, a new
Zūm space can be created and devices added.
NOTE:
Only set up one Zūm space at a time.
NOTE:
For simplified setup of a Zūm space, use the Zūm app on a mobile device.
Step 1
Create a New Zūm Space
Creating a Zūm space defines the area where the devices are located, such as a board
room or conference room. A Zūm space is created with a keypad, dimmer or switch, a
J-box device, or an AV Bridge.
NOTE:
Creating a Zūm space can only be performed by one device in the space.
NOTE:
A Zūm space cannot be created from a battery-powered keypad.
To create a new Zūm space using a keypad, dimmer, or switch:
1. Press the bottom button 5 times.
2. Press and hold the bottom button until the LED on the device lights (about
10 seconds). After approximately 3 seconds, the device LED begins slowly
flashing. This indicates that the Zūm space is now created and in Joining mode,
allowing you to add devices.
Press and hold until LED lights
Press 5x
then


