background image

MODEL PS10FRA

ASSEMBLY MANUAL

If you have problems or questions about your Creative Playthings Playset,

DO NOT CALL THE RETAILER.

Contact Creative Playthings Customer Service at 1-800-833-4001 or

[email protected]

Please read the owner

s manual before assem-

bling  your  Playset,  it  provides  additional 
information  on  the  care  and  use  of  your 
Playset.

You  must  carefully  read  the  entire  instruction 

manual before proceeding with the assembly 
or use of your new Playset.

Creative  Playthings  takes  great  care  to  de-

sign its products with your child

s safety in 

mind.  However,  only  with  careful  supervi-
sion and proper safety instructions, can you 
be assured of safe play time on any product 
designed for children.

By

This product is intended for single 

family home/residential use only and 

not intended for use in any public 

setting. Placement in any public 

setting constitutes a misuse of this 

product.

All hardware on this set is specially coated 

for corrosion resistance.

If non-Creative Playthings hardware is used, 

it must be galvanized or stainless steel.
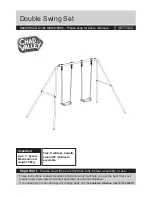
Model PS10FRA with 

Swing Beam

Model PS10FRA with 

Top Ladder

Summary of Contents for Playtime PS10FRA

Page 1: ...se of your new Playset Creative Playthings takes great care to de sign its products with your child s safety in mind However only with careful supervi sion and proper safety instructions can you be assured of safe play time on any product designed for children By This product is intended for single family home residential use only and not intended for use in any public setting Placement in any pub...

Page 2: ...things include Dog runs clothes lines electrical devices or bird feeders etc 6XVSHQGHG URSHV FKDLQV DQG FDEOHV PXVW EH VHFXUHG DW ERWK HQGV 6XVSHQGHG URSHV FKDLQV DQG FDEOHV PXVW QRW EH FDSDEOH RI ORRSLQJ EDFN RQ WKHPVHOYHV R QRW DOORZ PRUH WKDQ OEV RQ 6LQJOH RFFXSDQF VZLQJ DFFHVVRULHV VXFK DV WKH 6OLQJ 6ZLQJ DQG 7UDSH H R 127 DOORZ PRUH WKDQ OEV RQ PXOWLSOH XVH VZLQJ DFFHVVRULHV VXFK DV WKH DFN W...

Page 3: ...dditional stress on all connections and joints and in time will cause those connections to loosen and fail 7KH 6DIH 3OD UHD PXVW EH IUHH RI DOO VWUXFWXUHV ODQGVFDSLQJ WUHHV DQG EUDQFKHV URFNV ZLUHV DQG RWKHU obstacles to safe play Children can be seriously injured running or swinging into these obstacles 5HPRYH DOO WULSSLQJ KD DUGV IURP WKH 6DIH 3OD UHD 7ULSSLQJ KD DUGV LQFOXGH URRWV VWXPSV URFNV ...

Page 4: ...1 4 x 2 1 2 4 17003 1609 Hex Bolt 1 4 x 4 18 17003 1809 Hex Bolt 1 4 x 4 1 2 2 17119 409 Truss Head Bolt 1 4 x 1 6FUHZ DJ 63 17020 105 Screw 10 x 1 1 2 6FUHZ DJ 34 17020 107 Screw 10 x 2 4 17020 110 Screw 10 x 3 8 17020 109 Screw 8 x 2 1 2 8 17019 304 Round Head Screw 10x3 4 8 17120 902 Self Drilling Screw 10 x 2 1 2 DJ 6FUHZ DJ 8 17036 601 Lag Screw 1 4 x 1 1 2 4 17036 1201 Lag Screw 1 4 x 3 4 17...

Page 5: ...r tightness during the life of the Playset Do not over tighten Incorrect Assembly During assembly or maintenance the bolt pro trudes 1 8 past the weld nut Call customer service or replace the bolt at a local hardware store You may be overtightening or using the wrong size bolt Failure to replace this bolt with a shorter one could result in serious injury Typical Installation Lag Screws 3LORW GULOO...

Page 6: ...A B Z D E F G H I J L M N AA AB AC AG AJ AD AF AI AK AL AM AN Q R S2 T V W X C KDLQHG 6ZLQJ FFHVVRULHV 2 40321 400 Sling Swing Green w Chain 1 40311 402 Ring Trapeze Assembly w Chain 5RSHG 6ZLQJ FFHVVRULHV 2 40009 400 Sling Swing Green w Rope 1 40381 100 Plastic Ring Trap Combo Yellow or Swing Options 60056 101 Swing Beam 60055 101 Top Ladder U ...

Page 7: ...Gym Base Rail 2 x 3 x 94 B 1 32193 102 Bottom Rope Ladder Support 2 x 3 x 50 C 2 32195 102 Angled Side Support 2 x 3 x 51 1 8 D 2 32730 102 Rock Climber Upright 2 x 3 x 51 7 8 E 2 33180 102 Right Corner Post 2 x 4 x 88 1 2 F 2 33181 102 Left Corner Post 2 x 4 x 88 1 2 G 1 33185 102 Left Access Ladder Rail 2 x 4 x 53 1 4 H 1 33186 102 Right Access Ladder Rail 2 x 4 x 53 1 4 I 1 33188 102 Long Tent ...

Page 8: ...WLRQ KDUGZDUH KDV VKDUS HGJHV rusted or structural pieces have signs of premature failure replace them through Creative Playthings Customer Service 2LO DOO PHWDOOLF PRYLQJ SDUWV PRQWKO GXULQJ WKH XVDJH VHDVRQ 7KH VZLQJV WUDSH H WHQW URSH ODGGHUV DQG DQ RWKHU UHPRYDEOH SODVWLF DFFHVVRULHV VKRXOG EH UHPRYHG DQG WDNHQ indoors when outside temperatures drop below 32 F 0 C RRG ZLOO H SDQG DQG FRQWUDFW ...

Page 9: ...H ODW Washer and one Weld Nut Stand the assembly up and fasten the Gym Base Rail A using a 1 4 x 2 1 2 Hex Bolt Assembly Note the Location of the pre drilled holes in the Corner Post and the Sandbox End in the illustration at right Orient all Corner Posts so the hole 36 from the bottom is offset toward the Sandbox Ends 1RWH H ROW VVHPEO FRQVLVWV RI RQH H ROW RQH Lock Washer one Flat Washer and one...

Page 10: ...W 5DLO Fasten one Side Wall Support AA to the left Corner Posts as a safety rail Use four 1 4 x 2 1 2 Hex Bolt Assemblies Move the base assembly into position in your Safe Play Area Do not forget to account for the Access Ladder Slide and Swing Beam or Top Ladder 1RWH 5HIHU WR SDJH IRU WKH 6DIH 3OD UHD GLPHQVLRQV 67 3 3ODWIRUP 6LGHV Fasten the Left Platform Side AH to the inside of the Left Corner...

Page 11: ...en the Platform Back AJ to the back Corner Posts in the same way STEP 8 Platform Stringer Fasten the Platform Stringer Y between the Platform Ends using one 1 4 x 4 Lag Screw and 1 4 Washer in each end 67 3 QJOH UDFHV Loosely fasten the bottom of the four Angle Braces T to the Corner Posts using 1 4 x 2 1 2 Hex Bolt Assemblies Loosely attach the top of the Angle Braces to the Platform End or Platf...

Page 12: ... x 4 Lag Screws and 1 4 Flat Washers STEP 11 Square and Secure Gym Use a level and square to check that the Corner Posts are plumb and the Side and End Supports are level Once the position is satisfactory tighten the bolts holding the Angled Side Supports to the Gym Base Rail and the Angle Braces to the Corner Posts Check Gym position again and then tighten the bolts that connect the Angle Braces ...

Page 13: ...sten two Side Wall Supports AA to the outside of the Left Corner Posts in the positions shown at right Use four 1 4 x 2 1 2 Hex Bolt Assemblies in each Side Wall Support Use four 1 4 x 2 1 2 Hex Bolt Assemblies to fasten one Side Wall Support on the inside of the Right Corner Posts as shown 67 3 RQJ 7HQW 6XSSRUWV Fasten the Long Tent Support I to the Left Corner Posts us ing four 1 4 x 2 1 2 Hex B...

Page 14: ...rt and Tent Rope Support using four 1 4 x 3 Lag Screws with four 1 4 Flat Washers as shown STEP 17 Tent Posts Fasten the Tent Posts AK to the Long Tent Support and Tent Rope Support as shown Use two 1 4 x 2 1 2 Hex Bolt Assemblies for each Tent Post Use a level to ensure that the Tent Posts are plumb STEP 18 Tent Beam Fasten the Tent Beam AM to the Tent Posts as shown Use two 10 x 3 Screws at each...

Page 15: ...t against the Rails before inserting the screws LQWR WKH KROHV DQG IDVWHQLQJ WKHP ZLWK D GULOO ÀWWHG ZLWK D Phillips bit KHQ IDVWHQLQJ SUHVV ÀUPO ZLWK RXU ERG PDVV FHQWHUHG over the drill STEP 20 Bottom Rope Support and Slat Fasten the Bottom Rope Ladder Support B to the Access Ladder Assembly using two 1 4 x 4 1 2 Hex Bolt Assem blies as shown Fasten the Ladder Slat S1 to the Access Ladder Rails ...

Page 16: ...ce Drive one Ground Stake O into the ground along side a Rock Climber Upright as shown The upper corner of the Stake should be behind the top edge of the Upright to avoid interfering with the Bottom Board in the next step Secure the stake with two 8 x 2 1 2 Wood Screws through the pre drilled hole Do not use concrete to set Ground Stakes Pound a metal spike or rod into the ground to start a hole i...

Page 17: ...H RQH DQG ULS ÁDW DJDLQVW WKH EDFN IDFH RI WKH EDFN Left Corner Post as shown The bottom hole of the Hand Grip should be approximately 8 above the top of the Plat form surface With the Hand Grip centered on the face of the Corner Post mark the positions of the holes in the Hand Grip Drill 1 8 diameter pilot holes 1 deep at the marks Fasten the Hand Grip using two 1 4 x 1 1 2 Lag Screws and two 1 4...

Page 18: ...g Beam U U Top Ladder or Swing Beam Swing Beam Top Ladder 1 1 2 1 1 2 C L C L 8 1 4 8 1 4 Your gym comes with either a Swing Beam or Top Ladder Both come with instructions for assem bly and mounting The instructions on this page show the unique steps for mounting them to this gym STEP 28 Swing Mounts The Swing Mounts U for this gym fasten in a way very simi lar to the method shown in the instructi...

Page 19: ...e Tent R across the top of the gym over the Tent Beam Secure the Tent to the end of the front End Tent Sup port using three 10x 3 4 Round Head Screws through the grommets in the hem of the Tent If the heads of the Screws are smaller than the grommet openings use 1 4 Flat Wash ers under the heads of the Screws Stretch the Tent smoothly and evenly across the Tent Beam Secure the other end of the Ten...

Page 20: ...hown Fasten each Ground Stake using two 8 x 2 1 2 Screws through the pre drilled holes Pound the last Ground Stake along the inside of the Front Sandbox End on the side farthest from the Gym Base Rail Secure the Stake with two 10 x 2 Screws 1RWH R 127 XVH FRQFUHWH WR VHW URXQG 6WDNHV 6LPSO pound them in to the ground Use a metal spike or rod to start a hole in hard or rocky ground STEP 33 Slide Ce...

Reviews: