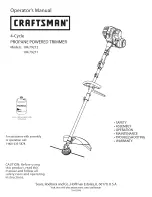
background image

Summary of Contents for 917.773744

Page 1: ......

Page 2: ...hts and you may also have other rights which vary from state to state Sears Brands Management Corporation Hoffman Estates IL 60179 A WARNING This trimmer is equipped with an internal combustion engine and should not be used on or near any unimproved forest covered brush covered or grass covered land unless the engine s exhaust system is equipped with a spark arrester meeting ap plicable local or s...

Page 3: ...ds unless ab solutely necessary Always Iookdown and behind before andwhile moving backwards Do not operate the machine without proper guards plates or other safety protective devices in place See manufacturer s instructions for proper operation and installation of accessories Only use accessories ap proved by the manufacturer Never use blades wire or flailing devices This unit is designed for line...

Page 4: ...ry before restarting Do not change the engine governor set ting or overspeed the engine Clean and replace safety and instruction decals as necessary Repair Protection Agreements Congratulations on making a smart pur chase Your new Craftsman product is designed and manufactured for years of dependable operation But like all prod ucts it may require repair from time to time That s when having a Repa...

Page 5: ... must be tightened securely Use the correct tools as necessary to ensure proper tightness When right hand RH or left hand LH is mentioned in this manual it means when you are in the operating position standing behind the handle Loose Parts Packed Separately HOW TO SET UP YOUR TRIMMER TO UNFOLD HANDLE IMPORTANT Unfold handle carefully so as not to pinch or damage control cables 1 Loosen handle knob...

Page 6: ...e oil cap with dipstick Air filter Primer Gasoline cap Muffler Chassis cover Trimmer head control bar must be held down to the handle to engage trimmer head Release to stop the trimmer head Primer pumps additional fuel from the carburetor to the cylinder for use when 6 starting a cold engine Throttle control used for starting and stopping the engine and allows you to se lect either FAST or SLOW en...

Page 7: ...ing and normal trimming SLOW is for light trimming and fuel economy STOP is for stopping the engine Adj Trimmer Head Locking Plate Tab FAST SLOW I_ TRIMMER HEAD DRIVE CONTROL Your trimmer is equipped with a trimmer head drive control bar which will require the operator to be positioned behind the trimmer handle to operate the trimmer Trimmer head rotation is controlled by holding the trimmer head ...

Page 8: ...ne filler ine ca oil cap Primer TO STOP ENGINE To stop engine move throttle control lever to STOP position TO START ENGINE 1 To start a cold engine push primer three 3 times before trying to start Use a firm push This step is not usually neces sary when starting an engine which has already run for a few minutes 2 Move throttle control lever to FAST position 3 Hold upper handle firmly and pull star...

Page 9: ...in trimmer as instructed in this manual Some adjustments will need to be made periodically to properly maintain your unit At least once a season check to see if you should make any of the adjustments described in the Service and Adjustments section of this manual o At least once a year replace the spark plug and replace air filter element A new spark plug and clean new air filter element assure pr...

Page 10: ...or this unit see the Repair Parts section of this manual If trimmer line is purchased in bulk it must be cut to 18 3 4 inches before using Use the built in length guage as follows 1 From front of trimmer place the end of spooled trimmer line at the mark on the side of the debris shield as shown 2 Wrap trimmer line around front of chas sis cover to other side and cut at the 22 mark your unit s widt...

Page 11: ...pped inside of engine Container 4 Wipe off any spilled oil from trimmer or side of engine 5 Fill engine with oil See ADD OIL in the Operation section of this manual 11 6 Replace engine oil cap 7 Reconnect spark plug wire to spark plug AIR FILTER Your engine will not run properly and may be damaged by using a dirty air filter Replace the air filter cartridge every 100 hours of operation or every se...

Page 12: ...nnect spark plug wire from spark plug and place wire where it cannot come in contact with plug TRIMMER TO ADJUST TRIMMING HEIGHT See TO ADJUST TRIMMING HEIGHT in the Operation section of this manual TO ADJUST HANDLE The upper handle may be adjusted to dif ferent height positions Loosen handle knob only enough to allow the upper handle to pivot to the desired position Tighten handle knob securely N...

Page 13: ...e pulley Idler spring Idler bracket S Flatidler Bottom belt keeper _ Flat idler Trimmer head pulley ENGINE ENGINE SPEED Your engine speed has been factory set Do not attempt to increase engine speed or it may result in personal injury If you believe that the engine is running too fast or too slow take your unit to a Sears or other qualified service center for repair and or adjustment CARBURETOR Yo...

Page 14: ... lines and carburetor are empty o Never use engine or carburetor cleaner products in the fuel tank or permanent damage may occur o Use fresh fuel next season NOTE Fuel stabilizer is an acceptable alternative in minimizing the formation of fuel gum deposits during storage Add stabilizer to gasoline in fuel tank or storage container Always follow the mix ratio found on stabilizer container Run engin...

Page 15: ...rim at slower walking speed 1 Check trimmer lines 2 Check all hardware including engine bolts 3 Check repair trimmer head 1 Contact a Sears or other qualified service center Loss of head 1 Belt not driving 1 Put belt on pulleys or drive replace belt if broken Hard to push 1 Handle height position not 1 Adjust handle height right for you to suit 1 Poor trimming performance Trimmer head does not ret...

Page 16: ...ght at appro imately 1 7 feet in 10 feet A 15 degree slope is a hill that increas_ in height at approximately 2 5 feet in 10 feet Use extreme care at a times and avoid sudden turns or maneuvers Follow other instructions in this manual for safety in trimming on slopes Operate a trimmer across the face of slopes never up or down slopes Use extra care when operating on or near slopes and obstructions...

Page 17: ...llado cubierto de bosques de arbustos o de cesped o menos que el sistema de escape del motor venga equipado con un amortiguador de chispas que cumpla con las leyes locales o estatales si existen Si se usa un amortiguador de chispas el operador debe mantenerlo en condiciones de trabajo eficientes En el estado de California la Icy exige Io anterior Secci6n 4442 del California Public Resources Code O...

Page 18: ...minos de grava Espere que las cuerdas de corte paten de girar Pare el motor siempre que tengaque dejar el equipo antes de limpiar reparar o inspeccio nat la unidad AsegOrese de que la cabeza de la recortadora y todas las partes en movimiento se hayan detenido Opere solamente con luz del d a o con una buena luz artificial No opere la mAquina bajo la influencia del alcohol o de las drogas Nunca oper...

Page 19: ...do para funcionar de modo fiable pot muchos aflos Pero como todos los productos puede necesitar alguna reparaci6n de tanto en tanto En este caso tener un Acuerdo de Protecci6n para la Reparaci6n puede hacerles ahorrar dinero y fastidios Compre ahora un Acuerdo de Proteccidn para la Reparacidn y protegese de molestias y gas tos inesperados Un Acuerdo incluye los puntos siguientes Servicio experto d...

Page 20: ...ramientas correctas adecuadas para asegurar un apretado firme Cuando la mano derecha o la mano izquierda est_ n mencionadas en este manual significa que usted esta situado en la posici6n de opera dot detr_ s del mango Piezas sueltas ernpaquetadas pot separado IMPORTANTE Despliegue el mango con mucho cuidado para no apretar o daflar los cables de control 1 Aflojar la perilla del mango Io suficiente...

Page 21: ...rilla indicadora de nivet Filtro de aire Cebador Tapa det deposito de la gasotina NOTA Esta m_tquina puede utilizar gasolina con un contenido de hasta el 10 deetanol E10 Elusodeuna gasolina que supere el 10 de etanol El 0 anular_t la garanfia del producto IMPORTANTE Esta recortadora viene SIN ACEITE O GASOLINA en el motor Sitenciador Cubierta det chasis _ recortadora la __ Cabeza de Linea de la re...

Page 22: ... la buj a de la buj a y p6ngalo en donde no pueda entrar en contacto con esta La altura del corte puede ser fijada en seis 6 diversas posiciones que se extienden a partir de 1 1 2 pulgadas a 3 pulgadas La altura de corte recomendada para un cercado normal es 2 pulgadas 1 Para ajustar la altura del recorte empuje la aleta tabulaci6n de la placa de bloque y mueva el cabezal de la recortadora hacia a...

Page 23: ...ancar un motor que ya ha estado funcio nando por unos cuantos minutos 2 Mueva la palanca de control de la aceler aci6n a la posici6n mas RA PIDA 3 Sujete la barra de control superior y tire del mango del arrancador rb pidamente No per mita que el cord6n arrancador se devuelva abruptamente AVlSO En climas mb s fr os puede que sea necesario repetir los pasos del cebado En climas mas calurosos el ceb...

Page 24: ...ujfa nueva y un elemento del filtro de aire limpio nuevo aseguran la mezcla de aire combustible adecuada y ayudan a que su motor funcione mejor y que dure m_ s Siga el programa de mantenimiento en este manual ANTES DE CADA USO 1 Revise el nivel del aceite del motor 2 Revise si hay sujetadores sueltos 3 Limpiar debajo de la tapa del motor LUBRIOAOI N Para prolongar la vida de su recortadora cam bie...

Page 25: ...segurase que sean de la misma largura 7 Vuelva a conectar el alambre de la buj a a esta Linea de la recortadora Apertura de la placa portante Clip del sujetador Marca det Nueva btindaje de Extremc linea de la escombros de la linea encanillada recortadora PARA REEMPLAZAR LAS LiNEA DE LA RE CORTADORA 1 Desconecte el alambre de la buj a y p6ngalo de modo que no pueda entrar en contacto con esta 2 Rem...

Page 26: ...ntes de petr61eo tales como el keroseno no se deben usar para limpiar el cartucho Pueden producir el deterioro de este No aceite el cartucho No use aire a presi6n para limpiarlo o secarlo Instale el cartucho luego vuelva a poner la cubierta asegur_ ndose que las orejas esten alineadas con las ranuras en la plancha trasera Apriete el tornillo en forma segura Labio Plancha trasera Cartucho Ranuras O...

Page 27: ...a 2 Apriete la perilla del mango de modo firme NOTA La parrilla y la perno del mango pueden ser invertidos para las operaciones sobre el lado izquierdo Mango superior II PARA REMOVER AJUSTAR LA CORREA DE IMPULSION DEL CABEZAL DE LA RE CORTADORA 1 Remueva el tornillo en el frente de la cubi erta del chasis 2 Gire la cubierta hacia arriba y a distancia de la recortadora Cubierta det chasis 3 Remueva...

Page 28: ...o con seguridad Utilice siempre las piezas de recambio Crafts man para asegurar un ajuste adecuado y una vida larga Bouton Espaciador Ecrou Conjunto del pifi6n Ioco Engranaje piano Espaciador Resorte del pifi6n Fijador de correa inferior Engranaje t e piano Potea det cabezat de la recoriadora MOTOR VELOCIDAD DEL MOTOR La velocidad del motor ha sido ajustada en la f_ brica No trate de aumentar la v...

Page 29: ...nte termine y el carburador este vac o Nunca use los productos para limpieza del carburador o del motor en el estanque de combustible pues se pueden producir da_os permanentes Use combustible nuevo la pr6xima temporada AVlSO El estabilizador de combustible es una alternativa aceptable para reducir a un m nimo la formaci6n de dep6sitos de goma en el combustible durante el periodo de almacenamiento ...

Page 30: ...nte ins talada reemplazada 2 Clip del sujetador roto 3 Linea de la recortadora de medida incorrecta CORRECCION 1 Limpie cambie el filtro de aire 2 Llene el estanque de combus tible 3 Vaciar el estanque y vuelva a Ilenarlo con combustible limpio y nueva 4 Vaciar el estanque y vuelva a Ilenarlo con combustible limpio y nueva 5 Conecte el alambre a la buj a 6 7 2 4 Cambie la buj a Mover la palanca de...

Page 31: ...ue aumenta apro imadamente 1 7 pies de altura pot cada 10 pies Una inclinaci6n de 15 grados es una cuesta que aumenta apro imadamente 2 5 pies de altura pot carla 10 pies Use extrema precauci6n y evite cambios de direcci6n o movimientos bruscos y repenUnos cuando recorte en cuestas Siga ias instrucciones adicionales en este manual para recortar con seguridad en las cuestas Opere la recortadora de ...

Page 32: ...CRAFTSMAN WEED TRIMMER MODEL NUMBER 917 773744 30 28 18 20 21 16 10 1 11 26 31 27 26 25 24 3 38 _ 37 36 27 32 ...

Page 33: ... x 3 4 Handle Upper Bolt Handle Knob Handle Handle Adjuster Assembly Guide Rope Wire Tire Control Bar Throttle Control Screw Hex Washer Head Axle Shaft Assembly Screw Hex Washer Head 5 16 18 x 3 4 Spacer O Ring Wheel Tire Assembly 12 x 1 3 4 Nut Hex Flangelock 3 8 16 Drive Control Cable Decal Warning Decal Engine Cover Bracket Support Axle Shaft Nut Bracket Upstop Screw Threaded Rolled 10 24 x 5 8...

Page 34: ...CRAFTSMAN WEED TRIMMER MODEL NUMBER 917 773744 52 1 20 4721 _ 14 43 4 40 17 I _8 _ _ 2322 12 24 5 25 41 26 6 9 27 45 19 28 3 32 j 29 27 o_ 31 33 34 ...

Page 35: ...lt Shoulder Locknut Hex 5 16 18 Spacer Bolt Shoulder Nut Hex Flangelock Spring Return Deflector Bottom Screw 1 4 20 x 1 2 Screw 10 24 x 3 4 Belt Keeper Cover Chassis Top Screw 10 24 x 1 3 4 Nut Hex 3 8 24 UNF Washer Lock 3 8 Washer Flat 3 8 Pulley Driven Spacer Pulley Bearing Jackshaft Cover Chassis Bottom Spindle Housing Assembly Includes Upper Bearing Key Number 27 Ring Retaining External 17mm S...

Page 36: ...ODEL NUMBER 126M02 1378 B1 I _SSHORTBLOOK I 10_8OPERATOR SMA UAL 11329REP_OEME TE G E I I 1330REPA RMANUALI 306 13 7 _ _ o 5 U 33 635 _y 684 _ 40 45 _jS _ 36 _ _ _J 33 _U _ _ 35 _ _ X _ _4_ _o_ _ 615 404 _ _J 24 287 524 _ 27 32 12 36 ...

Page 37: ...BRIGGS STRATTON 4 CYCLE ENGINE MODEL NUMBER 126M02 1378 B1 365_ 163 127 188_ 883 6Ol 968 535 445 443 668 _S jf j_ 209_J 202_ _ fY _ 163 11A 725 676 37 ...

Page 38: ...BRIGGS STRATTON 4 CYCLE ENGINE MODEL NUMBER 126M02 1378 B1 1036 EMISSIONS LABEL 604 703 55 592 1211 1210 58 6O 689 _3_ 456 _ 597 949 78 304 37 305 332 455 _ _j 334 1005 635 23 356 J__ 38 ...

Page 39: ...ll be lower and is affected by among other things ambi ent operating conditions and engine to engine variability Given both the wide array of products on which engines are placed and the variety of environmental issues applicable to operating the equipment the gas engine will not develop the rated gross power when used in a given piece of power equipment actual on site or net horsepower This diffe...

Page 40: ... 23 790536 Flywheel 134 398188 Kit Needle Seat 24 222698s Key Flywheel 137 796610 Gasket Float Bowl 25 590404 Piston Assembly Standard 163 795629 Gasket Air Cleaner 590405 Piston Assembly 187 791766 Line Fuel 020 Oversize Cut to Required Length 26 590402 Ring Set Standard 188 693999 Screw Control Bracket 590403 Ring Set 020 Oversize 190 690940 Screw Fuel Tank 27 691588 Lock Piston Pin 202 691829 L...

Page 41: ... Rewind 1095 Screw Muffler 1210 Retainer Governor Shaft Crank Governor 1211 SeaI O Ring Intake Manifold Switch Stop Brake 1311 Seal Choke Throttle Shaft 1329 Throttle Shaft 1330 Boot Spark Plug Spacer Control Bracket Deflector Muffler Screw Muffler Deflector Screw Breather Passage Cover Spring Friction Clip Pin Locating Shield Heat Gear Timing SeaI O Ring Dipstick Tube 692047 493880s 590410 691155...

Page 42: ...S_RV C_ NOTES 42 ...

Page 43: ...S_RV C_ NOTES 43 ...

Page 44: ...OME Anytime day or night 1 800 469 4663 U S A and Canada www sears com www sears ca Our Home For repair of carry in products like vacuums lawn equipment and electronics call or go on line for the nearest Sears Parts and Repair Center 1 800 488 1222 Anytime day or night U S A only www sears com To purchase a protection agreement U S A or maintenance agreement Canada on a product serviced by Sears 1...

Reviews: