background image

INSTALLATION AND OPERATION MANUAL 

CNGE28FX4TX24MS(2,POE2/48)

Layer 2 Industrially Hardened Managed Ethernet Switch  

All Gigabit 24 TX with PoE+ and 4 Combo Ports

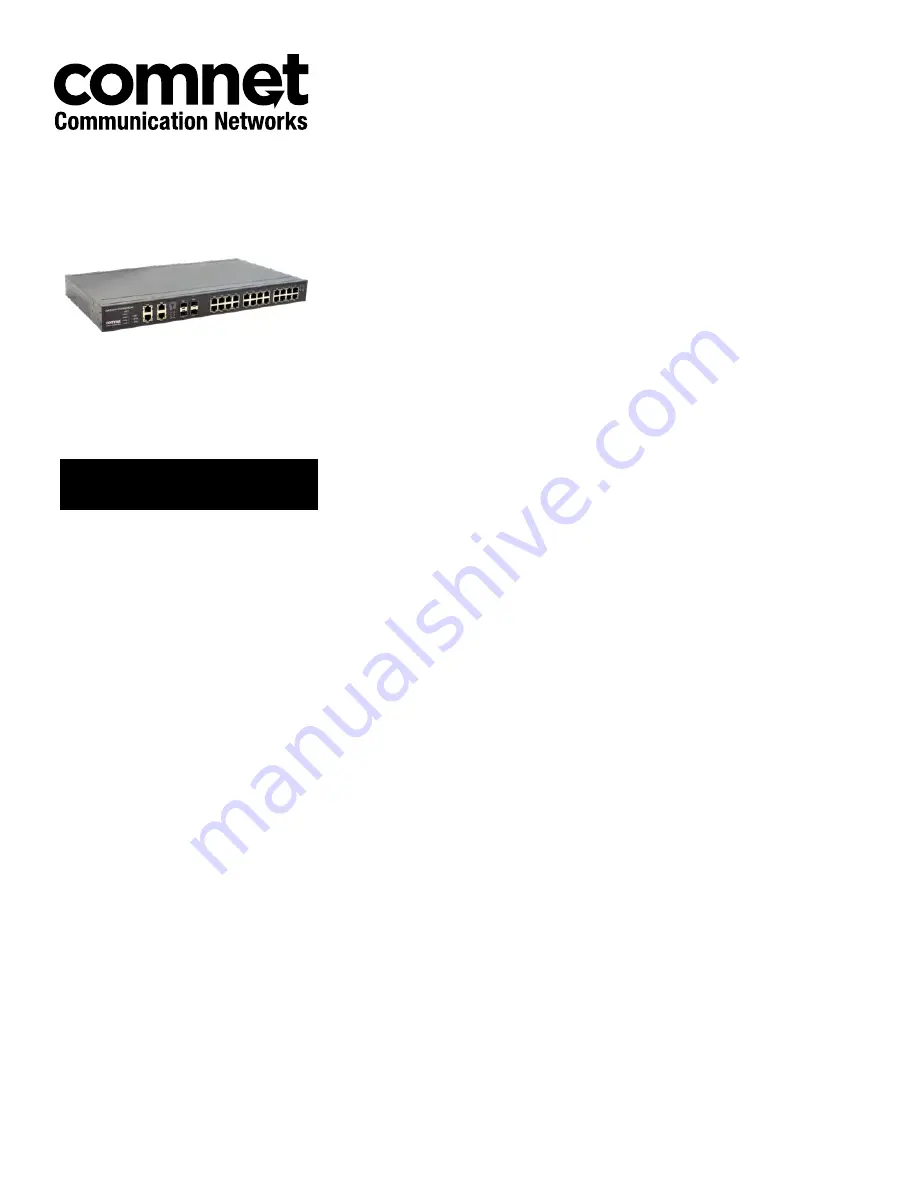
The ComNet CNGE28FX4TX24MS(2,POE2/48) Layer 2 Managed 28 Port Ethernet 
Switch supports twenty-four 10/100/1000 BASE-TX ports and four 10/100/1000 
BASE-TX or 100/1000 BASE-FX SFP Combo ports of Ethernet data. PoE+ power is 
available for distribution across all 24 BASE-TX ports. The four combination ports are 
10/100/1000TX or 100/1000FX SFP configurable for fiber type (multimode or single-
mode), connector type and distance. Dual 48 VDC input power design ensures vital 
network capabilities with minimum downtime. Utilizing RSTP/STP (802.1w/1D) MSTP, 
and X-Ring redundant ring topologies, a network recovery time of <20 ms is provided 
for protection from network faults or temporary interruptions. The switch is optically 
(100/1000BASE-FX) and electrically compatible with any IEEE 802.3 compliant 
Ethernet device and are hardened for use in harsh operating environments.

This manual serves the following 

ComNet Model Numbers:

CNGE28FX4TX24MS2
CNGE28FX4TX24MSPOE2/48

Summary of Contents for CNGE28FX4TX24MS2

Page 1: ... ports are 10 100 1000TX or 100 1000FX SFP configurable for fiber type multimode or single mode connector type and distance Dual 48 VDC input power design ensures vital network capabilities with minimum downtime Utilizing RSTP STP 802 1w 1D MSTP and X Ring redundant ring topologies a network recovery time of 20 ms is provided for protection from network faults or temporary interruptions The switch...

Page 2: ...duct Overview 7 1 1 Specifications 7 1 2 Hardware Views 8 1 3 Dimensions 11 1 4 Packing List 12 2 0 Installation Guidelines 13 2 1 Warnings 13 2 2 Installation Guidelines 14 2 4 Verifying Switch Operation 15 2 5 Installing the Switch 16 2 6 Installing and Removing SFP Modules 17 2 7 Connecting the Switch to Ethernet Ports 20 2 8 Connecting the Switch to Console Port 21 2 9 Power Supply Installatio...

Page 3: ...2 POE2 48 TECH SUPPORT 1 888 678 9427 4 0 Switch Management 32 4 1 Log In 32 4 2 Recommended Practices 33 4 3 Monitoring 34 4 4 System 40 4 5 L2 Switching 47 4 6 MAC Address Table 82 4 7 Security 85 4 8 QoS 99 4 9 Management 111 4 10 Diagnostics 135 4 11 Tools 145 APPENDIX 151 Troubleshooting 151 ...

Page 4: ...ed improperly installed or damaged by accidents Please refer to the Technical Specifications section for the actual warranty period s of the product s associated with this publication Disclaimer Information in this publication is intended to be accurate ComNet shall not be responsible for its use or infringements on third parties as a result of its use There may occasionally be unintentional error...

Page 5: ...trial enclosure In order to protect the product from being damaged by ESD Electrostatic Discharge and EMI leakage we strongly recommend the use of CE compliant industrial enclosure products FCC Class A This equipment has been tested and found to comply with the limits for a Class A digital device pursuant to part 15 of the FCC Rules These limits are designed to provide reasonable protection agains...

Page 6: ...o not place anything over the power cord All cautions and warning on the equipment should be noted If the equipment is not used for a long time disconnect it from the power source to avoid damage by transient over voltage Never pour any liquid into an opening This may cause fire or electrical shock Never open the equipment For safety reasons the equipment should be opened only by qualified service...

Page 7: ...only for CNGE28FX4TX24MSPOE2 48 Environment Operating Temperature 40 C 75 C 40 F 167 F Storage Temperature 40 C 85 C 40 F 185 F Ambient Relative Humidity 10 95 non condensing Switch Properties MAC Address 8K entry Switching Bandwidth 56 Gbps Power Power Consumption CNGE28FX4TX24MS2 20W 24V CNGE28FX4TX24MSPOE2 48 20W 48V before PoE Load Power Input CNGE28FX4TX24MS2 12 48 VDC CNGE28FX4TX24MSPOE2 48 ...

Page 8: ...1 Reset button Button allows for system soft reset or factory default reset 2 System LED panel See System LED Panel on page 4 for further details 3 ETH port RJ45 ports x 4 4 SFP LEDs SFP link activity LEDs 5 ETH port Fiber ports x 4 6 PoE LED Orange 100M Green 1G 7 LNK ACT LED Link activity LED 8 ETH port RJ45 ports x 24 System LED Panel 1 2 3 4 5 6 7 8 9 10 11 Figure 1 2 System LED Panel Table 1 ...

Page 9: ...lled 4 P FAIL Solid Red PWR1 or PWR2 is disconnected Off PWR1 or PWR2 connected 5 LOOP Solid Red Loop detected Off No loop detected 6 R M Solid Green Switch is Ring Master 7 Ring Fail 8 Temp SFP 9 SFP LED Solid Green SFP plug in and link up Blink Green Packet transmit receive Off SFP unplugged or link down RJ45 10 PoE Solid Green Connected to power supply and able to act as PSE Off Disconnected fr...

Page 10: ...2 Rear View 1 2 3 4 Figure 1 3 Rear View Table 1 4 Rear View No Item Description 1 Ground terminal Screw terminal used to ground chassis 2 Console serial port Console cable port to COM port DB9 male on computer to RS232 managed switch RJ45 female 3 P Fail block Connect cabling for alarm wiring 4 Power block Connect cabling for power wiring ...

Page 11: ...INS_CNGE28FX4TX24MS 2 POE2 48 04 30 18 PAGE 11 INSTALLATION AND OPERATION MANUAL CNGE28FX4TX24MS 2 POE2 48 TECH SUPPORT 1 888 678 9427 1 3 Dimensions Figure 1 4 CNGE28FX4TX24MSPOE2 48 Dimensions ...

Page 12: ...2 48 TECH SUPPORT 1 888 678 9427 1 4 Packing List The product package you have received should contain the following items If any of them are not included or are damaged please contact your local vendor for support 1 Industrial Ethernet Switch 1 Rack Mount Kit 1 Quick Start Guide 1 Serial Console Cable ...

Page 13: ...s power source This unit is intended for installation in restricted access areas A restricted access area is defined as an area that can be accessed only through the use of a special tool lock and key or other means of security The device must be grounded Never defeat the ground conductor or operate the equipment in the absence of a suitably installed ground conductor This unit may have more than ...

Page 14: ... installation This equipment is intended for use in a Pollution Degree 2 industrial environment in over voltage Category II applications as defined in IEC publication 60664 1 at altitudes up to 9842 ft 3 km without derating This equipment is considered Group 1 Class A industrial equipment according to IEC CISPR Publication 11 Without appropriate precautions there may be potential difficulties ensu...

Page 15: ...nnect the cabling to the power source see Power Supply Installation on page 15 At startup POST the System LED blinks green while the remaining LEDs are a solidy green Once the switch passes POST self test the System LED turns green The other LEDs turn off and return to their operating status If the switch fails POST the System LED switches to an amber state After a successful self test power down ...

Page 16: ... Installing the Switch 2 5 1 Rack Mounting 1 Align the rack mount brackets with the holes on the switch 2 Secure the rack mount brackets with the provided screws Figure 2 1 Installing the Rack Mount Brackets 3 Align the switch with the posts on the rack cabinet 4 Secure the switch with the provided screws Figure 2 2 Installing the Switch ...

Page 17: ...e II to device I for full duplex transmission Remember to connect the Tx transmit port of device I to the Rx receive port of device II and the Rx receive port of device I to the Tx transmit port of device II If you make your own cable we suggest labeling the two sides of the same line with the same letter A to A and B to B or A1 to A2 and B1 to B2 2 6 1 Installing SFP Modules To connect the fiber ...

Page 18: ...he dust plug from the transceiver if you are not installing the fiber optic cable at this time The dust plug protects hardware from dust contamination 7 Insert the fiber cable into the transceiver The connector snaps into place and locks Figure 2 5 Attaching a Fiber Optic Cable to a Transceiver 8 Repeat the previous procedures to install any additional SFP transceivers in the switch The fiber port...

Page 19: ...888 678 9427 Figure 2 6 Removing a Fiber Optic Cable to a Transceiver 3 Hold the handle on the transceiver and pull the transceiver out of the slot Handle Figure 2 7 Removing an SFP Transceiver Replace the dust plug on the slot if you are not installing a transceiver The dust plug protects hardware from dust contamination ...

Page 20: ...ded The connector bodies on the RJ45 Ethernet ports are metallic and connected to the GND terminal For best performance use shielded cabling Shielded cabling may be used to provide further protection Table 2 1 RJ45 Ethernet Wiring for Reference Straight thru Cable Wiring Cross over Cable Wiring Pin 1 Pin 1 Pin 1 Pin 3 Pin 2 Pin 2 Pin 2 Pin 6 Pin 3 Pin 3 Pin 3 Pin 1 Pin 6 Pin 6 Pin 6 Pin 2 Figure 2...

Page 21: ...he RJ45 to RS232 serial cable between a COM port on your PC 9 pin D sub female and the switch s RJ45 RJ45 port a wired connection for management can be established To terminal or PC To console port Figure 2 9 Serial Console Cable 5 9 1 6 Figure 2 10 DB 9 Pin Position Table 2 2 Pin Assignment DB9 Connector RJ45 Connector NC 1 Orange White NC 2 Orange 2 3 Green White NC 4 Blue 5 5 Blue White 3 6 Gre...

Page 22: ... power supply unit to reduce network down time as a result of power loss Dual power inputs are supported and allow you to connect a backup power source Single DC Power Redundant DC Power P2 P1 Chassis GND pane One DC Supply Dual DC Supplies Chassis GND pane P2 P1 Figure 2 12 Power Wiring for Managed Ethernet Switch 2 9 2 Considerations Take into consideration the following guidelines before wiring...

Page 23: ...nterference EMI affects the transmission performance of a device By properly grounding the device to earth ground through a drain wire you can setup the best possible noise immunity and emissions Connection to Grounding Point Drain Wire with Lug Console Figure 2 13 Grounding Connection By connecting the ground terminal by drain wire to earth ground the switch and chassis can be ground Before apply...

Page 24: ...rations The power input 2 is used for wiring a redundant power configuration See the following for terminal block connector views PWR2 PWR1 V2 V2 V1 V1 Figure 2 15 Terminal Receptor Power Input Contacts To wire the power inputs Make sure the power is not connected to the switch or the power converter before proceed ing 1 Insert a small flat bladed screwdriver in the V1 V1 wire clamp screws and loo...

Page 25: ...UAL CNGE28FX4TX24MS 2 POE2 48 TECH SUPPORT 1 888 678 9427 2 10 Reset Button Reset configuration to factory default Press and hold Reset button for 5 seconds System reboot Press and hold Reset button for 2 seconds Do NOT power off the Ethernet switch when loading default settings ...

Page 26: ...tocol RSTP and Simple Network Man agement Protocol SNMP to provide most of the services offered by the switch Rapid Spanning Tree Protocol allows managed switches to communicate with each other to ensure that there exists only one active route between each pair of network nodes and pro vides automatic failover to the next available redundant route A brief explanation of how RSTP works is given in ...

Page 27: ...browser such as Opera Mozilla or Internet Explorer JavaScript must be supported and enabled in your browser for the graphical inter face to work correctly HTTP and HTTPS secure HTTP are supported for access to the web server By default both protocols are enabled Either or both may be disabled to secure the switch See the Remote Access Security topic in this section To access the graphical interfac...

Page 28: ...HCP This can speed up initial set up as the network administrator does not have to find an open IP address IP Address and subnet mask configuration The IP address for the switch can be changed to a user defined address along with a customized subnet mask to separate subnets Advanced users can set the IP address to 0 0 0 0 to disable the use of an IP address for additional security However any feat...

Page 29: ...apable of autonegotiation such that the fastest bandwidth is selected Choose to enable auto negotiation or use fixed settings 100Mbps Fiber ports are Fixed speed only Speed Duplex Flow Control The managed switch accepts three local area network Ethernet Standards The first standard 10BASE T runs 10Mbps with twisted pair Ether net cable between network interfaces The second local area network stand...

Page 30: ...work section will have parameters for DHCP IP address subnet mask and default gate way value is the new value of the parameter If value is omitted the current value is dis played Please note that new values will not take effect until explicitly committed Sections and parameter names are case sensitive e g Network is not the same as net work Any commands in the CLI Commands section of this chapter ...

Page 31: ...ion and connection of the switch to the existing network A PC also connected to the network is required to connect to the switch and access the inter face through a web browser The required networking information is provided as follows IP address 192 168 10 1 Subnet mask 255 255 255 0 Default gateway 192 168 10 254 User name admin Password admin 3 3 2 System Login Once the switch is installed and ...

Page 32: ...tch When the switch is first installed the default network configuration is set to DHCP enabled You will need to make sure your network environment supports the switch setup before connecting it to the network 1 Launch your web browser on a computer 2 In the browser s address bar type in the switch s default IP address 192 168 10 1 The login screen displays 3 Enter the default user name and passwo...

Page 33: ...d security practices it is recommended that you change the default password as soon as the device is functioning and setup correctly The following details the necessary steps to change the default password To change the password 1 Navigate to Tools User Account 2 From the User drop down menu select the Admin default account 3 In the User Name field enter admin for this account It is not necessary ...

Page 34: ...umeric characters default is Switch System Location Click Default to enter the location up to 256 alphanumeric characters default is Default System Contact Click Default to enter the contact person up to 128 alphanumeric characters default is Default MAC Address Displays the MAC address of the switch IP Address Displays the assigned IP address of the switch Subnet Mask Displays the assigned subnet...

Page 35: ...severity level target setting The level options are emerg Indicates system is unusable It is the highest level of severity alert Indicates action must be taken immediately crit Indicates critical conditions error Indicates error conditions warning Indicates warning conditions notice Indicates normal but significant conditions info Indicates informational messages debug Indicates debug level messag...

Page 36: ...st Pkts ifInNUcastPkts ifInDiscards ifOutOctets ifOutUcastPkts ifOutNUcastPkts ifOutDis cards ifInMulticastPkts ifInBroadcastPkts ifOutMulticastPkts and ifOutBroadcastPkts The ensuing table for Ether Like MIB Counters settings are informational only dot3StatsAlignmentErrors dot3StatsFCSErrors dot3StatsSingleCollisionFrames dot3StatsMultipleCollisionFrames dot3StatsDeferredTransmissions dot3StatsLa...

Page 37: ...to refresh the information TX and RX listings IFG Click the drop down menu to enable or disable the Interframe Gap IFG statistic 4 3 4 Link Aggregation The Link Aggregation function provides LAG information for each trunk It displays membership status link state and membership type for each port To access this page click Monitoring Link Aggregation The ensuing table for Link Aggregation Group Stat...

Page 38: ...nitoring LLDP Statistics Item Description Clear Click Clear to reset LLDP Statistics of all the interfaces Refresh Click Refresh to update the data on the screen with the present state of the data in the switch The ensuing table for LLDP Global Statistics settings are informational only Insertions Deletions Drops and Age Outs The ensuing table for LLDP Port Statistics settings are informational on...

Page 39: ...P Statistics Table 4 6 Monitoring IGMP Statistics Item Description Clear Click Clear to refresh IGMP Statistics of all the interfaces Refresh Click Refresh to update the data on the screen with the present state of the data in the switch The ensuing table for IGMP Statistics settings are informational only Total RX Valid RX Invalid RX Other RX Leave RX Report RX General Query RX Special Group Quer...

Page 40: ...nter a value to specify the IP address of the interface The default is 192 168 10 1 Subnet Mask Enter a value to specify the IP subnet mask for the interface The default is 255 255 255 0 Gateway Enter a value to specify the default gateway for the interface The default is 192 168 1 254 DNS Server 1 Enter a value to specify the DNS server 1 for the interface The default is 168 95 1 1 DNS Server 2 E...

Page 41: ...2 configurable Circuit ID and Remote ID feature enhances validation security by allowing you to select naming choices suboptions You can select a switch configured hostname or specify an ASCII test string for the remote ID You can also configure an ASCII text string to override the circuit ID To access this page click System DHCP Client Option 82 Figure 4 10 System DHCP Client Option 82 ...

Page 42: ...D User Define Enter the remote user definition of the corresponding class Apply Click Apply to save the values and update the screen The ensuing table for DHCP Client Option 82 Information table settings are informational only Status Circuit ID Format Circuit ID String Circuit ID Hex Circuit ID User Define Remote ID Format Remote ID String Remote ID Hex and Remote ID User Define 4 4 3 DHCP Auto Pr...

Page 43: ...iption Auto Configuration Select the radio button to enable or disable the IPv6 IPv6 Address Enter the IPv6 address for the system Gateway Enter the gateway address for the system DHCPv6 Client Enter the DHCPv6 address for the system Apply Click Apply to save the values and update the screen The ensuing table for IPv6 Information settings are informational only Auto Configuration IPv6 In Use Addre...

Page 44: ...roviding communication with the switch management interface To access this page click System Management VLAN Figure 4 13 System Management VLAN Table 4 11 System Management VLAN Item Description Management VLAN Click the drop down menu to select a defined VLAN Apply Click Apply to save the values and update the screen The ensuing table for Management VLAN State are informational only Management VL...

Page 45: ...TX24MS 2 POE2 48 04 30 18 PAGE 45 INSTALLATION AND OPERATION MANUAL CNGE28FX4TX24MS 2 POE2 48 TECH SUPPORT 1 888 678 9427 4 4 6 System Time To access this page click System System Time Figure 4 14 System System Time ...

Page 46: ... system Time Zone Click the drop down menu to select a system time zone Daylight Saving Time Click the drop down menu to enable or disable the daylight saving time settings Daylight Saving Time Offset Enter the offsetting variable in seconds to adjust for daylight saving time Recurring From Click the drop down menu to designate the start date and time for daylight saving time Recurring To Click th...

Page 47: ...drop down menu to select the port for the L2 Switch setting Enabled Click the radio button to enable or disable the Port Setting function Speed Click the drop down menu to select the port speed Auto Auto 10M Auto 100M Auto 1000M Auto 10 100M 10M 100M or 1000M Duplex Click the drop down menu to select the duplex setting Half or Full Flow Control Click the radio button to enable or disable the flow ...

Page 48: ...ts seen on one switch port to a network monitoring connection on another switch port Port mirroring can be used to analyze and debug data or diagnose errors on a network or to mirror either inbound or outbound traffic or both There are no preset values in the Port Mirror The displayed values do not represent the actual setting values To access this page click L2 Switching Port Mirror Figure 4 16 L...

Page 49: ...creen The ensuing table for Mirror Status settings are informational only Session ID Destination Port Ingress State Source TX Port and Source RX Port 4 5 3 Link Aggregation Link Aggregation is a method for combining multiple network connections in parallel in order to increase throughput beyond the capability of a single connection and to provide redundancy in case one of the links should fail Loa...

Page 50: ...4 18 L2 Switching Link Aggregation LAG Management Table 4 16 L2 Switching Link Aggregation LAG Management Item Description LAG Click the drop down menu to select the designated trunk group Trunk 1 8 Name Enter an entry to specify the LAG name Type Click the radio button to specify the type mode Static or LACP Ports Click the drop down menu to select designated ports FE1 8 or GE1 2 Apply Click Appl...

Page 51: ...ble 4 17 L2 Switching Link Aggregation LAG Port Settings Item Description LAG Select Click the drop down menu to select a predefined LAG trunk definition LAG 1 8 Enabled Click the radio button to enable or disable the LAG Port Speed Click the drop down menu to select the port speed Auto Auto 10M Auto 100M Auto 1000M Auto 10 100M 10M 100M or 1000M Flow Control Click the radio button to enable or di...

Page 52: ... Priority Enter the value 1 65535 to designate the LACP system priority Apply Click Apply to save the values and update the screen The ensuing table for LACP Information settings are informational only System Priority LACP Port Settings Link Aggregation Control Protocol LACP provides a method to control the bundling of several physical ports together to form a single logical channel By configuring...

Page 53: ... Enables LACP only when an LACP device is detected default state Apply Click Apply to save the values and update the screen The ensuing table for LACP Port Information settings are informational only Port Name Priority Timeout and Mode 4 5 4 802 1Q VLAN The 802 1Q VLAN feature allows for a single VLAN to support multiple VLANs With the 802 1Q feature you can preserve VLAN IDs and segregate differe...

Page 54: ...eld VLAN Name Prefix Enter the prefix to be used by the VLAN list entry in the previous field Apply Click Apply to save the values and update the screen The ensuing table for VLAN Table settings are informational only VLAN ID VLAN Name VLAN Type and Edit click to enter VLAN name PVID Settings The PVID Settings page allows you to designate a PVID for a selected port define the accepted type and ena...

Page 55: ...gged or priority tagged frames Untag Only discards any tagged frames All accepts all untagged and tagged frames Whichever you select VLAN tagged frames are forwarded in accordance with the IEEE 802 1Q VLAN standard The default is All Ingress Filtering Click the radio button to specify how you want the port to handle tagged frames If you enable Ingress Filtering a tagged frame will be discarded if ...

Page 56: ...ANUAL CNGE28FX4TX24MS 2 POE2 48 TECH SUPPORT 1 888 678 9427 Port to VLAN The Port to VLAN page allows you to add a port to a VLAN and select the related parameters To access this page click L2 Switching 802 1Q VLAN Port to VLAN Figure 4 24 L2 Switching 802 1Q VLAN Port to VLAN ...

Page 57: ...AN Mapping Table settings are informational only Port Mode Administrative VLANs and Operational VLANs 4 5 5 Q in Q Q in Q is commonly referred as VLAN stacking in which VLANs are nested by adding two tags to each frame instead of one Network service provider and users both can use VLANs and makes it possible to have more than the 4094 separate VLANs allowed by 802 1Q There are three ways in which ...

Page 58: ...L2 Switching Q in Q Global Settings Item Description Outer VLAN Ethertype Enter the outer VLAN handled by the switch giving the attached machine a single tagged 802 1Q VLAN frame Apply Click Apply to save the values and update the screen The ensuing table for QinQ Global Information settings are informational only Outer VLAN Ethertype Port Settings The Port Settings page allows you to define the o...

Page 59: ...ve VLAN ID All untagged traffic coming in or out of the 802 1Q port is forwarded based on the PVID value Outer Mode Click the drop down menu to select between UNI or NNI role UNI Selects a user network interface which specifies communication between the specified user and a specified network NNI Selects a network to network interface which specifies communication between two specified networks App...

Page 60: ... a value to specify the time to wait after receiving an unregister request for a VLAN or multicast group before deleting the associated entry in centiseconds This allows time for another station to assert registration for the same attribute in order to maintain uninterrupted service Enter a number between 12 and 3000 An instance of this timer exists for each GARP participant for each port Leave Al...

Page 61: ...ates control of virtual local area networks VLANs within a larger network To access this page click L2 Switching GARP GVRP Settings Figure 4 28 L2 Switching GARP GVRP Settings Table 4 26 L2 Switching GARP GVRP Settings Item Description Status Click to enable or disable the GARP VLAN Registration Protocol administrative mode for the switch The factory default is Disable Apply Click Apply to save th...

Page 62: ...link detection Inactive link detection function automatically reduces power usage when inactive links or devices are detected To access this page click L2 Switching 802 3az EEE Figure 4 29 L2 Switching 802 3az EEE Table 4 27 L2 Switching 802 3az EEE Item Description Port Select Enter the port to setup the EEE function State Click Enabled or Disabled to set the state mode of the port select setting...

Page 63: ...ticast Multicast Filtering Figure 4 30 L2 Switching Multicast Multicast Filtering Table 4 28 L2 Switching Multicast Multicast Filtering Item Description Unknown Multicast Action Select the configuration protocol Drop Flood or Router Port to apply for any unknown multicast event Apply Click Apply to save the values and update the screen The ensuing table for Properties Information settings are info...

Page 64: ...te the IGMP Snooping Version V2 or V3 IGMP Snooping Report Suppression Select Enable or Disable to setup the report suppression for IGMP Snooping Apply Click Apply to save the values and update the screen The ensuing table for IGMP Snooping Information settings are informational only IGMP Snooping State IGMP Snooping Version and IGMP Snooping V2 Report Suppression The ensuing table for IGMP Snoopi...

Page 65: ...g IGMP Querier Figure 4 32 L2 Switching Multicast IGMP Snooping IGMP Querier Table 4 30 L2 Switching Multicast IGMP Snooping IGMP Querier Item Description VLAN ID Select the VLAN ID to define the local IGMP querier Querier State Select Disable or Enable to configure the VLAN ID IGMP Querier Querier Version Select the querier version V2 or V3 designated to the selected VLAN ID Apply Click Apply to ...

Page 66: ...dress assigned to the VLAN ID Member Ports Enter the port numbers to associate with the static group Add Click Add to add an IGMP group The ensuing table for IGMP Static Groups Status settings are informational only VLAN ID Group IP Address Member Ports and Modify Multicast Groups To access this page click L2 Switching Multicast IGMP Snooping Multicast Groups The ensuing table for Multicast Groups...

Page 67: ...m Description MLD Snooping State Select Enable or Disable to setup the MLD Snooping State MLD Snooping Version Select the querier version V1 or V2 designated to the MLD Snooping Version MLD Snooping Report Suppression Select Enable or Disable to designate the status of the report suppression Apply Click Apply to save the values and update the screen The ensuing table for MLD Snooping Information s...

Page 68: ...ast MLD Snooping MLD Querier Table 4 33 L2 Switching Multicast MLD Snooping MLD Querier Item Description VLAN ID Enter the VLAN ID to configure Querier State Select Enable or Disable status on the selected VLAN Enable Enable IGMP Querier Election Disable Disable IGMP Querier Election Querier Version Select the querier version IGMPV1 or IGMPV2 designated to the MLD Querier function Apply Click Appl...

Page 69: ...tatic Group Group IP Address Enter the IP address associated with the static group Member Ports Enter the ports designated with the static group Add Click Add to add a MLD static group The ensuing table for MLD Static Groups Status settings are informational only VLAN ID Group IP Address Member Ports and Modify Multicast Groups To access this page click L2 Switching Multicast MLD Snooping Multicas...

Page 70: ...o Frame function allows the configuration of Ethernet frame size To access this page click L2 Switching Jumbo Frame Figure 4 37 L2 Switching Jumbo Frame Table 4 35 L2 Switching Jumbo Frame Item Description Jumbo Frame Bytes Enter the variable in bytes 1518 to 9216 to define the jumbo frame size Apply Click Apply to save the values and update the screen The ensuing table for Jumbo Frame Config sett...

Page 71: ... Global Settings Figure 4 38 L2 Switching Spanning Tree STP Global Settings Table 4 36 L2 Switching Spanning Tree STP Global Settings Item Description Enabled Click the radio button to enable or disable the STP status BPDU Forward Select flooding or filtering to designate the type of BPDU packet PathCost Method Select short or long to define the method of used for path cost calculations Force Vers...

Page 72: ...to setup the admin profile for the STP port Path Cost 0 Auto Set the port s cost contribution For a root port the root path cost for the bridge 0 means Auto Edge Port Click the drop down menu to set the edge port configuration No Force to false state as link to a bridge Yes Force to true state as link to a host P2P MAC Click the drop down menu to set the Point to Point port configuration No Force ...

Page 73: ...to select the STP bridge priority Forward Delay Enter the variable 4 to 30 to set the forward delay for STP bridge settings Max Age Enter the variable 6 to 40 to set the Max age for STP bridge settings Tx Hold Count Enter the variable 1 to 10 to designate the TX hold count for STP bridge settings Hello Time Enter the variable 1 to 10 to designate the Hello Time for STP bridge settings Apply Click ...

Page 74: ... Select the port to designate the STP settings Priority Click the drop down menu to designate a priority Apply Click Apply to save the values and update the screen The ensuing table for STP Port Status settings are informational only Port Identifier Priority Port Id Path Cost Conf Oper Designated Root Bridge Root Path Cost Designated Bridge Edge Port Conf Oper P2P MAC Conf Oper Port Role and Port ...

Page 75: ...ing table for MST Configuration Identification Information settings are informational only Configuration Name and Revision Level MST Instance ID Settings The MST Instance ID Settings page allows you to edit the MSTI ID and VID List settings To access this page click L2 Switching Spanning Tree MST Instance ID Settings Figure 4 43 L2 Switching Spanning Tree MST Instance ID Settings Table 4 41 L2 Swi...

Page 76: ... update the screen The ensuing table for MST Instance Priority Information settings are informational only MSTI ID Priority and Action MST Instance Info To access this page click L2 Switching Spanning Tree MST Instance Info The ensuing table for STP Bridge Status settings are informational only Bridge Identifier Designated Root Bridge Root Path Cost Designated Bridge Root Port and TCNLast Topology...

Page 77: ...To access this page click L2 Switching X Ring Elite X Ring Elite Settings Figure 4 45 L2 Switching X Ring Elite X Ring Elite Settings Table 4 43 L2 Switching X Ring Elite X Ring Elite Settings Item Description State Select Enabled or Disabled to setup the X Ring Elite mode Apply Click Apply to save the values and update the screen The ensuing table for Information settings are informational only X...

Page 78: ...ID Role Port 1 Port 2 and Delete click to delete the desired Ring ID 4 5 12 X Ring Pro The X Ring Pro function provides an improvement over Spanning Tree and Rapid Spanning Tree and a rapid auto recovery in the event that the network suffers a corrupt or broken link and prevents network loops X Ring Pro Settings The X Ring Pro Settings page allows you to configure the status enabled or disabled of...

Page 79: ... Port 1 Click the drop down menu to define the port designation Port 2 Click the drop down menu to define the port designation Add Click Add to save the values and update the screen Figure 4 49 L2 Switching X Ring Pro X Ring Pro Groups Couple Setting Table 4 47 L2 Switching X Ring Pro X Ring Pro Groups Couple Setting Item Description Couple Ring ID Enter a number to specifies a ranging from 1 to 2...

Page 80: ...h frames are transmitted and the delay before recovery To access this page click L2 Switching Loopback Detection Global Settings Figure 4 50 L2 Switching Loopback Detection Global Settings Table 4 48 L2 Switching Loopback Detection Global Settings Item Description State Select Enabled or Disabled to setup the loopback mode Interval Enter the variable in seconds 1 to 32767 to set the interval at wh...

Page 81: ...e click L2 Switching Loopback Detection Port Settings Figure 4 51 L2 Switching Loopback Detection Port Settings Table 4 49 L2 Switching Loopback Detection Port Settings Item Description Port Select Enter the port to define the local loopback detection setting Enabled Select Enabled or Disabled to setup the Loopback Detection function Apply Click Apply to save the values and update the screen The e...

Page 82: ...nated Port To access this page click MAC Address Table Static MAC Figure 4 52 MAC Address Table Static MAC Table 4 50 MAC Address Table Static MAC Item Description MAC Address Enter the MAC address to which packets are statically forwarded VLAN Click the drop down menu to select the VLAN ID number of the VLAN for which the MAC address is residing Port Click the drop down menu to select the port nu...

Page 83: ...of the aging time to study To access this page click MAC Address Table MAC Aging Time Figure 4 53 MAC Address Table MAC Aging Time Table 4 51 MAC Address Table MAC Aging Time Item Description Aging Time Enter the variable 10 to 630 to define the time required for aging Apply Click Apply to save the values and update the screen The ensuing table for Dynamic Address Status settings are informational...

Page 84: ...ble Item Description Port Click the drop down menu to select the port number to show or clear dynamic MAC entries If a port VLAN or MAC address is not selected the whole dynamic MAC table is displayed or cleared VLAN Click the drop down menu to select the VLAN to show or clear dynamic MAC entries MAC Address Enter the MAC address to show or clear dynamic MAC entries If a port VLAN or MAC address i...

Page 85: ... LAN and consequent traffic to prevent the degrading of network performance Global Settings To access this page click Security Storm Control Global Settings Figure 4 55 Security Storm Control Global Settings Table 4 53 Security Storm Control Global Settings Item Description Unit Select pps or bps control units for the Storm Control function Preamble IFG Select Excluded or Included to setup the Sto...

Page 86: ...Port State Select Disabled or Enabled to define the port state Action Click the drop down menu to select the type of action to designate for the selected port during a Storm Control incident The options are Drop and Shutdown Type Enable Click the radio button to enable Broadcast Unknown Multicast or Unknown Unicast Broadcast Select the variable in Kbps to define the broadcast bandwidth Unknown Mul...

Page 87: ... Port Security Item Description Port Select Enter a single or multiple port numbers to configure Enabled Select Enabled or Disabled to define the selected Port FDB Learn Limit 0 64 Enter the variable 0 to 64 to set the learn limit for the FDB setting Violation MAC Notification Select Enabled or Disabled to define the selected Port Apply Click Apply to save the values and update the screen The ensu...

Page 88: ... type To access this page click Security Protected Ports Figure 4 58 Security Protected Ports Table 4 56 Security Protected Ports Item Description Port List Enter the port number to designate for the Protected Port setting Port Type Select Unprotected or Protected to define the port type Apply Click Apply to save the values and update the screen The ensuing table for Protected Ports Status setting...

Page 89: ...ATION MANUAL CNGE28FX4TX24MS 2 POE2 48 TECH SUPPORT 1 888 678 9427 4 7 4 DoS Prevention DoS Global Settings The DoS Global Settings page allows you to enabled or disable the setting for each function To access this page click Security DoS Prevention DoS Global Settings ...

Page 90: ... the IPv6 protocol Ping Max Size Setting Enter the variable in bytes 0 to 65535 to set the maximum ping size Smurf Attack Click Enabled or Disabled to set the Smurf Attack function TCP Min Hdr Size Click Enabled or Disabled to set the minimum header size Enter the variable in bytes 0 to 31 to set the minimum header size TCP SYN SPORT 1024 Click Enabled or Disabled to set the TCP synchronization fu...

Page 91: ...e click Security DoS Prevention DoS Port Settings Figure 4 60 Security DoS Prevention DoS Port Settings Table 4 58 Security DoS Prevention DoS Port Settings Item Description Port Select the port to configure for the DoS prevention function DoS Protection Click Enabled or Disabled to set the DoS Port security function state Apply Click Apply to save the values and update the screen The ensuing tabl...

Page 92: ...ions TELNET Table 4 59 Security Applications TELNET Item Description Telnet Service Click Enabled or Disabled to set remote access through the Telnet Service function Apply Click Apply to save the values and update the screen Disconnect Click Disconnect to disable the current Telnet service The ensuing table for Telnet Information settings are informational only Telnet Service and Current Telnet S...

Page 93: ...ge allows you to combine all kinds of AAA lists to the HTTP line Attempts to access the switch s Web UI from HTTP are first authenticated To access this page click Security Applications HTTP Figure 4 63 Security Applications HTTP Table 4 61 Security Applications HTTP Item Description HTTP Service Click Enabled or Disabled to set up Ethernet encapsulation remote access through HTTP function Session...

Page 94: ...cess this page click Security Applications HTTPS Figure 4 64 Security Applications HTTPS Table 4 62 Security Applications HTTPS Item Description HTTPS Service Click Enabled or Disabled to set up Ethernet encapsulation over HTTPS Session Timeout Enter the variable in minutes 0 to 86400 to define the timeout period for the HTTP session Apply Click Apply to save the values and update the screen The e...

Page 95: ...Figure 4 65 Security 802 1x 802 1x Settings Table 4 63 Security 802 1x 802 1x Settings Item Description State Click Enabled or Disabled to set up 802 1x Setting function Server IP Enter the IP address of the local server providing authentication function Server Port Enter the port number 1 to 65535 assigned to the listed Server IP Accounting Port Enter the port number 1 to 65535 assigned to the li...

Page 96: ... Configuration Figure 4 66 Security 802 1x 802 1x Port Configuration Table 4 64 Security 802 1x 802 1x Port Configuration Item Description Authentication based Click Port or Mac to designate the type of configuration for the 802 1x Port setting Port Select Enter the port number associated with the configuration setting State Click Authorize or Disabled to define the listed port s state mode Apply ...

Page 97: ...lows you to set the IP Security status enabled or disabled To access this page click Security IP Security Global Settings Figure 4 67 Security IP Security Global Settings Table 4 65 Security IP Security Global Settings Item Description Status Click Enabled or Disabled to define the global setting for the IP security function Apply Click Apply to save the values and update the screen The ensuing ta...

Page 98: ...re 4 68 Security IP Security Entry Settings Table 4 66 Security IP Security Entry Settings Item Description IP Address Enter the source IP address to apply the IP Security function IP Mask Enter the IP address for use in masking the previous IP Address Services Enter the type of services to associate with the entry setting Apply Click Apply to save the values and update the screen The ensuing tabl...

Page 99: ...n equal chance of being dropped The QoS feature can be configured for congestion management and congestion avoidance to specifically manage the priority of the traffic delivery Implementing QoS in the network makes performance predictable and bandwidth utilization much more effective The QoS implementation is based on the prioritization values in Layer 2 frames QoS Properties The QoS Properties al...

Page 100: ...Click the drop down menu to designate the Class of Service CoS value 0 to 7 for the Port entry Remark CoS Click Disabled or Enabled to setup the Remark CoS function When enabled the LAN preassigned priority values is marked at Layer 2 boundary to CoS values Remark DSCP Click Disabled or Enabled to setup the DSCP remark option for the QoS function Remark IP Precedence Click Disabled or Enabled to s...

Page 101: ...queues Packets in a high priority queue are always sent first and packets in a low priority queue are only sent after all the high priority queues are empty Weighted RoundRobin WRR scheduling is based on the user priority specification to indicate the importance weight of the queue relative to the other CoS queues WRR scheduling prevents low priority queues from being completely ignored during per...

Page 102: ...ign the scheduling designation to the selected queue WRR Select WRR to assign the scheduling designation to the selected queue Weight Enter a queue priority weight relative to the defined entries WRR only of WRR Bandwidth Displays the allotted bandwidth for the queue entry in percentage values Apply Click Apply to save the values and update the screen The ensuing table for Queue Information settin...

Page 103: ...AGE 103 INSTALLATION AND OPERATION MANUAL CNGE28FX4TX24MS 2 POE2 48 TECH SUPPORT 1 888 678 9427 CoS Mapping The CoS Mapping allows you to apply CoS mapping To access this page click QoS General CoS Mapping Figure 4 72 QoS General CoS Mapping ...

Page 104: ... the CoS type Apply Click Apply to save the values and update the screen The ensuing table for CoS Mapping Information settings are informational only CoS and Mapping to Queue The ensuing table for Queue Mapping Information settings are informational only Queue and Mapping to CoS DSCP Mapping The DSCP to Queue mapping function maps queue values in incoming packets to a DSCP value that QoS uses int...

Page 105: ...ng Queue Displays the queue value for the DSCP map DSCP Enter the DSCP entry to define the precedence values Apply Click Apply to save the values and update the screen The ensuing table for DSCP Mapping Information settings are informational only DSCP and Mapping to Queue The ensuing table for Queue Mapping Information settings are informational only Queue and Mapping to DSCP IP Precedence Mapping...

Page 106: ...dence Mapping Information settings are informational only IP Precedence and Mapping to Queue The ensuing table for Queue Mapping Information settings are informational only Queue and Mapping to IP Precedence 4 8 2 QoS Basic Mode Quality of Service QoS allows to give preferential treatment to certain types of traffic at the expense of others Without QoS the switch offers best effort service to each...

Page 107: ...are informational only Trust Mode Port Settings The Port Settings page allows you to define a trust state enabled or disabled to a listed port To access this page click QoS QoS Basic Mode Port Settings Figure 4 76 QoS QoS Basic Mode Port Settings Table 4 74 QoS QoS Basic Mode Port Settings Item Description Port Enter the port number for the QoS basic mode setting Trust State Select Enabled or Disa...

Page 108: ...width control for a listed port To access this page click QoS Rate Limit Ingress Bandwidth Control Figure 4 77 QoS Rate Limit Ingress Bandwidth Control Table 4 75 QoS Rate Limit Ingress Bandwidth Control Item Description Port Enter the port number for the rate limit setup State Select Disabled or Enabled to set the port s state status Rate Kbps Enter the value in Kbps 16 to 1000000 to set as the b...

Page 109: ...ntrol Figure 4 78 QoS Rate Limit Egress Bandwidth Control Table 4 76 QoS Rate Limit Egress Bandwidth Control Item Description Port Enter the port number to set the Egress Bandwidth Control State Select Disabled or Enabled to set the Egress Bandwidth Control state Rate Kbps Enter the value in Kbps 16 to 1000000 to set the Egress Bandwidth rate Apply Click Apply to save the values and update the scr...

Page 110: ...7 QoS Rate Limit Egress Queue Item Description Port Click the drop down menu to select the port to define the Egress queue Queue Click the drop down menu to set the queue order for the Egress setting State Click Disabled or Enabled to set the Egress queue state CIR Kbps Enter the value in Kbps 16 to 1000000 to set the CIR rate for the Egress queue Apply Click Apply to save the values and update th...

Page 111: ...cess this page click Management LLDP LLDP System Settings Figure 4 80 Management LLDP LLDP System Settings Table 4 78 Management LLDP LLDP System Settings Item Description Enabled Click Enabled or Disabled to set the Global Settings state LLDP PDU Disable Action Click to select the LLDP PDU handling action when LLDP is globally disabled Options include Filtered Bridged or Flooded Transmission Inte...

Page 112: ...Settings page allows you to configure the state enabled or disabled of the selected port To access this page click Management LLDP LLDP Port Settings Figure 4 81 Management LLDP LLDP Port Settings LLDP Port Configuration Table 4 79 Management LLDP LLDP Port Settings LLDP Port Configuration Item Description Port Select Enter the port number associated with the LLDP setting State Click the drop down...

Page 113: ... System Capability To include system capability TLV in LLDP frames 802 3 MAC PHY 802 3 Link Aggregation 802 3 Maximum Frame Size Management Address 802 1 PVID Apply Click Apply to save the values and update the screen The ensuing table for LLDP Port Status settings are informational only Port State and Selected Optional TLVs Figure 4 83 Management LLDP LLDP Port Settings VLAN Name TLV VLAN Selecti...

Page 114: ...ional only Port Selected VLAN and Detail click the radio box and click Detail to displays the details LLDP Remote Device Info The LLDP Remote Device Info page allows you to view information about remote devices LLDP information must be available on the switch To access this page click Management LLDP LLDP Remote Device Info Figure 4 84 Management LLDP LLDP Remote Device Info Table 4 82 Management ...

Page 115: ...tings Figure 4 85 Management SNMP SNMP Settings Table 4 83 Management SNMP SNMP Settings Item Description State Click Enabled or Disabled to define the SNMP daemon Apply Click Apply to save the values and update the screen The ensuing table for SNMP Information settings are informational only SNMP SNMP Community The SNMP Community page provides configuration options for the community SNMP v1 and S...

Page 116: ...y or read write Apply Click Apply to save the values and update the screen The ensuing table for Community Status settings are informational only No Community Name Access Right and Delete click to delete the desired community name SNMP User Settings The SNMP User Settings page allows you to create SNMP groups The users have the same level of security and access control permissions as defined by th...

Page 117: ...ld requires a user password MD5 specify HMAC MD5 96 authentication level SHA specify HMAC SHA authentication protocol Password Enter the characters to define the password associated with the authentication protocol Priv Protocol Click the drop down menu to select an authorization protocol none or DES The field requires a user password None no authorization protocol in use DES specify 56 bit encryp...

Page 118: ...MP SNMP Trap Figure 4 88 Management SNMP SNMP Trap Table 4 86 Management SNMP SNMP Trap Item Description IP Address Enter the IP address to designate the SNMP trap host Community Name Click the drop down menu to select a defined community name Version Click the drop down menu to designate the SNMP version credentials v1 or v2c Add Click Add to save the values and update the screen The ensuing tabl...

Page 119: ...re the overload disconnect and the maximum available wattage To access this page click Management Power Over Ethernet PoE System Settings Figure 4 89 Management Power Over Ethernet PoE System Settings Table 4 87 Management Power Over Ethernet PoE System Settings Item Description Maximum Power Available Select the value in Watts to set the maximum available power OverLoad Disconnect Mode Click the ...

Page 120: ...enu to select a PoE port Enabled Select Enabled or Disabled to designate the PoE port function by ports Power Limit From Classification Select Enabled or Disabled to designate the power limit classification Legacy Mode Select Enabled or Disabled to designate the legacy mode option for the port Priority Click the drop down menu to configure the power supply priority Critical Low Medium or High Defa...

Page 121: ...e in the networking running MODBUS client software client TCP Modbus Settings The TCP Modbus Settings page allows you to configure the modbus function To access this page click Management TCP Modbus TCP Modbus Settings Figure 4 91 Management TCP Modbus TCP Modbus Settings Table 4 89 Management TCP Modbus TCP Modbus Settings Item Description State Click Disabled or Enabled to set the TCP Modbus sta...

Page 122: ...Management DHCP Server Status Settings Figure 4 92 Management DHCP Server Status Settings Table 4 90 Management DHCP Server Status Settings Item Description DHCP Server Select Enable or Disable to designate the DHCP server function type When a new DHCP server mode is selected the switch requires a system restart for the new mode to take effect Apply Click Apply to save the values and update the sc...

Page 123: ...se time 60 864000 in seconds for each setting lease Low IP Address Type in the value designating the lowest range in the IP address pool High IP Address Type in the value designating the highest range in the IP address pool Subnet Mask Type in the value designating the subnet mask for the IP address pool Gateway Type in the value designating the gateway for the IP address pool DNS Type in the valu...

Page 124: ...ptions are designated for the selected port Low IP Address Type in the value designating the lowest range in the IP address pool High IP Address Type in the value designating the highest range in the IP address pool Subnet Mask Type in the value designating the subnet mask for the IP address pool Gateway Type in the value designating the gateway for the IP address pool DNS Type in the value design...

Page 125: ...tion 82 Settings also known as the DHCP relay agent information option provide information about the network location of a DHCP client In turn the DHCP server uses the information to implement IP addresses or other parameters for the client To access this page click Management DHCP Server Option 82 Settings Figure 4 95 Management DHCP Server Option 82 Settings ...

Page 126: ...ess pool High IP Address Type in the value designating the highest range in the IP address pool Subnet Mask Type in the value designating the subnet mask for the IP address pool Gateway Type in the value designating the gateway for the IP address pool DNS Type in the value designating the DNS for the IP address pool Apply Click Apply to save the values and update the screen The ensuing table for E...

Page 127: ...uses TCP port 25 Global Settings The Global Settings page allows you to set the active profile for the SMTP client To access this page click Management SMTP Client Global Settings Figure 4 96 Management SMTP Client Global Settings Table 4 94 Management SMTP Client Global Settings Item Description Active Profile Click the drop down menu to select the profile status None 1 or 2 Apply Click Apply to ...

Page 128: ...ient Profile Settings Profile Settings Table 4 95 Management SMTP Client Profile Settings Profile Settings Item Description Profile ID Click the drop down menu to select the identification type for the profile 1 or 2 Server IP Enter the IP address to designate the server host Server Port Enter the port number to designate the port associated with the server IP address Sender Mail Enter the email a...

Page 129: ...y Profile ID click the drop down menu to select a profile ID Server IP Server Port and Sender Mail Address Sending Message The Sending Message page allows you to setup the log message for use with the SMTP client To access this page click Management SMTP Client Sending Message Figure 4 99 Management SMTP Client Sending Message Table 4 97 Management SMTP Client Sending Message Item Description Titl...

Page 130: ...o the RMON standard To access this page click Management RMON RMON Statistics Figure 4 100 Management RMON Rmon Statistics Table 4 98 Management RMON Rmon Statistics Item Description Index Enter an entry selection 1 to 65535 to display its statistical information Port Enter the respective port number for the selected entry Owner Enter the name of the owner of the RMON group Apply Click Apply to sa...

Page 131: ...dex Enter the index entry 1 to 65535 to select the number of new history table entries Port Select the specific port switch Buckets Requested Enter the specific 1 50 number of samples to store Interval Enter value in seconds 1 to 3600 to designate a specific interval time for the collection of samples Owner Enter the name of the owner of the RMON history group Apply Click Apply to save the values ...

Page 132: ... AND OPERATION MANUAL CNGE28FX4TX24MS 2 POE2 48 TECH SUPPORT 1 888 678 9427 RMON Alarm The RMON Alarm page allows you to configure RMON statistics group and alarm groups To access this page click Management RMON RMON Alarm Figure 4 102 Management RMON Rmon Alarm ...

Page 133: ... Enter the variable sample type Rising Threshold Enter the rising alarm threshold trigger Falling Threshold Enter the falling alarm threshold trigger Rising Event Index Enter the rising event index 1 65535 to define the alarm group Falling Event Index Enter the falling event index 1 65535 to define the alarm group Owner Enter the name of the owner of the RMON alarm group Apply Click Apply to save ...

Page 134: ...ntry 1 to 65535 to define a specific RMON event Description Enter a value 1 to 2147483647 to define the interval value for the Alarm Collection history Type Click the drop down menu to define the event type None Log SNMP Trap Log and Trap Community Enter the community string to be passed for the specified event Owner Enter the name of the owner of the RMON event Apply Click Apply to save the value...

Page 135: ...test To access this page click Diagnostics Cable Diagnostics Figure 4 104 Diagnostics Cable Diagnostics Table 4 102 Diagnostics Cable Diagnostics Item Description Port Click the drop down menu to select a pre defined port for diagnostic testing Giga ports are displayed with a channel A to D designation Copper Test Click Copper Test to display the test result for the selected port The ensuing table...

Page 136: ... INSTALLATION AND OPERATION MANUAL CNGE28FX4TX24MS 2 POE2 48 TECH SUPPORT 1 888 678 9427 4 10 2 Ping Test The Ping Test page allows you to configure the test log page To access this page click Diagnostics Ping Test Figure 4 105 Diagnostics Ping Test ...

Page 137: ...kets in seconds The default value is 1 The value ranges from 1 to 5 The interval entered is not retained across a power cycle Size in bytes Enter the size of ping packet The default value is 56 The value ranges from 8 to 5120 The size entered is not retained across a power cycle Ping Results Display the reply format of ping PING 172 17 8 254 172 17 8 254 56 data bytes 172 17 8 254 ping statistics ...

Page 138: ... AND OPERATION MANUAL CNGE28FX4TX24MS 2 POE2 48 TECH SUPPORT 1 888 678 9427 4 10 3 IPv6 Ping Test The IPv6 Ping Test page allows you to configure the Ping Test for IPv6 To access this page click Diagnostics IPv6 Ping Test Figure 4 106 Diagnostics IPv6 Ping Test ...

Page 139: ...l in sec Enter the interval between ping packets in seconds The default value is 1 The value ranges from 1 to 5 The interval you enter is not retained across a power cycle Size in bytes Enter the size of ping packet The default value is 56 The value ranges from 8 to 5120 The size you enter is not retained across a power cycle Ping Results Display the reply format of ping PING 2222 777 2222 777 56 ...

Page 140: ...feature for the system log To access this page click Diagnostics System Log Logging Service Figure 4 107 Diagnostics System Log Logging Services Table 4 105 Diagnostics System Log Logging Service Item Description Logging Service Click Enabled or Disabled to set the Logging Service status Apply Click Apply to save the values and update the screen The ensuing table for Logging Information settings a...

Page 141: ...everity Click the drop down menu to select the severity level for local log messages The level options are emerg Indicates system is unusable It is the highest level of severity alert Indicates action must be taken immediately crit Indicates critical conditions error Indicates error conditions warning Indicates warning conditions notice Indicates normal but significant conditions info Indicates in...

Page 142: ... select the severity level for local log messages The default is emerg The level options are emerg Indicates system is unusable It is the highest level of severity alert Indicates action must be taken immediately crit Indicates critical conditions error Indicates error conditions warning Indicates warning conditions notice Indicates normal but significant conditions info Indicates informational me...

Page 143: ... access this page click Diagnostics DDM Figure 4 110 Diagnostics DDM Table 4 108 Diagnostics DDM Item Description Diagnostic Alarm Click the drop down menu to designate the announcement method Disabled SysLog E mail or SNMP Apply Click Apply to save the values and update the screen The ensuing table for Diagnostic Alarm Information settings are informational only Diagnostic Alarm Figure 4 111 Diag...

Page 144: ...te High Warning Click Enabled or Disabled to set the alarm state Low Alarm Click Enabled or Disabled to set the alarm state Low Warning Click Enabled or Disabled to set the alarm state Apply Click Apply to save the values and update the screen The ensuing table for Vendor Info settings are informational only Refresh click to reload the vendor information Port Connector Speed VendorName VendorOui V...

Page 145: ...t to each device to configure it To access this page click Tools IXM Figure 4 112 Tools IXM Table 4 110 Tools IXM Item Description Search Field Enter criteria to search the IXM information Displays the reference to the device number Device Name Displays the device name Device Model Displays the device model type Category Displays the device s category type IP Address Displays the device s IP addre...

Page 146: ...this page click Tools Backup Manager Figure 4 113 Tools Backup Manager Table 4 111 Tools Backup Manager Item Description Backup Method Click the drop down menu to select the backup method TFTP or HTTP Server IP Enter the IP address of the backup server Backup Type Click a type to define the backup method image running configuration startup configuration flash log or buffered log Image Click the fo...

Page 147: ...pgrade Manager Figure 4 114 Tools Upgrade Manager Table 4 112 Tools Upgrade Manager Item Description Upgrade Method Click the drop down menu to select the upgrade method TFTP or HTTP Server IP Enter the IP address of the upgrade server File Name Enter the file name of the new firmware version Upgrade Type Click a type to define the upgrade method image startup configuration or running configuratio...

Page 148: ...Description Active Image Click the format for the image type Partition0 Active or Partition1 backup Save Click Save to save and keep the new settings The ensuing table for Image Information 0 1 settings are informational only Flash Partition Image Name Image Size and Created Time 4 11 5 Save Configuration To access this page click Tools Save Configuration Click Save Configuration to FLASH to have ...

Page 149: ...name of the new user entry Password Type Click the drop down menu to define the type of password Clear Text Encrypted or No Password Password Enter the character set for the define password type Retype Password Retype the password entry to confirm the profile password Privilege Type Click the drop down menu to designate privilege authority for the user entry Admin or User Apply Click Apply to crea...

Page 150: ...lick Restore to have all configuration parameters reset to their factory default values All changes that have been made will be lost even if you have issued a save Reset settings take effect after a system reboot 4 11 8 Reboot Device To access this page click Tools Reboot Device Click Reboot to reboot the switch Any configuration changes you have made since the last time you issued a save will be ...

Page 151: ... cable for 1000Mbps connections Also be sure that the length of any twisted pair connection does not exceed 100 meters 328 feet R replacement letter for Ohm symbol Diagnosing LED Indicators To assist in identifying problems the switch can be easily monitored through panel indicators which describe common problems the user may encounter and where the user can find possible solutions If the power in...

Page 152: ...INS_CNGE28FX4TX24MS 2 POE2 48 04 30 18 PAGE 152 INSTALLATION AND OPERATION MANUAL CNGE28FX4TX24MS 2 POE2 48 TECH SUPPORT 1 888 678 9427 ...

Page 153: ...INS_CNGE28FX4TX24MS 2 POE2 48 04 30 18 PAGE 153 INSTALLATION AND OPERATION MANUAL CNGE28FX4TX24MS 2 POE2 48 TECH SUPPORT 1 888 678 9427 ...

Page 154: ...ECH SUPPORT 1 888 678 9427 INFO COMNET NET 8 TURNBERRY PARK ROAD GILDERSOME MORLEY LEEDS UK LS27 7LE T 44 0 113 307 6400 F 44 0 113 253 7462 INFO EUROPE COMNET NET MECHANICAL INSTALLATION INSTRUCTIONS ComNet Customer Service Customer Care is ComNet Technology s global service center where our professional staff is ready to answer your questions at any time Email ComNet Global Service Center custom...

Reviews: