


Installation and service of this product should be conducted by a trained
personnel to avoid any bodily injury from electric shock or heavy object hazard
Observe ESD (Electrostatic Discharge) practices during integration to avoid
possible damage to the board and / or other components
FlacheSAN1L-D4 Enclosure Quick Guide
Version 2.80 – 2016.03.28
1.
Check the content
of the box. Please verify that
your package contains the following:
# Description
Image / Description
Qty
1
1U20 Enclosure,
27” depth
1
2
2.5” Tool-less
Drive Trays
20
3
Motherboard
Asrock EP2C612D16NM series
1
4
Internal SAS
cables
SFF8087-8087 or SFF8087-8643
depending on SKU
5
5
Expander board or
OS disk bracket
Depending on SKU
1
6
CPU and memory
(optional)
Pre-installed upon request
2
sets
7
Heat sink
(optional)
2
8
Screw Sets*
for drives, motherboard, and rail
/ rack
3
sets
9
Power Cable*
2
10 Slide Rail Kit (opt)
1
11 Front Bezel (opt)
12 This Quick Guide
1
13 Packaging
1 set
* Inside the accessories box. If any items are missing, please contact
your authorized reseller or sales representative
2.
Get familiar with the unit.
Front View
Power Button / LED:
System Status LED:
NIC LED:
System On
System Off
Reset Button
System Normal
ID Button / LED:
ID On
ID Off
20 Drive Bays
Ear Handle
Link UP /Act
Link Down
1
2
Front Panel
(Blink) System Error e.g. Fan fail
Rear View
PCIe Gen3
x16 Slot
Power
Supply B
Power
Supply A
IPMI
LAN Port
COM
Port
USB3.0
Ports
VGA
Port
PCIe Gen3
x16 Slot
Serial
Port
1GbE or 10GbE
Ports
Alarm Mute
Button
1
2
10GbE Slot
w/ mezzanine
or
OS Disks
or
Drive Tray
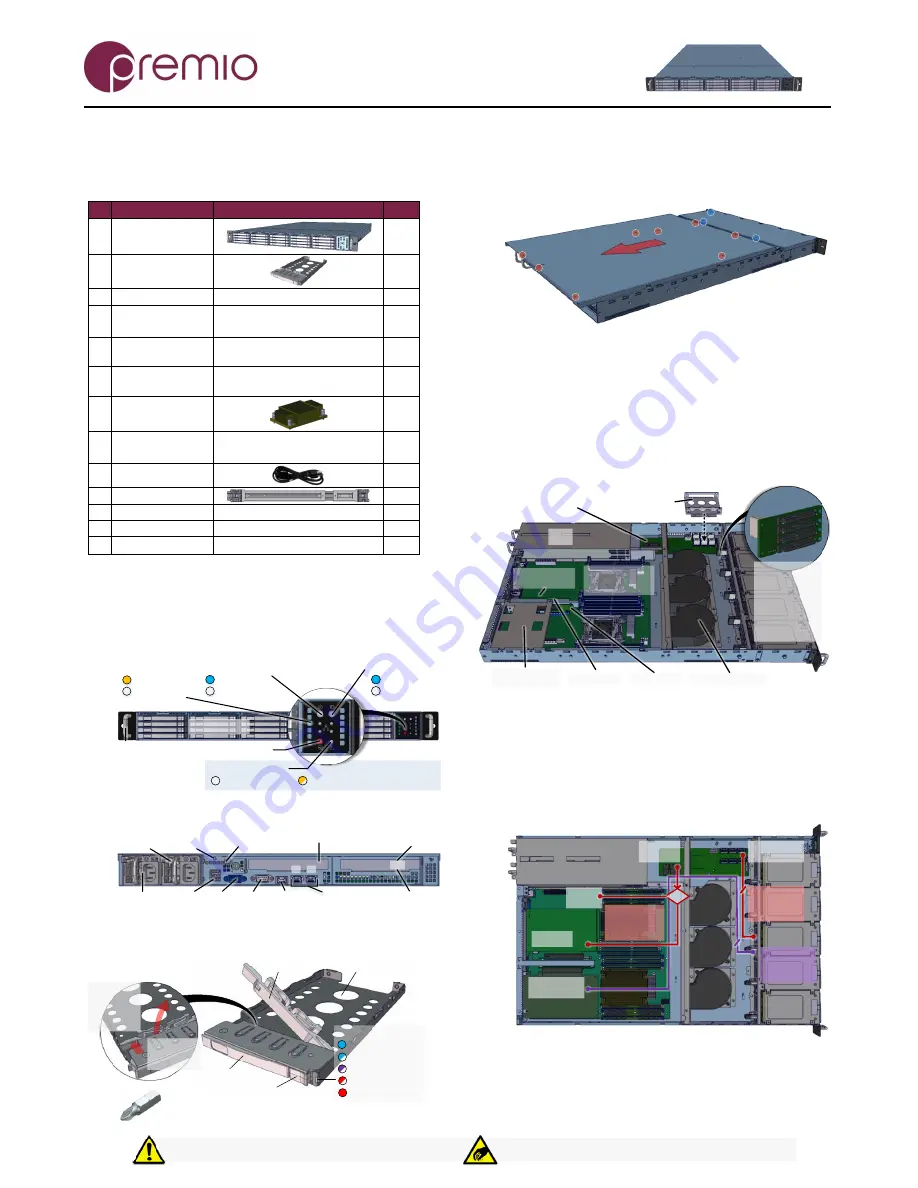
3.
Remove the top cover
by removing the 8 screws
(red circles) on the top of the unit and slide the cover towards
the back of the unit.
Remove additional 3 screws (blue circles) to open the middle
top cover (for backplane access).
4.
Inspect the internal
of the chassis. By default, it
consists of an Asrock EP2C612D16NM series
Haswell DP
Grantley motherboard, a set of backplanes, blower modules,
PCIe riser cards for IO cards, and an option of an expander
module or a drive bracket depending on the order SKU.
OS Disk Bracket
(optional)
PSU
Asrock
EP2C612D16NM
motherboard
PCIE7 Riser
Blower Module x3
Expander Board
(optional)
5 columns of
backplanes
with one SFF-
8087 mini-SAS
connector and
4 SATA drive
slots each
OS Disk Bracket
(optional)
Mezzannine
Slot (optional)
PCIE6 Riser
See illustration below for the data path from disk devices to
the host. Two options are available: through an expander (red
path), and with no expander (purple path).
For expander mode, a set of SAS cables are routed from
backplanes to expander board and then a choice of routing to
an IO card or an on-board SCU port (SAS2/SATA3 6Gb/s).
For OS, in place of one PCIE6 card, OS disk bracket is used.
IO Card
IO Card with
5 SAS ports
5 SAS DOWN
Ports
SAS UP
Port(s)
5 SFF 8087-
8087 SAS
cables
1 SFF 8643 to
8643 or 8087
SAS cable
LSI3008
Ports
5 SFF 8087-
8643 SAS
cables
OR
For a non-expander SKU, in place of expander board, an OS
disk bracket occupies the space. Due to an absence of the
expander board, to access all 20 drives from the front bay, an
IO card with five SAS ports is required, e.g. Adaptec 72405.
Thank you for your purchase of FlacheSAN1L-D3 1U 20-Bay Haswell Dual-Processor Storage Server!
2.5" 7mm
HDD / SSD
Tray
Drive Lock
(unlocked position)
Tray Latch
Tray Handle
Drive Status LED:
(Solid) Drive Online
To unlock the drive lock:
1. Push the
drive lock
latch
inwards
2. Then pull
it upwards
(Blink) Drive Activity
(Fast Blink) Drive Locate
(Slow Blink) Rebuild
(Solid) Drive Fail
Tool-less drive tray is best used for SSDs.
It is recommended to apply M3 screws when installing HDDs


