

Handy Scanner
Instruction Manual
D3959
1. Key features
Colour /Monochrome (Mono) scan selection
600/300 dpi scan selection
Direct save JPG file to micro SD card
Supports micro SD card up to 32GB
Driver free to download for Windows 7 / Vista / XP and
Mac OS10.4 or above (direct plug-in, driver installation not required)
2. Description of parts
Part
Function
1
Battery door
For 2x AA alkaline batteries
2
Power/Scan
Power On/ Off: Press and hold this key for 2 seconds to
turn power on or off. In power on mode, press this button to
start scan, press this button again to stop
3
Error LED
indicator
Scanning too quickly: Red LED on
4
Scan LED
indicator
Ready to scan: Green LED on
5
LCD screen
Scanning status display
6
Resolution
Select High (600dpi)/Low (300dpi) resolution;
High/Low resolution mode icon will be displayed on status LCD
7
C/BW
Select Colour/Mono scan, Colour/Mono mode icon will be
displayed on status LCD
8
USB interface
Download photos to a computer via USB cable provided.
9
SD card slot
Micro SD card storage location.
10
Format button
Press this button to format the micro SD card.
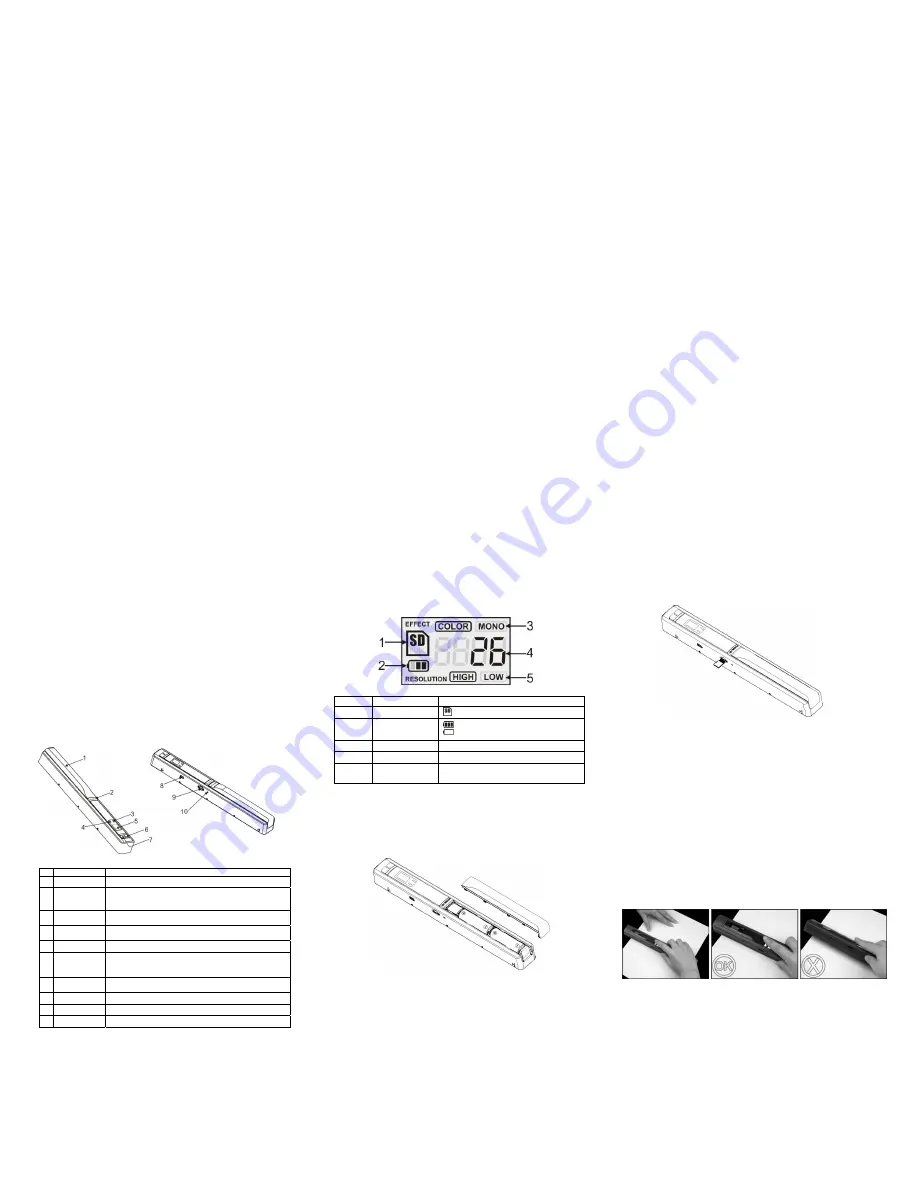
3. Explanation of the status icons
Item Function
Description
1
SD card indicator
Photos will be stored to micro SD card
2
Battery indicator
Battery is full
Battery is flat
3
Effect indicator
Colour or Mono
4
Counting indicator
Show scanned files in micro SD card
5
Selected resolution
High: 600 dpi / Low: 300 dpi
4. Using the scanner
4.1 Installing the battery
1. Open the battery compartment (silver section on top of scanner)
2. Insert 2x AA alkaline batteries into the battery compartment.
3. Turn on the scanner by pressing the [POWER] button for 2 seconds.
4.2 Inserting a micro SD memory card (not included)
You must insert a micro SD Card (not supplied) to record and store your pictures. To insert the
micro SD memory card proceed as follows:
1. Turn OFF the scanner.
2. Insert the micro SD card into the micro SD card slot, gently press in until card clicks into
position.
Note:
Do not force the card into the slot; forcing may damage scanner and the micro SD memory
card. Align micro SD card position (as marked) and try again.
Note:
The micro SD memory card must be formatted before scanning. See the following
instructions.
4.3 Formatting the micro SD memory card
1. Insert a new micro SD card into the scanner, then turn on the scanner.
2. Press the format button and “F” shows on the LCD.
3. Press the Power/Scan button to start formatting the micro SD card.
4. SD card indicator will flash until format is complete.
4.4 Setting the resolution
Press the [DPI] button to select High/Low resolution.
High/Low resolution icon will be displayed on status LCD.
4.5 Setting the scan mode
Press the [C/BW] button to select Colour/Mono mode.
Colour/Mono icon will be displayed on status LCD.
4.6 How to scan
•
Make sure that the scanner is not connected to your computer with the USB cable.
•
Hold the document firmly by one hand.
•
Place the scanner on the start-scanning position.
•
Hold the scanner tight and press the scan button once.
•
Slide the scanner slowly and keep your hand stable to get the best quality picture.
•
Press the scan button again to stop scanning.


