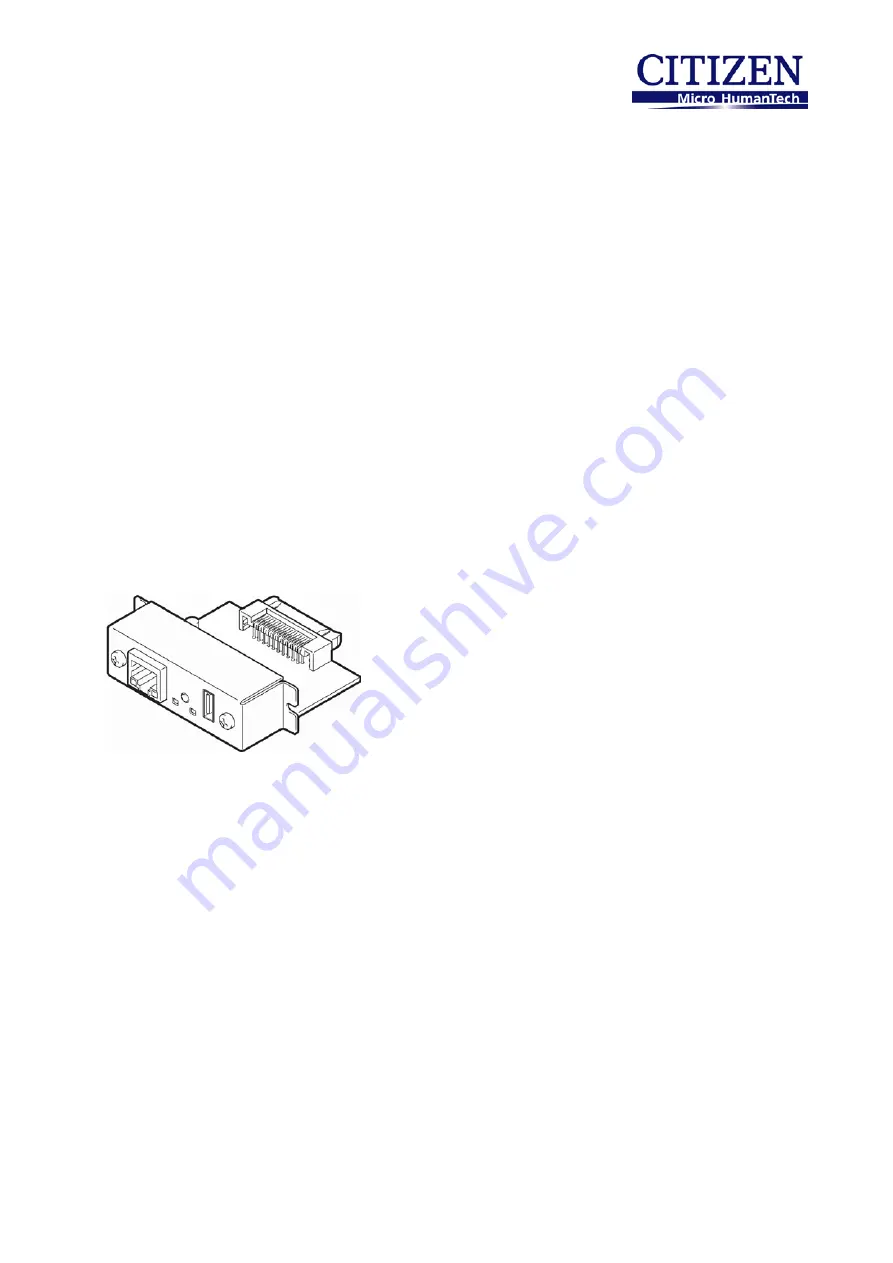
background image


IF1-WFXX 
Wireless LAN (WLAN) Interface Board
 
User’s Manual 


Rev2.10 


CITIZEN SYSTEMS JAPAN CO., LTD. 

6-1-12, Tanashi-cho, Nishi-Tokyo-shi, Tokyo,  
188-8511. Japan 
TEL. +81-424-68-4608 
[email protected] 
http://www.citizen-systems.co.jp/english/ 


Summary of Contents for IF1-WF 2 Series

Page 1: ...LAN WLAN Interface Board User s Manual Rev2 10 CITIZEN SYSTEMS JAPAN CO LTD 6 1 12 Tanashi cho Nishi Tokyo shi Tokyo 188 8511 Japan TEL 81 424 68 4608 sales op systems citizen co jp http www citizen systems co jp english ...

Page 2: ...ory Default Settings 19 2 7 Setting the WLAN 20 2 7 1 Settings 20 2 7 2 Example Settings 22 3 Web Manager 23 3 1 Starting the Web Manager 23 3 2 HOME Window 24 3 3 STATUS Window 25 3 3 1 System Status Tab 26 3 3 2 Network Status Tab 27 3 3 3 Wireless LAN Tab 28 3 3 4 Printer Status Tab 29 3 4 CONFIG Window 30 3 4 1 General Tab 31 3 4 2 Wireless LAN Tab 33 3 4 3 User Account Tab 36 3 4 4 Maintenanc...

Page 3: ...device is not possible Note that we will not be responsible for any loss or loss of profits owing to loss of data due to breakdown repairs inspections etc Please contact us if there are omissions errors ambiguities etc in this manual Refer to this document along with the user manual of the printer This product operates by setting up a wireless connection between itself and other WLAN equipment for...

Page 4: ...ubject the network cable connected to the device to rough treatment Do not connect a telephone line to the RJ45 connector on the device Be sure to connect STP cable category 5 or higher Connect the product only to devices that operate on SELV voltage safety extra low voltage Be sure to use the device inserted in the interface board slot of the printer Do not use the device when it is not inserted ...

Page 5: ...s to resolve the interference Restrictions by Country Frequency range 2400 0 to 2483 5 MHz Country Restrictions Notes Bulgaria None Outdoor use and public service require general authorization France Outdoor use is limited to 10 mW e i r p within the band 2 454 to 2 483 5 MHz Used for military radiolocation The 2 4 GHz band is being reformed to relax the current regulations Full implementation is ...

Page 6: ...ernet for configuration Support for 802 11a IF1 WFX2 only and 802 11b g n WLAN WPS function for easy WLAN setup IF1 WF01 only Support for WPA WPA2 WLAN encryption Support for DHCP static IP and ZeroConf methods of IP address acquisition Configuration through a browser or utility software Support for Raw 9100 port and LPR printing methods Panel button to print configuration information and change t...

Page 7: ...PS support WPS non support Access mode Infrastructure Ad Hoc Security WPA2 PSK encryption AES TKIP WPA2 PSK encryption AES TKIP WEP Key size 64 bit 128 bit Ethernet Standards 100BASE TX 10BASE T Full Duplex Half Duplex auto negotiation Port RJ 45 Network IP Version IPv4 Protocols TCP UDP HTTP ICMP DHCP SNMP Port number for printing RAW port 9100 Changeable LPR IP address setting Manual DHCP Softwa...

Page 8: ...12 VCCI Class A The communication by Ad Hoc does not work correctly in various cases due to various restrictions If Ad Hoc does not work correctly we recommend Infrastructure The purpose of Ethernet port is to set up the WLAN interface board And printing through the Ethernet port is not taken into the consideration Therefore depending on the used environment the Ethernet port may not work properly...

Page 9: ...nsmission connection and error statuses of the IF1 WFXX with combinations of steady and blinking lights Panel button 2 Used to operate the IF1 WFXX USB connector Connection for the Wi Fi adapter 1 See 2 4 LED Functions page 15 for indicator details 2 See 2 3 Using the Panel Button page 14 for panel button operations WLAN Adapter WPS button Start settings using the WPS function Wireless adapter sta...

Page 10: ...the printer 4 Connect the interface connector of the IF1 WFXX to the interface connector inside the printer 5 Fix the IF1 WFXX in place with screws Malfunctions may occur if the WLAN interface board is removed or re inserted To install the WLAN interface board please contact your dealer or service person If you work on your own consider static electricity and other factors carefully and then intal...

Page 11: ...as good reception the WLAN adapter can be directly connected without using the extension cable 2 Connect the USB extension cable and WLAN adapter 3 Set the WLAN adapter in the adapter cover 4 Attach the double sided fixing tape to the adapter cover 5 Fix the adapter cover to a flat surface such as the printer or a wall using the double sided tape ...

Page 12: ...ect the network cable to the RJ45 connector of the IF1 WFXX Connect the Ethernet when using the IF1 WFXX with Ethernet or when setting the WLAN The Ethernet is enabled when the wired and WLAN are connected simultaneously Network cable RJ45 connector ...

Page 13: ...smission distance for the IF1 WFXX is approximately 30 m The transmission distance depends on the setup environment This includes electrical interference from the periphery obstacles such as the printer and the antenna location Carefully consider these points before installing the IF1 WFXX ...

Page 14: ... mode Setting mode enables the reading of the factory default settings If there is no activity for three seconds in the setting mode the buzzer will sound once signaling a return to normal mode Note that the buzzer will not sound if the IF1 WFXXis connected to the barcode printer In addition the buzzer will not sound when the IF1 WFXX is used with the POS printer if the buzzer has been set to not ...

Page 15: ...on Printer disconnected Off Not connected to printer Printer connection Network disconnected On Off Connected to printer Ethernet connecting On Flashing 1 second cycle Seeking IP address from DHCP server via Ethernet Ethernet working On On Network operation via Ethernet WLAN connecting Flashing 2 second cycle Flashing 1 second cycle Connecting to access point or seeking IP address from DHCP server...

Page 16: ...AN adapter status indicator IF1 WF01 only LED Status LED Connecting Repeats short cycle and long cycle flashing Communicating Irregular flashing changes with data transmission status Setting using WPS Short cycle flashing ...

Page 17: ...nted Configuration information of the IF1 WFXX The information stored in the IF1 WFXX is printed and may be different from the connection status of the current network Check the connection status using the network information of I F Board Information IF1 WFXX Rev1 1 4 Ver 1 19 System WLAN Board Name Net Printer Serial Number 100123 MAC Address 00 01 02 0a 0b 0c Current Network Status IP Address 19...

Page 18: ...and may be different from the connection status of the current network Check the connection status using the network information of I F Board Information IF1 WFXX Rev1 1 4 Ver 1 19 System WLAN Board Name Net Printer Serial Number 100123 MAC Address 00 01 02 0a 0b 0b Current Network Status IP Address 192 168 10 10 Fixed Subnet Mask 255 255 255 0 Gateway 192 168 10 1 DHCP Server Wireless LAN Status ...

Page 19: ...hold the panel button to switch to setting mode 2 After the IF1 WFXX has switched to setting mode press and hold the panel button again within three seconds The following message is printed and the IF1 WFXX returns to factory default settings I F Board Information Caution Print Server will automatically restart ...

Page 20: ... gateway for a static address 192 168 10 100 factory default UPnP Setting UPnP Set the UPnP setting Enable factory default Disable Print Setting Raw Port Number Set the TCP port number for raw protocol printing 9100 factory default Timeout for print data Set the timeout duration of connection to the host 0 to 65535 seconds When the setting is 0 there is no timeout 180 factory default Action at Tim...

Page 21: ...nd select the key to be used KEY1 0123456789 factory default Key Format Select the key format when WPA PSK WPA2 PSK is selected Passphrase 8 63 chars factory default Hex 64 chars Pre Shared Key Enter the shared key when WPA PSK WPA2 PSK is selected ABCDEF4321 factory default Encryption Enter the encryption method when WPA PSK WPA2 PSK is selected TKIP factory default AES TKIP AES mixed mode WPS Se...

Page 22: ...panel button to print out the configuration of the IF1 WFXX See 2 5 Printing the WLAN Interface Board Configuration page 17 for details For the method to start the WPS function see the manual of the access point If the access point you are using does not support the WPS function perform configuration by using the Configuring using the Ethernet Adapter method Configuring using the Ethernet Adapter ...

Page 23: ...the IF1 WFXX cannot be displayed if the network settings of your computer and the IF1 WFXX differ Ensure that the IP address of the IF1 WFXX matches the settings of your network The IP address of the IF1 WFXX can be confirmed by using the Printing the Wireless LAN Interface Board Configuration method Warning The image to the left is a sample Enter the actual allocated value for the IP address HOME...

Page 24: ...atus window you can check the status of the IF1 WFXX CONFIG button Display the CONFIG window At the CONFIG window you can configure the IF1 WFXX Logout button Log out from the CONFIG window of the IF1 WFXX It is not possible to open the CONFIG window at multiple PCs of the same time You must log out to make settings using another Web manager or WLAN Setup Tool ...

Page 25: ... status of the IF1 WFXX System Status tab See 3 3 1 System Status Tab page 26 Network Status tab See 3 3 2 Network Status Tab page 27 Wireless LAN Status tab See 3 3 3 Wireless LAN Tab page 28 Printer Status tab See 3 3 4 Printer Status Tab page 29 ...

Page 26: ... Port Number Displays the TCP port number for RAW printing Timeout for print data Displays the socket timeout duration during printing When the host and the TCP IP socket are connected and the host sends no data for this duration during printing the socket is forced to close When the setting is 0 the socket remains connected until a disconnection request is received from the host LPR Queue Name Di...

Page 27: ... IP address of the IF1 WFXX Subnet Mask Displays the subnet mask of the IF1 WFXX Default Gateway Displays the default gateway of the IF1 WFXX DHCP Server Displays the IP address of the DHCP server from which the IF1 WFXX obtained its IP address Lease Time Displays the lease time of the IP address allocated by the DHCP server ...

Page 28: ...he MAC address of the access point Channel No Displays the WLAN channel used by the IF1 WFXX Network Type Displays the current access method Infrastructure or Ad Hoc Link Quality Displays the current link quality of the WLAN using four bars Signal Strength Displays the signal strength of the WLAN using four bars Security System Displays the security method of the WLAN to which the IF1 WFXX is curr...

Page 29: ...al status of the printer to which the IF1 WFXX is connected Ready Ready to print Offline Not ready to print Paper Empty Out of paper Error Error status Note When the CT S801 851 601 651 series is connected to the IF1 WFXX and the bi directional port of the printer driver is enabled the printer status is not correctly displayed In such cases confirm the printer status from the Windows spooler ...

Page 30: ...word Enter the administrator password Initial setting admin Login button Enter the administrator name and password and then click Login The CONFIG window appears Cancel button Cancel login General tab See 3 4 1 General Tab page 31 Wireless LAN tab See 3 4 2 Wireless LAN Tab page 33 Administrator tab See 3 4 3 User Account Tab page 36 Maintenance tab See 3 4 4 Maintenance Tab page 37 ...

Page 31: ...er IP addresses in the IPAddress Subnet Mask and Default Gateway fields UPnP Setting UPnP factory default Enable Set the UPnP setting LAN Setting Priority to Ethernet factory default Enable Enable When Ethernet cable is connected LAN Ethernet is chosen Disable The connection is fixed for either LAN or WLAN chosen at boot Enable Disable WLAN at boot WLAN WLAN WLAN at boot Ethernet connected later L...

Page 32: ...er for RAW protocol printing Timeout for print data Set the timeout duration for the connection to the host Action at Timeout Select the action for other connections when a timeout occurs with the host There are two selections Close all connections and Move to next connection Submit button Enter the changes Reset button Cancel the changes ...

Page 33: ... default Disable Select the encryption method from Disable WEP WPA PSK and WPA2 PSK For WEP Authentication factory default Open System Select the authentication method from Open System and Shared Key Key Size factory default 64 Bit Hex 10 chars Select a key size from 64 Bit Hex 10 chars 64 Bit ASCII 5 chars 128 Bit Hex 26 chars and 128 Bit ASCII 13 chars Key 1 to Key 4 factory default Key 1 012345...

Page 34: ...hrase 8 63 chars and Hex 64 chars Pre Shared Key factory default ABCDEF4321 Enter the shared key Site Survey Setting This function searches for access points An SSID can be selected when this function is used Click Start to display the following window Select the button of the access point you want to set and then click Set ...

Page 35: ...de the pin code set at the IF1 WFXX is specified at the access point and then the WPS setting is started PIN factory default Random Generation Select the PIN allocation method from Random Generation and Manually Generation With Random Generation the pin code is generated automatically by the IF1 WFXX With Manually Generation the user specifies the PIN code When the pin code is set and Start is cli...

Page 36: ...dministrator name and password can be changed Set User New User name factory default admin Enter the new administrator name New Password factory default admin Enter the new password Confirm New Password Enter the password again Warning If you forget the new username and password settings must be returned to the factory default settings ...

Page 37: ...g changes Factory Default button Return the IF1 WFXX to the factory default settings Firmware Upgrade button Upgrade the firmware of the IF1 WFXX Firmware upgrade 1 Click Browse and select the firmware file 2 Click Write Warning After the firmware upgrade starts do not disconnect power or transmission to the printer until the upgrade is complete ...

Page 38: ...he settings of the IF1 WFXX 4 1 Installing the WLAN Setup Tool 1 Acquire the file WLANSetupToolSetup exe from the CD ROM or our website Double click the file 2 If the User Account Control screen appears click Continue 3 The screen shown on the right appears Click Next 4 Enter a username and organization and then click Next ...

Page 39: ...4 WLAN Setup Tool 39 5 The screen shown on the right appears Click Next 6 The screen shown on the right appears Click Install 7 Click Finish to complete installation ...

Page 40: ...4 WLAN Setup Tool 40 8 The PC setting tool starts From the System menu select Exit 9 The icon on the right is placed on the desktop of the computer You can now start program by double clicking this icon ...

Page 41: ...up Tool Tools Select Tools Settings to switch the display of the WLAN interface board information When the Display WLAN board information check box is selected the WLAN interface board operation status can be displayed as shown below Help menu Operation status of the wireless LAN interface board ...

Page 42: ...g a Web Browser button Select the WLAN interface board you want to configure and then click Configure using a web browser The browser starts and displays the Web manager Configure the WLAN Board button Select the WLAN interface board you want to configure and then click Configure the WLAN Board See 4 3 Setup Window page 43 WLAN interface board list The list displays the WLAN interface boards conne...

Page 43: ...e list screen and clicking Configure the WLAN Board To login at the login screen enter a username and password Username admin factory default Password admin factory default 4 3 1 General Tab Use the General tab to configure the WLAN board name and IP address 4 3 2 Wireless LAN Tab Use the Wireless LAN tab to configure the WLAN ...

Page 44: ...ou forget the new username and password settings must be returned to the factory default settings 4 3 5 Maintenance Tab Use the Maintenance tab to restart the WLAN interface board return the settings to the factory default settings and update the firmware Note After the firmware upgrade starts do not disconnect power or transmission to the printer until the upgrade is complete Note If the computer...

Page 45: ... red letters If this message appears set the IP address using the Configure the WLAN Board button before configuring the WLAN interface board Only the server name and IP address can be configured Configure the IP address correctly one time before configuring the wireless LAN interface board ...

Reviews: