

FAQ
1.How long is the warranty for this timer?
We offer 12-month limited warranty on this timer. if your
time is broken or any other problems, please email your
order number and describe the issue. we will deal with a
full refund or arrange a new replacement after
verification.
we believe what makes us different is not just the product
but also our outstanding customer service. we also
believe
the buyer and seller can achieve a win-win outcome
through
mutual effective communication.
2.What should I do if I am having trouble with setting up the
timer?
(eg:adjust to sunday.)
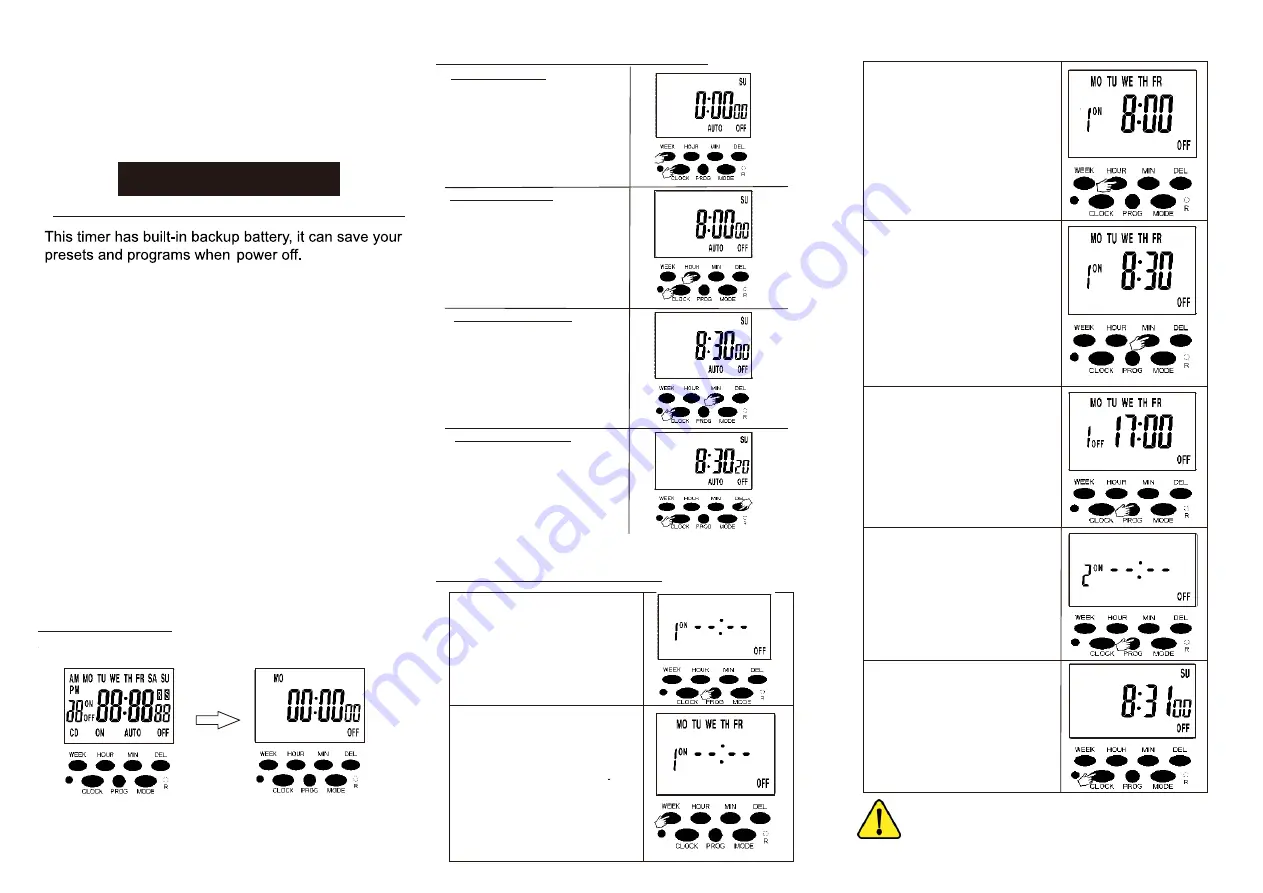
1.Install Setup
Press the reset button “R”. Then the screen will show the reset display,
as the picture shows below.
Tips:
2. Set the digital clock
a. Day Setting
While holding the
"CLOCK" button,
press the "WEEK"
button to adjust
the day you want. ”
b. Hour Setting
While holding the
“clock”button,
press the “Hour”
button to adjust the
Hour you want.
(eg:adjust to 8:30)
C. Minute setting
While holding the
“clock”button,
press the “MIN”
button to adjust the
minute you want.
(eg:adjust to 8:30)
d: Sec Setting
While holding the “clock”
button , press the
“DEL” button to adjust
the sec you want.
(eg: adjust to 08:30:20S.)
Note: Press the "MIN" and the "DEL" button at the same time, you can switch the AM&PM
12H/24 hours display mode, and when in 12-hour clock, the top left of the screen will
shows AM or PM.
3. Set the Timer
a: Press the "PROG" button,
you will see "1ON "shows on
he screen
(as the picture shows)
eg: If you want to set the first
group of "ON" time is
MO~FR 8:30
b: Press the "WEEK" button to
adjust the day you want the
timer "ON" for the group, as
the picture shows, the screen
shows MO~FR days
Note: The group will advance in the sequence
of : MO→TU→WE→TH→FR→SA→SU→MO
TH WE
TH FR→SA SU→MO TU WE
TH FR
SA→MO WE FR→TU TH SA→MO TU WE→
TH FR SA→MO TU WE
TH FR SA
SU
C.
Press
the “HO
U
R” button
to adjust the hour you want
the timer “ON” for the group.
Keep press the “HO
U
R”
>3S, The hour fast adjust.
d.
Press the "MIN" button to adjust
the minute you want the timer
"ON" for the group.
(eg: we set the minutes is 30)
Note: Press the "MIN" button one time,
the minutes will add 1 minute,
and press the "MIN" button more
than 3s, the minutes will add rapidly.
cancel/ recover setting time.
(eg:we set the hours is 8)
pree the “DEL” button can
Note: Please don't forget to press
the " WEEK" button to adjust the
day you want the timer off, thanks.
f.
Continue to press the “PROG”,
you can set the other groups if
you need, you just need to
repeat the b to e steps to set
more timer groups.
Note: you can set up to 20
g.
You can press “clock” button to
return the clock time when you
set the groups, and you also
can press “PROG” button go
back to set the timer group.
Note: You can press the “DEL”
button to cancel the or
restore the settings.
Please don’t set the overlappedON/OFF
time for the different timer groups!!!
CFGROW
Digital Timer Outlet
Model No.:GET06A-
U
S
Questions or Concerns? [email protected]
Safety Use & Care
Please read this manual .carefully before you set this timer.
DO NOT plug in any appliances that the load exceeds 1800W/15A.
DO NOT attempt to repair, disassemble or modify in any situation.
We designed this timer for indoor use, so please make sure the
timer is dry and far away from water.
1) If the screen is blank, please plug the timer into outlet
for 30 minutes to charge the internal battery first.
2) After reset the timer, all the programs & settings will
be deleted.
e.
Follow the a, b, c steps, the time
"1ON" for the group is finished.
Press the " PROG" button agin,
the screen will shows "1OFF",
and please repeat the b, c,
d steps to set the off time “1OFF”
for the group.


