CPR3 Relay - rev.1
DATE: 11/06/13 Pag. 1 of 3
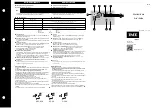
INSTALLATION, OPERATION AND MAINTENANCE GUIDE
PROTECTIVE RELAY
CPR3
FOR RUBBER BAG CONSERVATOR
STORAGE AND SHELF LIFE
Handle with care. Max storage period before putting the instrument into operation is 5 years
(temperature -20 +50 °C – air humidity 50-75 %) as long as the instrument is kept in its envelope
and in a clean place. Before use, visual check that no damages happened to any parts.
UNPACKING
Unpack the CPR3 from its carton box, pull it out from the plastic bag and remove the plastic plug
under bottom flange. Before use visual check that no damages happened to any parts.
Make a correct disposal of packaging according local regulations.
MOUNTING POSITION
According to your arrangements the protective relay CPR3 can be mounted top of conservator top
of conservator (see alternative 1 in mounting sketch in dwg.3678) or top of a piping coming off
conservator from front wall (see alternative 2 mounting sketch in dwg.3678) using 4 screws,
washers and nuts M10. Sealing is obtained using a flat gasket made in NBR (standard material).
SETTING TO WORK
Before setting to work fill up the relay with insulation oil making sure that air inside the body has
been released through gas release cock pos.2.
To do this operation cover the top cock with a cloth (to avoid oil spraying) open the cock pos.2
acting the side handle and wait until oil leaks off. After the oil spurges off the cock close the handle.
Make wiring according to provided wiring diagram and take out the wires through cable entry
according your arrangements.
Electrical circuit can now be manually tested by pressing down the push button pos.3.
TESTING OF CONTACT
The relay is provided with a self resetting push-button for checking the continuity of the electrical
circuits.
The procedure for testing is very simple: unscrew the knurled cap pos.3 (see drawing) which
protect the push-button and press it slowly in order to activate the alarm contact and after the trip
contact. When the push-button end his stroke, release it slowly, in order to switch off the alarm
contact.
During testing it is possible to observe the movement of the float through the inspection window.
Test of alarm contact at ground level
When at site, without needing to climb up top of conservator, you can test the contact function
inflating gas through a piping connected to gas release cock pos.2. Arrange for a copper tube
coming down from gas cock to ground level where a cock / ball-valve shall be fitted as shown in the
sketches in the following page.