background image

1

Start Here

Quick Setup Guide

UK/IRE/GEN Version 0

ADS-2600W

Please read the Product Safety Guide first before you set up your machine. Then, please read this Quick Setup 
Guide for the correct setup and installation.

1

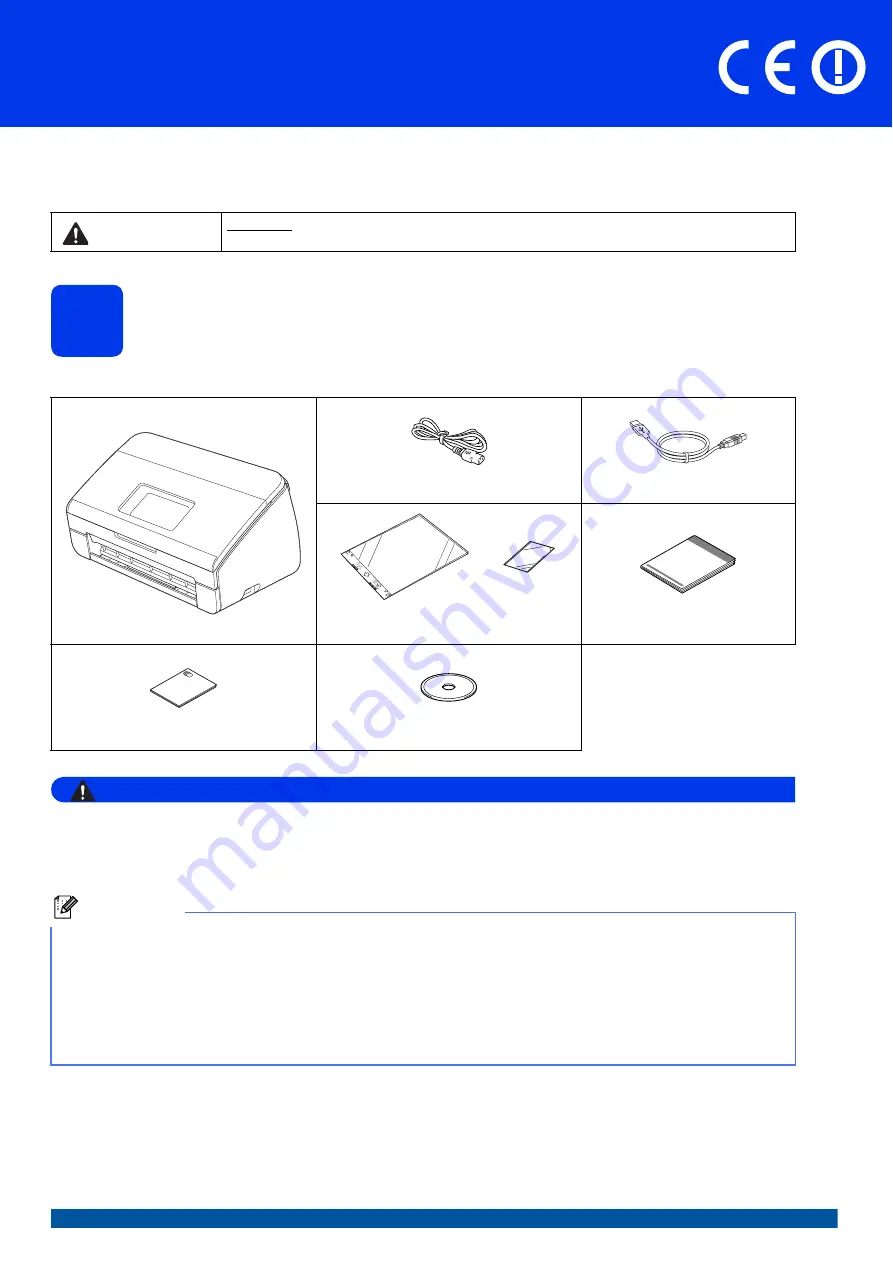
Unpack the machine and check the components

The components included in the box may differ depending on your country

.

WARNING

• Plastic bags are used in the packing of your machine. To avoid danger of suffocation, keep these 

plastic bags away from babies and children. Plastic bags are not toys.

• Only use the power cord supplied with this product.

a

Remove the protective tape and film covering the machine and the LCD.

b

Make sure you have all the components.

WARNING

WARNING indicates a potentially hazardous situation which, if not avoided, could result in death 
or serious injuries.

AC Power Cord

USB Interface Cable

Carrier Sheet/

Plastic Card Carrier Sheet

Quick Setup Guide

Product Safety Guide

DVD-ROM

Note

• We recommend that you save the original packaging in case you must ship your machine.
• Please use the supplied USB cable if you wish to connect the machine to a computer.

USB cable

It is recommended to use a USB 2.0 cable (Type A/B) that is no more than 2 metres long.

Network cable

Use a straight-through Category5 (or greater) twisted-pair cable for 10BASE-T or 100BASE-TX Fast Ethernet 
Network.

Summary of Contents for ADS-2600W

Page 1: ...uct a Remove the protective tape and film covering the machine and the LCD b Make sure you have all the components WARNING WARNING indicates a potentially hazardous situation which if not avoided could result in death or serious injuries AC Power Cord USB Interface Cable Carrier Sheet Plastic Card Carrier Sheet Quick Setup Guide Product Safety Guide DVD ROM Note We recommend that you save the orig...

Page 2: ... Tray out of the machine a and then unfold the Document Stopper b 3 Choose your language if necessary a Press b Swipe up or down or press a or b to display Initial Setup Press Initial Setup c Press Local Language d Swipe up or down or press a or b to display your language Press your language e Press Important DO NOT connect the USB cable yet 1 2 1 ...

Page 3: ...f Repeat for month and day g Press Time then press OK h Enter the time on the Touchscreen in 24 hour format i Press 5 Automatic Daylight Savings Time You can set the machine to change automatically for daylight savings time It will reset itself forward one hour in the spring and backward one hour in the fall a Press b Swipe up or down or press a or b to display Initial Setup Press Initial Setup c ...

Page 4: ...time zone not summer time but standard time on the machine for your location a Press b Swipe up or down or press a or b to display Initial Setup Press Initial Setup c Press Date Time d Press Time Zone e Enter your time zone Press OK f Press ...

Page 5: ...mputer does not have a DVD ROM drive you can download the latest drivers manuals and utilities for your model from the Brother Solutions Center at http solutions brother com Some software applications included on the DVD ROM may not be available as a download For USB interface cable Windows go to page 6 Macintosh go to page 8 For Wired Network Windows go to page 10 Macintosh go to page 13 For Wire...

Page 6: ...creen appears go to the next step Important DO NOT connect the USB cable yet If there are any programs running close them Note The screens may differ depending on your operating system The DVD ROM includes Nuance PaperPort 12SE This software supports Windows XP Home SP3 or greater XP Professional SP3 or greater Windows Vista SP2 or greater and Windows 7 Update to the latest Windows Service Pack be...

Page 7: ... screen appears choose the software update setting you want and click OK When the Brother Product Research Support Program starts up follow the on screen instructions Now go to Proceed to Install Optional Applications on page 33 Important DO NOT cancel any of the screens during the installation It may take a few seconds for all screens to appear Note If an error message appears during the software...

Page 8: ... click the Start Here OSX icon to install If the model name screen appears choose your machine c Choose Local Connection USB and then click Next Follow the on screen instructions d Please wait for the software to install After the installation the Brother software will search for the Brother device This will take a few moments to complete e Choose your machine from the list and then click Next The...

Page 9: ...cintosh USB Windows Macintosh USB 11 Install Presto PageManager and Presto BizCard a Click Presto PageManager or Presto BizCard and follow the on screen instructions Finish The installation is now complete ...

Page 10: ...differ depending on your operating system The DVD ROM includes Nuance PaperPort 12SE This software supports Windows XP Home SP3 or greater XP Professional SP3 or greater Windows Vista SP2 or greater and Windows 7 Update to the latest Windows Service Pack before installing MFL Pro Suite If you have previously set up your machine for a wireless network and then want to set it up on a wired network y...

Page 11: ...ll other than the Windows Firewall or the Windows Firewall is off this screen may appear See the instructions provided with your firewall software for information on how to add the following network ports For network scanning add UDP port 54925 If you still have trouble with your network connection add UDP port 137 and 161 Note If the Brother screen does not appear automatically go to Computer My ...

Page 12: ...nstall Optional Applications on page 33 Important DO NOT cancel any of the screens during the installation It may take a few seconds for all screens to appear Note For Windows Vista and Windows 7 when the Windows Security screen appears click the check box and click Install to complete the installation correctly Note If an error message appears during the software installation run the Installation...

Page 13: ... the network cable to the Ethernet port b Connect the cable to your network Note For Mac OS X v10 5 x users upgrade to Mac OS X v10 6 x 10 7 x before installation If you have previously set up your machine for a wireless network and then want to set it up on a wired network you should check that the machine s Wired Enable is set to On The wireless network interface will become inactive with this s...

Page 14: ... This will take a few moments to complete e If the machine is configured for your network choose your machine from the list and then click Next The installation of MFL Pro Suite is now complete Go to step 11 Note If your machine is not found over the network confirm your network settings You can find your machine s MAC Address Ethernet Address and IP Address from the control panel of the machine I...

Page 15: ...r Presto BizCard and follow the on screen instructions 12 Install MFL Pro Suite on additional computers if necessary If you want to use your machine with multiple computers on the network install MFL Pro Suite on each computer Go to step 10 on page 14 Also see step 8 on page 13 before you install Finish The installation is now complete ...

Page 16: ...to a computer through an access point router Infrastructure Mode a Access point router b Wireless Network machine your machine c Wireless capable computer connected to the access point router d Wired computer connected to the access point router e Mobile Device connected to the wireless access point router Please make sure the wireless network settings of the machine match the access point router ...

Page 17: ...e write down your wireless network settings in the area below Please do not contact Brother Customer Service for assistance without the wireless security information We cannot assist you in locating your network security settings Item Record the current wireless network settings SSID Network Name Network Key The Network Key may also be described as the Password Security Key or Encryption Key Note ...

Page 18: ...settings SSID Network Name Network Key The Network Key may also be described as the Password Security Key or Encryption Key Note If you do not know this information SSID and Network Key you cannot continue the wireless setup How can I find this information 1 You should see the documentation provided with your wireless access point router 2 The default SSID could be the manufacturer s name or the m...

Page 19: ...e Windows Firewall or the Windows Firewall is off this screen may appear See the instructions provided with your firewall software for information on how to add the following network ports For network scanning add UDP port 54925 If you still have trouble with your network connection add UDP port 137 and 161 Note This example shows Windows installation For Mac installation insert the installation D...

Page 20: ... wrote down for your network in step 9 a on page 17 and then click Next Note If this screen appears read the Important Notice Check the box after you confirm the SSID and Network Key and then click Next Note For instructions on connecting the USB cable to the USB port of your machine see Connect the USB cable on page 7 Note If the list is blank check that the access point has power and is broadcas...

Page 21: ...rength of your access point router To install MFL Pro Suite For Windows users Now go to Step 12 e on page 29 For Macintosh users Now go to Step 12 d on page 31 Note If your network is not configured for Authentication and Encryption the following screen will appear To continue configuration click OK and go to j Note The settings will remain unchanged if you click Cancel If you want to manually ent...

Page 22: ...inue manual configuration go to d to enter a Network Key When the LCD shows Start WPS press the WPS button on your wireless access point router and then press Next to proceed Go to e d Enter the Network Key you wrote down in step 9 b on page 18 using the Touchscreen Press to cycle between lower case and upper case Press to cycle between letters numbers and special characters The characters availab...

Page 23: ...n you are using e g Brother iPrint Scan or other applications for additional details on how to use your machine with the application To download the User s Guide for the application you are using please go to the manuals download section on your model s home page on the Brother Solutions Center at http solutions brother com ...

Page 24: ...point router for instructions Then press OK and your machine will now automatically detect which mode WPS or AOSS your wireless access point router uses and try to connect to your wireless network e A connection result message appears until the OK button is pressed on the LCD If your wireless device is connected successfully the LCD shows Connected If the connection failed the LCD shows an error c...

Page 25: ... Error code Recommended Solutions TS 01 The wireless setting is not activated turn the wireless setting to ON If a network cable is connected to your machine disconnect it and turn the wireless setting of your machine to ON 1 On your machine press and Network 2 Press WLAN and then Setup Wizard 3 When Enable WLAN is displayed press Yes This will start the wireless setup wizard TS 02 The wireless ac...

Page 26: ...ngs See How can I find the wireless security information SSID and Network Key on page 25 to confirm For ad hoc mode change the authentication and encryption methods of your computer for the wireless setting Your machine supports Open authentication method only with optional WEP encryption TS 05 The security information SSID Network Key is incorrect Reconfirm the SSID and security information Netwo...

Page 27: ...OSS see the documentation provided with your wireless access point router ask the manufacturer of your wireless access point router or ask your network administrator TS 08 Two or more wireless access points that have WPS or AOSS enabled are detected Confirm that only one wireless access point router within range has the WPS or AOSS method active and try again Try starting again after a few minutes...

Page 28: ...se agreements Follow the on screen instructions c Choose Wireless Network Connection and then click Next Important If there are any programs running close them Note The screens may differ depending on your operating system The DVD ROM includes Nuance PaperPort 12SE This software supports Windows XP Home SP3 or greater XP Professional SP3 or greater Windows Vista SP2 or greater and Windows 7 Update...

Page 29: ...Brother drivers will automatically start The installation screens appear one after another g When the On Line Registration screen is displayed make your selection and follow the on screen instructions Note If your machine is not found over the network confirm your settings by following the on screen instructions If you encounter this failure go to step 9 b on page 18 and setup the wireless connect...

Page 30: ... Install Optional Applications on page 33 Note If an error message appears during the software installation run the Installation Diagnostics located in Start All Programs Brother ADS 2600W LAN Note Internet access is required for the software update and the Brother Product Research Support Program Note Network license Windows This product includes a PC license for up to 2 users This license suppor...

Page 31: ...d installation DVD ROM into your DVD ROM drive b Double click the Start Here OSX icon to install If the model name screen appears choose your machine c Choose Wireless Network Connection and then click Next d Choose your machine from the list and then click Next Note For Mac OS X v10 5 x users upgrade to Mac OS X v10 6 x 10 7 x before installation Note If your wireless settings fail the Wireless D...

Page 32: ...additional computers if necessary If you want to use your machine with multiple computers on the network install MFL Pro Suite on each computer Go to step 11 on page 31 Note You can find your machine s MAC Address Ethernet Address and IP Address from the control panel of the machine If this screen appears enter a name for your Macintosh up to 15 characters long and then click Next The name you ent...

Page 33: ...ailing addresses phone fax numbers and e mail addresses on your computer Simply scan or import your business cards and Presto BizCard automatically saves the data and image for each card Different viewing modes are available for easy searching editing creating and sorting a Open the top menu again by ejecting and then reinserting the DVD ROM or by double clicking the start exe program If the model...

Page 34: ...ft or right or press d or c to display Scan 1 d Press to PC e Swipe left or right to select to File and then press OK f Select the destination computer you want to save to g Press Start The machine starts to feed and scan your document The scanned data is saved in PDF format on the computer that is connected to the machine Note You can change Scan to PC settings such as the saved file format using...

Page 35: ... down Yes for 2 seconds to confirm g The machine will restart re connect the cables once this is complete Entering Text for Wireless Settings Press to cycle between lower case and upper case Press to cycle between letters numbers and special characters The characters available may differ depending on your country To move the cursor to the left or right press d or c Inserting spaces To enter a spac...

Page 36: ...nual has a Software License Agreement specific to its proprietary programs Any trade names and product names of companies appearing on Brother products related documents and any other materials are all trademarks or registered trademarks of those respective companies Compilation and Publication Under the supervision of Brother Industries Ltd this manual has been compiled and published covering the...

Reviews: