background image


BiPAC 7800NL


802.11n ADSL2+ Firewall Router


User Manual


Version released: 

2.02a.dc1


Last revised date: 09-3-2010 

Summary of Contents for BiPAC 7800NL

Page 1: ...BiPAC 7800NL 802 11n ADSL2 Firewall Router User Manual Version released 2 02a dc1 Last revised date 09 3 2010 ...

Page 2: ...hapter 3 Basic Installation 13 Connecting Your Router 14 Network Configuration 15 ConfiguringPCinwindows7 15 ConfiguringPCinWindowsVista 17 ConfiguringPCinWindowsXP 19 ConfiguringPCinWindows2000 20 ConfiguringPCinWindows95 98 Me 21 ConfiguringPCinWindowsNT4 0 22 Factory Default Settings 23 Information from your ISP 25 Configuration via Web Interface 26 Chapter 4 Configuration 27 Device Info 28 Sum...

Page 3: ...rver 109 Dynamic DNS 110 DSL 111 UPnP 113 DNSProxy 120 InterfaceGrouping 121 Certificate 123 Multicast 126 Wireless 128 Basic 129 Security 131 MACFilter 145 WirelessBridge 146 Advanced 148 StationInfo 150 Management 151 SystemLog 152 SNMPAgent 154 TR 069Client 155 InternetTime 157 MailAlert 158 WakeonLAN 159 AccessControl 160 RemoteAccess 161 UpdateSoftware 162 Backup Update 163 Restart 164 Chapte...

Page 4: ...ce QoS gives full control over outgoing data traffic Priority can be assigned by the router to ensure that important transmissions like gaming packets VoIP calls or IPTV streaming content passes through the router at lightning speed even when there is heavy Internet traffic The transfer speed of different types of outgoing data passing through the router is also controlled to ensure that users do ...

Page 5: ...irtual LAN is defined by 802 1Q tagging protocol which expended the original Ethernet frame header to include VLAN ID tag and priority bits With the support of network equipments multiple virtual networks can coexist over the same physical network Ethernet frames are used to transfer data over ADSL line when bridging MER or PPPoE mode is used While the DSL connection we usually configured is to us...

Page 6: ...3 Firmware Upgradeable Device can be upgraded to the latest firmware through the WEB based GUI ...

Page 7: ...Name System DDNS Available Syslog Ease of Use with Quick Installation Wizard and Auto scan ADSL settings Featuring VLAN to support IPTV Application 2 Easy Sign On EZSO ADSL Compliance Compliant with ADSL Standard Full rate ANSI T1 413 Issue 2 G dmt ITU G 992 1 G lite ITU G 992 2 G hs ITU G 994 1 ADSL over ISDN U R2 Compliant with ADSL2 Standard G dmt bis ITU G 992 3 ADSL2 Annex M ITU G 992 3 Annex...

Page 8: ...Filtering port source IP address destination IP address MAC address URL Content Filtering domain name detection in URL string MAC Filtering Password protection for system management VPN pass through Quality of Service Control Supports the DiffServ approach Traffic prioritization and bandwidth management based on IP protocol port number and address ATM PTM and PPP Protocols ATM Adaptation Layer Typ...

Page 9: ...r easy setup Wireless Security with WPA PSK WPA2 PSK support WDS repeater function support 802 1x radius supported Web based GUI for WLAN on off switch Management Easy Sign On EZSO and Auto scan ADSL settings Web based GUI for remote and local management IPv4 IPv6 Firmware upgrades and configuration data upload and download via web based GUI Embedded Telnet server for remote and local management A...

Page 10: ...e Specifications Physical Interface WLAN 2 x 2dbi detachable antennas DSL ADSL port Ethernet 4 port 10 100Mbps auto crossover MDI MDI X Switch Factory default reset button WPS push button Power jack Power switch ...

Page 11: ...r Package Contents BiPAC 7800NL 802 11n ADSL2 Firewall Router Quick Start Guide CD containing the on line manual Two 2dBi detachable antennas Ethernet RJ 45 cable RJ 11 ADSL telephone cable Power adapter Splitter Micro filter Optional ...

Page 12: ...9 Important note for using this router ...

Page 13: ...cted to an ADSL DSLAM line sync 3 WPS Flash green when WPS configuration is in progress Unlit when WPS fails 4 Wireless Lit green when a wireless connection is established Unlit when wireless is disabled 5 Ethernet port 1X 4X RJ 45 connector Lit green when successfully connected to an Ethernet device Blinking when data is being transmitted received 6 Power When the system is ready it will be lit g...

Page 14: ... Push WPS button to trigger Wi Fi Protected Setup function For WPS configuration details please refer to WPS Setup section of this User Manual 5 Ethernet Connect your computer to a LAN port using the included Ethernet cable with RJ 45 cable 6 DSL Connect the supplied RJ 11 cable to this port when connecting to the ADSL telephone network 7 Wireless Antenna Connect the detachable antenna for wireles...

Page 15: ...connected to the same telephone line as your router e g telephones fax machines analogue modems have a line filter connected between them and the wall socket unless you are using a Central Splitter or Central Filter installed by a qualified and licensed electrician and ensure that all line filters are correctly installed and the right way around Missing line filters or line filters installed the w...

Page 16: ...talled properly prior to connecting the router device You ought to configure your PCs to obtain an IP address through a DHCP server or a fixed IP address that must be in the same subnet as the router The default IP address of the router is 192 168 1 254 and the subnet mask is 255 255 255 0 i e any attached PC must be in the same subnet and have an IP address in the range of 192 168 1 1 to 192 168 ...

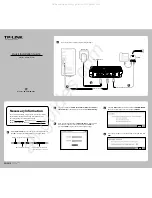
Page 17: ...14 Connecting Your Router Users can connect the ADSL2 router as the following ...

Page 18: ...art Click on Control Panel Then click on Network and Internet 2 When the Network and Sharing Center window pops up select and click on Change adapter settings on the left window panel 3 Select the Local Area Connection and right click the icon to select Properties ...

Page 19: ...s 5 In the TCP IPv4 properties window select the Obtain an IP address automatically and Obtain DNS Server address automatically radio buttons Then click OK to exit the setting 6 Click OK again in the Local Area Connection Properties window to apply the new configuration ...

Page 20: ...k 2 Then click on Network and Sharing Center at the top bar 3 When the Network and Sharing Center window pops up select and click on Manage network connections on the left window column 4 Select the Local Area Connection and right click the icon to select Properties ...

Page 21: ...s 6 In the TCP IPv4 properties window select the Obtain an IP address automatically and Obtain DNS Server address automatically radio buttons Then click OK to exit the setting 7 Click OK again in the Local Area Connection Properties window to apply the new configuration ...

Page 22: ...ork Connections 2 Double click Local Area Connection 3 In the Local Area Connection Status window click Properties 4 Select Internet Protocol TCP IP and click Properties 5 Select the Obtain an IP address automatically and the Obtain DNS server address automatically radio buttons 6 Click OK to finish the configuration ...

Page 23: ...Dial up Connections 2 Double click Local Area Connection 3 In the Local Area Connection Status window click Properties 4 Select Internet Protocol TCP IP and click Properties 5 Select the Obtain an IP address automatically and the Obtain DNS server address automatically radio buttons 6 Click OK to finish the configuration ...

Page 24: ... Network and choose the Configuration tab 2 Select TCP IP NE2000 Compatible or the name of your Network Interface Card NIC in your PC 3 Select the Obtain an IP address automatically radio button 4 Then select the DNS Configuration tab 5 Select the Disable DNS radio button and click OK to finish the configuration ...

Page 25: ... 1 Go to Start Settings Control Panel In the Control Panel double click on Network and choose the Protocols tab 2 Select TCP IP Protocol and click Properties 3 Select the Obtain an IP address from a DHCP server radio button and click OK ...

Page 26: ...strator See Access Control section Administrator Username admin Password admin Local Username user Password user Remote Username support Password support Device LAN IPv4 settings IPv4 Address 192 168 1 254 Subnet Mask 255 255 255 0 Device LAN IPv6 settings IPv6 Address prefix Default is a link local address and is different from each other as MAC address is different from one to one For example fe...

Page 27: ...ontinuing from 192 168 1 100 through 192 168 1 199 The PPPoE function is enabled to automatically get the WAN port configuration from the ISP IPv6 LAN Port WAN Port IPv6 address prefix Default is a link local address and is different from each other as MAC address is different from one to one For example fe80 0000 0000 0000 0204 edff fe01 0001 64 the prefix initiates by fe80 DHCP server function E...

Page 28: ...sed multiplexing Username Password Service Name and Domain Name System DNS IP address it can be automatically assigned by your ISP when you connect or be set manually PPPoA RFC2364 VPI VCI VC LLC based multiplexing Username Password and Domain Name System DNS IP address it can be automatically assigned by your ISP when you connect or be set manually IPoA RFC1577 VPI VCI VC LLC based multiplexing I...

Page 29: ...92 168 1 254 and click or press Enter key on the keyboard a login prompt window will appear The default root username and password are admin and admin respectively Congratulations You are now successfully logged in to the Firewall Router If the authentication succeeds the Status page below will appear on the screen ...

Page 30: ...up pages which include Device Info Summary WAN Statistics Route ARP DHCP Quick Start Advanced Setup WAN LAN NAT Security Parental Control Quality of Service Routing DNS DSL UPnP DNS Proxy Interface Grouping Certificate Multicast Wireless Basic Security MAC Filter Wireless Bridge Advanced Station Info Management System Log SNMP Agent TR 069 Client Internet Time Mail Alert Wake on LAN Access Control...

Page 31: ...e Info This Section gives users an easy access to the information about the working router and view the current status of the router Here Summary WAN Statistics Router ARP and DHCP six subsections are included ...

Page 32: ...efault is a Link Local address but when connects to ISP it will display the Global Address like above figure MAC Address Display the MAC address DSL PHY and Driver Version Display DSL PHY and Driver version Wireless Driver Version Display wireless driver version WAN Line Rate Upstream Kbps Display Upstream line Rate in Kbps Line Rate Downstream Kbps Display Downstream line Rate in Kbps Default Gat...

Page 33: ...the VLANMuxld VLAN ID or disabled If VLAN ID is 1 then disabled is shown in this field while if VLAN ID isn t 1 the exact VLAN ID is shown here in this field Igmp Display the status of IGMP disabled or enabled NAT Display the status of NAT disabled or enabled Firewall Display the status of Firewall disabled or enabled Status Display the status of this WAN connection IPv4 Address the WAN IPv4 Addre...

Page 34: ...ng in Receiving or Transmitting data Reset Press this button to get the latest information WAN Service The table shows the statistics of LAN Interface Display the connection interface Description the description for the connection Bytes Display the WAN Received and Transmitted traffic statistics in Bytes Packets Display the WAN Received and Transmitted traffic statistics in Packests Errors Display...

Page 35: ...kets Number of received packets over the interface Out Packets Number of transmitted packets over the interface In OAM Cells Number of OAM cells received Out OAM Cells Number of OAM cells transmitted In ASM Cells Number of ASM cells received Out ASM Cells Number of ASM cells transmitted In Packet Errors Number of received packets with errors In Cell Errors Number of received cells with errors Rese...

Page 36: ...13 ADSL2 AnnexL ADSL2 and AnnexM Traffic Type transfer mode here supports ATM and PTM Status Show the status of DSL link Link Power State Show link output power state Line Coding Trellis Trellis on off SNR Margin 0 1 dB show the Signal to Noise Ratio SNR margin ...

Page 37: ...ds Total number of Reed Solomon code errors RS Correctable Errors Total number of RS with correctable errors RS Uncorrectable Errors Total number of RS words with uncorrectable errors HEC Errors Total number of Header Error Checksum errors OCD Errors Total number of out of cell Delineation errors LCD Errors Total number of Loss of Cell Delineation Total Cells Total number of cells Data Cells Total...

Page 38: ...ested Time sec press Start to start test When it is OK the following test result window will appear You can view the quality of ADSL connection Here the connection is OK Reset Click this button to reset the statistics ...

Page 39: ...ot the subnet L G show that the outside gateway is needed to forward packets in this route L R show that the route is reinstated from dynamic routing L D show that the route is dynamically installed by daemon or redirecting L M show the route is modified from routing daemon or redirect Metric Display the number of hops counted as the Metric of the route Service Display the service that this route ...

Page 40: ... for more information on this feature IP Address Shows the IP Address of the device that the MAC address maps to Flag Shows the current status of the ARP entries L Complete the route resolving is processing well L M Marked as permanent entry the route is permanent L P publish entry publish this route item MAC Address Shows the MAC address that is corresponded to the IP address of the device it is ...

Page 41: ...d by the DHCP server in the device IP Address The IP address which is assigned to the host with this MAC address MAC Address The MAC Address of internal DHCP client host Host Name The Host Name of DHCP client Register Information Show the remaining time information during registration ...

Page 42: ...to configure Wireless press Jump to Wireless setting to go to step 8 2 When ADSL line is not ready the screen1 below will appear to remind you Then you should connect the ADSL line While ADSL line is ready the screen 2 below will appear to let you go on Here you can select Auto or Manually Select Auto will go to step 3 and select manually will go to step 4 Screen 1 Screen 2 ...

Page 43: ...nd then it will quickly goes to step 6 Or you can Abort to manually setting to step 4 Screen 3 4 Here you should select the Layer2 Interface ATM and PTM are two kinds of transmission mode You can select according to your ISP Select ATM for example Click Add to add WAN Interface 5 Enter the VPI VCI from your ISP ...

Page 44: ...6 Enter the username password from your ISP for IP and DNS settings also refer to your ISP Here IPv6 service is enabled by default 7 Wait while the device is configured 8 WAN port configuration is success ...

Page 45: ...less setting For security information please turn to wireless security section in this manual for help 10 Configuration s success Then you successfully quick configured your router and can access the internet turn to Device Info you will see the basic information For more information turn to Advanced setup for help ...

Page 46: ...e sub items that will allow you to further configure your router WAN LAN NAT Security Parental Control Quality of Service Routing DNS DSL UPnP DNS Proxy Interface Grouping Certificate and Multicast The function of each configuration sub item is described in the following sections ...

Page 47: ... or PTM The following is the interface listing table Click Add to add WAN interface VCI VPI enter the VCI VPI from your ISP Link Type select the link type protocol EOA PPPoA IPoA Connection Mode L Default Mode this mode only allows single service over one connection L VLAN MUX Mode this mode allows multiple services over one PVC The two modes can be different in WAN service configuration And PPPoA...

Page 48: ...P Strict Priority always sends the packets with the highest priority WFQ Weighted Fair Queuing an automatically bandwidth adjusting method sharing the available bandwidth when congestion happens the bandwidth is assigned according to the priority and the weight value Turn to the Quality of Service Queue Config section for more information Precedence of the default queue default 8 lowest Weight Val...

Page 49: ...ws more time delay to R VBR Enter Peak Cell Rate Sustainable Cell Rate and Maximum Burst Rate Click Apply to apply the WAN interface Check the remove checkbox then press Remove to delete it only if this interface are not used by a WAN Service if it is used by a WAN service first remove the WAN service then turn back to remove the interface Don t feel confused it will remind you by the following pr...

Page 50: ...47 PTM PTM Setting is similar to ATM PTM Priority Select the PTM priority Normal or High Click Apply to save your settings The interface will be added to the PTM Interface listing table ...

Page 51: ...48 Now follow the above steps we set two ATM WAN interfaces for future illustration one is of DefaultMode and one is of VlanMuxMode ...

Page 52: ...rvice will be listed here Default Connection mode Select the interface which is a Default mode connection configured in WAN Service here for example in the following atm0 0_8_35 is a Default mode connection Click Add to create one WAN service Select the interface the listed interfaces are the one you configured in WAN interface section Click Next to further configure ...

Page 53: ...dvised by your ISP here select PPPoE Description user defined description IPv6 for this service check whether to enable IPv6 for this service Click Next to go on See IPv6 enabled and IPv6 disabled IPv6 enabled Username enter ISP account ...

Page 54: ...ddress if you enable Static IP Address Obtain DNS check whether to obtain DNS address automatically Primary Secondary DNS if you uncheck Obtain DNS then enter then primary secondary DNS address IPv6 Address enable to assign static IPv6 address else to obtain Ipv6 address automatically IP Address enter the Static IPv6 address if you enable Static IPv6 Address IPv6 Unnumbered Model Enables or disabl...

Page 55: ... to IPv4 DNS server There are two modes to get DNS server address Auto and static mode Obtain IPv6 DNS info from a WAN interface WAN Interface selected select one configured IPv6 WAN connection from the drop down menu to be as an IPv6 DNS Use the following Static IPv6 DNS address Primary IPv6 DNS Server Secondary IPv6 DNS Server type the specific primary and secondary IPv6 DNS Server address ...

Page 56: ...select the item you want to remove check the checkbox then press Remove it will be OK Here the corresponding WAN interface and WAN Service have been configured if it is OK you can access the internet You can go to Device Info WAN or Summary to view the WAN connection information if your ISP provides IPv6 service then you will obtain an IPv6 address ...

Page 57: ...54 The device summary information ...

Page 58: ...rmine whether to enable Fullcone NAT And while you disabled Fullcone NAT and only use NAT the default NAT type is Port Restricted cone NAT Of Port Restricted cone NAT the restriction includes port numbers Specifically an external host can send a packet with source IP address X and source port P to the internal host only if the internal host had previously sent a packet to IP address X and port P D...

Page 59: ...PPoE Frame between WAN and Local Ports check whether to enable this function It allows PC in LAN to set up its own PPP link or the PC will access internet via the PPP link in WAN port IGMP Multicast Proxy check whether to enable this function IGMP Internet Group Management Protocol Proxy intercept the IGMP request from Clients and forward it to the router after some dealings Click Next to go on to...

Page 60: ...llows If you don not need the service select the item you want to remove check the checkbox then press Remove it will be OK Here the corresponding WAN interface and WAN Service have been configured if it is OK you can access the internet You can go to Device Info WAN or Summary to view the WAN connection information ...

Page 61: ... for users to deal with the IP and DNS You can select obtain automatically or manually input the information according to your ISP Obtain an IP address automatically check whether to enable this function Option 60 Vendor ID Enter the associated information by your ISP This option is used by DHCP clients to optionally identify the vendor type and configuration of a DHCP client The information is a ...

Page 62: ...ether to enable or disable this feature WAN IPv6 Address Prefix Length Enter the WAN IPv6 Address Prefix Length from your ISP WAN Next Hop IPv6 Address Enter the WAN Next Hop IPv6 Address from your ISP Note If you don t know well about the DHCP Option you can leave it empty or leave it as default Click Next to go to next step NAT The NAT Network Address Translation feature allows multiple users to...

Page 63: ...v4 DNS server There are two modes to get DNS server address Auto and static mode Obtain IPv6 DNS info from a WAN interface WAN Interface selected select one configured IPv6 WAN connection from the drop down menu to be as an IPv6 DNS Use the following Static IPv6 DNS address Primary IPv6 DNS Server Secondary IPv6 DNS Server type the specific primary and secondary IPv6 DNS Server address ...

Page 64: ...61 Click Next to check the settings If you confirm click Apply to submit the settings ...

Page 65: ...t hexadecimal number s Option 125 Option 125 is a complementary standard of DHCP protocol it is used to encapsulate option 125 message into DHCP offer packet before forward it to clients After the clients receive the packet it check the option 125 field in the packet with the prestored message if it is matched then the client accepts this offer otherwise it will be abandoned Check Enable or Disabl...

Page 66: ...ou can determine whether to enable Fullcone NAT While only NAT enabled the default NAT type Port Restricted cone NAT will be used For detail please turn to page 47 for help Firewall Check uncheck this item to enable disable firewall function IGMP Multicast IGMP Internet Group Membership Protocol is a protocol used by IP hosts to report their multicast group memberships to any immediately neighbori...

Page 67: ...64 Click Next to go on to check the settings Click Apply to apply your settings ...

Page 68: ...ption You are allowed to enter the user defined name for this service IPv6 for this service check whether to enable IPv6 service Click Next to go to next step See IPv6 enabled and IPv6 disabled IPv6 enabled Click Apply to apply your settings ...

Page 69: ...66 IPv6 disabled Click Apply to apply your settings ...

Page 70: ...to prioritize different classes of traffic voice video data etc Enter the priority identification tagged 0 7 untagged 1 802 1Q VLAN ID It is a parameter to specify the VLAN which the frame belongs Enter the VLAN ID identification tagged 0 4094 untagged 1 You can leave 802 1P Priority and 802 1Q VLAN ID as default setting 1 means untagged in this mode the vlan tag header will not be contained but i...

Page 71: ...ple with IPv6 disabled let s look at a scenario in which 1 PPPoE and 1 Bridge service needed by user In the above page click Next to set WAN service parameters Click Next to set the default gateway of this connection ...

Page 72: ...n you can see the PPPoE connection is listed below Here it is just one service over atm1 0_1_35 Then we can again set a Bridging connection over atm1 0_1_35 interface Click Add in the above page the atm1 0_1_35 also is listed for selection to add services Continue clicking Next to select Bridging connection type ...

Page 73: ...w match the settings provided by your ISP And Click Apply to save your settings This screen is the interface we set previous here used for understanding The below is WAN connection status here you can see clearly the multiple services over one PVC ...

Page 74: ... But we have set two services on the same PVC they are bridging and PPPoE services While in contrast to Default connection mode one PVC can only hold one service if you want to more than one service over one PVC you should apply from your ISP more PVCs to meet your needs ...

Page 75: ...dress the IP address of the router Default is 192 168 1 254 Subnet Mask the default Subnet mask on the router IGMP Snooping Enable or disable the IGMP Snooping function Without IGMP snooping multicast traffic is treated in the same manner as broadcast traffic that is it is forwarded to all ports With IGMP snooping multicast traffic of a group is only forwarded to ports that have members of that gr...

Page 76: ... the information wanted Here as default Start IP Address the start IP address of the range the DHCP Server used to assign to the Clients End IP Address the end IP address f the range the DHCP Server used to assign to the Clients Leased Time the leased time for each DHCP Client Maximum Leased Time hour the Maximum Leased Time hour L DHCP Server Relay If you check DHCP Relay and then you must enter ...

Page 77: ...dress and Host Name then click Apply to confirm your settings IP Alias This function allows the creation of multiple virtual IP interfaces on this router It helps to connect two or more local networks to the ISP or remote node IP Alias check whether to enable this function IP Address Specify an IP address on this virtual interface Netmask Specify a subnet mask on this virtual interface Click Apply...

Page 78: ...tised by routers Routers advertise prefixes that identify the subnet s associated with a link while hosts generate an interface identifier that uniquely identifies an interface on a subnet An address is formed by combining the two When using stateless configuration you needn t configure anything on the client Static LAN IPv6 Address Configuration Interface Address Prefix Length enter the static LA...

Page 79: ... MLD snooping multicast traffic is treated in the same manner as broadcast traffic that is it is forwarded to all ports With MLD snooping multicast traffic of a group is only forwarded to ports that have members of that group L Standard Mode In standard mode multicast traffic will flood to all bridge ports when no client subscribes to a multicast group L Blocking Mode In blocking mode the multicas...

Page 80: ...e PCs addresses are configured the same as in IPv4 that is addresses are assigned by DHCPv6 server L With both DHCPv6 and Issue Router Advertisement Enabled With this method the PCs addresses are configured the same like above and the address information in RA packets will be neglected ...

Page 81: ...tions and P2P file sharing applications and are using NAT Network Address Translation then you will usually need to configure your router to forward these incoming connection attempts using specific ports to the PC on your network running the application You will also need to use port forwarding if you want to host an online game server The reason for this is that when using NAT your publicly acce...

Page 82: ... select Custom Service in the above parameter Server IP Address Enter your server IP Address here External Port L Start Enter a port number as the external starting number for the range you want to give access to internal network L End Enter a port number as the external ending number for the range you want to give access to internal network Internal Port L Start Enter a port number as the interna...

Page 83: ... drop down menu then the port will automatically appear modify some as you like or you can just leave it as default Remember to enter your server IP Address 2 Press Apply to conform and the items will be list in the Virtual Servers Setup table ...

Page 84: ...f you don t need a specified Server you can remove it Check the check box beside the item you want to remove then press Remove it will be OK ALG The ALG Controls enable or disable protocols over application layer ...

Page 85: ...ts your application requires instead of simply using DMZ or creating a Virtual Server entry for All protocols as doing so results in all connection attempts to your public IP address accessing the specified PC If you have disabled the NAT option in the WAN ISP section the Virtual Server function will hence be invalid If the DHCP server option is enabled you have to be very careful in assigning the...

Page 86: ...s satisfied the specified action will be taken Above is the listing table Click Add to add new configurations Filter name a user defined filter name or you can select from the drop down menu the application and leave the automatically generated name as the Filter name IP Version Select the IP Version IPv4 or IPv6 Internal IP Address External IP Address This is the Address Filter used to allow or b...

Page 87: ...ecommended that this option be configured by an advanced user External Port This is the Port or Port Range that defines the application Default is set from range 1 65535 Action If a packet matches this filter rule forward allows the packets to pass or drop disallow the packets to pass this packet Direction Determine whether the rule is for outgoing packets or for incoming packets Set up Select the...

Page 88: ...emove the item will be removed Reorder When there are more than one Filter application you can reorder them to the priority you want The former is prior to the latter one Click or to change the priority of the filter then press to confirm ...

Page 89: ...on L Disable disable the Time Restriction function L Allow allow the members in the following table to access the router L Block block the members listed in the following table from accessing the router Note here users should add the rules first then select the wanted action Click Add to add the rules Username user defined name MAC Address enter the MAC address es you want to allow or block to acc...

Page 90: ...ou of the attention If you needn t this rule you can check the box press Remove it will be OK URL Filter URL Uniform Resource Locator e g an address in the form of http www abcde com or http www example com filter rules allow you to prevent users on your network from accessing particular websites by their URL There are no pre defined URL filter rules you can add filter rules to meet your requireme...

Page 91: ...ilter web access with Java Applet components Click Block ActiveX to filter web access with ActiveX components Click Block Cookie to filter web access with Cookie components Click Block Proxy to filter web proxy access Exception IP Address You can input a list of IP addresses as the exception list for URL filtering Log Select Enable for this option if you will like to capture the logs for this URL ...

Page 92: ...h the pull down menu Next click Add Your new domain will be added to either the Trusted Domain or Forbidden Domain listing depending on which you selected previously For specific process please refer to Keywords filtering Exception IP Address Click to add the IP Addresses Enter the except IP address Click Add to save your changes The IP address will be entered into the Exception List and excluded ...

Page 93: ...ier If Enable Qos checkbox is not selected all QoS will be disabled for all interfaces Select Default DSCP Mark Select the default DSCP mark from the list box Differentiated Services Code Point DSCP is the first 6 bits in the ToS byte DSCP Mark allows users to classify the traffic of the application to be executed according to the DSCP value The default DSCP mark is used to mark all egress packets...

Page 94: ...lass1 L AF42 100100 Assured Forwarding Class1 M AF43 100110 Assured Forwarding Class1 H CS1 001000 Class Selector IP precedence 1 CS2 010000 Class Selector IP precedence 2 CS3 011000 Class Selector IP precedence 3 CS4 100000 Class Selector IP precedence 4 CS5 101000 Class Selector IP precedence 5 CS6 110000 Class Selector IP precedence 6 CS7 111000 Class Selector IP precedence 7 DSCP indicates thr...

Page 95: ...faces despite of the default queue And Wireless Service queue will be enabled by default if you enable wireless Also if you enable virtual APs the corresponding WMM service queues will be enabled as well Name the queue name Key the item number Interface the queue interface Scheduler Algorithm the QoS Scheduler Algorithm SP Strict Priority or WFQ Weight Fair Queuing Precedence the priority identifi...

Page 96: ...let you configure Enter the information Click Apply to conform Then the item will be listed in the table Precedence the precedence of the queue interface P1 P4 4 levels from high to low are 1 4 ATM or PTM interfaces 7 levels from high to low are 1 7 for the precedence of the default queue with the interface of SP Scheduler Algorithm is 8 Here if the interface is of WFQ Scheduler Algorithm you shou...

Page 97: ...Remove checkbox then click Remove button to delete the selected item Note only the queue added via the above mode can be directly removed here the default queue can t be removed here if you want to remove them remove the interface in WAN WAN Interface section Note In ATM mode maximum queues can be configured 16 In PTM mode maximum queues can be configured 8 For each Ethernet interface maximum queu...

Page 98: ... screen displays a packet QoS summary table and allows user to add or remove a QoS classification class This is the main place to configure the classification marking and queuing rules Click Add to add Network Traffic Class Rule ...

Page 99: ...means needed and 0 means ignored For example MAC address e0 3b 4a c2 ca e2 and MAC mask ff ff ff 00 00 00 that is whatever MAC address while matches e0 3b 4a XX XX XX will be accepted Specify Classification Results Enter or select appropriate parameters you want for the packets matched the above classification criteria in the following fields You have to choose a classification queue A blank mark ...

Page 100: ...first make sure there is at least one WAN queue If you have configured WAN interface and it will appeared as a default queue you can also add other queues of the specific interface See Queue Config Here we have a atm0 WAN interface the interface has a default queue and an added queue Make sure to enable the queue ...

Page 101: ... information to set up a rule 1 Specify the rule name rule order and rule status 2 Specify the classification criteria Here you can set every parameter to strictly control the specific traffic or you can set several parameters to let them be the key elements to control the traffic A blank criterion indicates it is not used for classification ...

Page 102: ...onfig section Select the needed queue If you find none queues here turn back to check whether you have configured a queue and enable it 3 Click Apply to save your settings The added rule will listed as below Enable check the enable check box then press Enable to activate the rule If you want to disable this rule you can uncheck the corresponding check box and press Enable button the rule will be d...

Page 103: ...mple Make sure there are enabled port P1 based queues here LAN queues need your configuration You can enable wireless to enable WMM queues by default or add P1 P4 ported based queues manually 2 In QoS Classification Setup page Click Add to add a Qos Classification ...

Page 104: ...101 Then in the Add Network Traffic Class Rule page enter the information to set up a rule 3 Click Apply to save your settings The added rule will be listed as below ...

Page 105: ...102 Port based QoS Take port P1 to WAN QoS for example 1 First make sure there is at least a WAN queue and it is enabled 2 In QoS Classification Setup page Click Add to add a QoS Classification ...

Page 106: ...Network Traffic Class Rule page enter the information to set up a rule to your needs To Assign Classification queue select the needed WAN queue 3 Click Apply to save your settings and the added rule will be listed as below ...

Page 107: ... section here select the one you want to be the default gateway by moving the interface via or And select a Default IPv6 Gateway from the drop down menu Note Only one default gateway interface will be used according to the priority with the first being the highest and the last one the lowest priority if the WAN interface is connected ...

Page 108: ...he submask it is another mode of presenting submask One IPv4 address 192 168 1 0 24 submask is 255 255 255 0 While in IPv6 IPv6 address composes of two parts thus the prefix and the interface ID the prefix is like the net ID in IPv4 and the interface ID is like the host ID in IPv4 The prefix length is to identify the net ID in the address One IPv6 address 3FFE FFFF 0 CD30 0 0 0 0 64 the prefix is ...

Page 109: ...106 In listing table you can remove the one you don t want by checking the checking box and press Remove button ...

Page 110: ...defined name Physical LAN Port select the LAN port Source IP enter the Host Source IP Interface select the WAN interface which you want the Source IP to access outside through Default Gateway enter the default gateway which you want the Source IP to access outside through Click Apply to apply your settings And the item will be listed in the policy Routing listing table Here if you want to remove t...

Page 111: ...ssive only receive the routing information broadcasted by other routers and modifies its routing table according to the received information L Active working in this mode the router sends and receives RIP routing information and modifies routing table according to the received information Enable check the checkbox to enable RIP rule for the interface Note RIP can not be configured on the WAN inter...

Page 112: ...4 DNS server There are two modes to get DNS server address Auto and Static mode Obtain IPv6 DNS info from a WAN interface WAN Interface selected select one configured IPv6 WAN connection from the drop down menu to be as an IPv6 DNS Use the following Static IPv6 DNS address Primary IPv6 DNS Server Secondary IPv6 DNS Server type the specific primary and secondary IPv6 DNS Server address ...

Page 113: ...S provider using their website for example http www dyndns org Dynamic DNS L Disable Check to disable the Dynamic DNS function L Enable Check to enable the Dynamic DNS function The following fields will be activated and required Wildcard When enabled you allow the system to lookup on domain names that do not exist to have MX records synthesized for them Dynamic DNS Server Select the DDNS service y...

Page 114: ...y You can choose Inner Pair or Outer Pair Capability There are 2 options Bitswap Enable and SRA Enable that user can select for this connection L Bitswap Enable Allows bitswaping function L SRA Enable Allows seamless rate adaptation Click Apply to confirm the settings Click to future configure DSL Select the Test Mode or leave it as default Tone Selection suggesting you to leave it as default or l...

Page 115: ...112 With each tone carrying separate data the technique operates as if 256 separate modems were running in parallel The tone range is from 0 to 31 for upstream and from 32 to 255 for downstream ...

Page 116: ...ed settings removing the need for the user to control advanced configuration of their device Both the user s Operating System and the relevant application must support UPnP in addition to the router Windows XP and Windows Me natively support UPnP when the component is installed and Windows 98 users may install the Internet Connection Sharing client from Windows XP in order to support UPnP Windows ...

Page 117: ...e Programs Step 2 Click on the Windows Setup tab and select Communication in the Components selection box Click Details Step 3 In the Communications window select the Universal Plug and Play check box in the Components selection box Step 4 Click OK to go back to the Add Remove Programs Properties window Click Next Step 5 Restart the computer when prompted ...

Page 118: ...ep 2 Double click Network Connections Step 3 In the Network Connections window click Advanced in the main menu and select Optional Networking Components The Windows Optional Networking Components Wizard window displays Step 4 Select Networking Service in the Components selection box and click Details ...

Page 119: ...lick OK to go back to the Windows Optional Networking Component Wizard window and click Next Auto discover Your UPnP enabled Network Device Step 1 Click start and Control Panel Double click Network Connections An icon displays under Internet Gateway Step 2 Right click the icon and select Properties ...

Page 120: ...lick Settings to see the port mappings that were automatically created Step 4 You may edit or delete the port mappings or click Add to manually add port mappings Step 5 Select Show icon in notification area when connected option and click OK An icon displays ...

Page 121: ...118 in the system tray Step 6 Double click on the icon to display your current Internet connection status ...

Page 122: ...tep 1 Click Start and then Control Panel Step 2 Double click Network Connections Step 3 Select My Network Places under Other Places Step 4 An icon describing each UPnP enabled device shows under Local Network Step 5 Right click on the icon of your BiPAC 7800NL and select Invoke The web configuration login screen displays Step 6 Right click on the icon of your BiPAC 7800NL and select Properties A p...

Page 123: ...y to connect to the DNS Server in public to correctly resolve Domain name to access the internet DNS Proxy select whether to enable or disable DNS Proxy function default is enabled Host name of the Broadband Router enter the host name of the router Default is home gateway Domain name of the LAN network enter the domain name of the LAN network home gateway ...

Page 124: ...common set of requirements that communicate as if they were attached to the same broadcast domain regardless of the physical location A VLAN has the same attributes as a physical LAN but it allows for end stations to be grouped together even if they are not located on the same network switch Click Add to add groups But note that the maximum number can be 16 ...

Page 125: ...settings and your added group will be listed in the Interface Grouping table below If you want to remove the group check the box as the following and press Remove Note If you like to automatically add LAN clients to a WAN Interface in the new group add the DHCP vendor ID string By configuring a DHCP vendor ID string any DHCP client request with the specified vendor ID DHCP option 60 will be denied...

Page 126: ...r Certificate Name the certificate identification name Subject the certificate subject Type the certificate type information ca indicates that the certificate is a CA signed certificate self indicates that the certificate is a certificate owner signed one x 509 indicates the certificate is the one created and signed according to the definition of Public Key System suggested by x 509 Action View vi...

Page 127: ...124 Click Import Certificate button to import your certificate Enter the certificate name and insert the certificate ...

Page 128: ...125 Click Apply to confirm your settings ...

Page 129: ...nications protocols used to manage the membership of Internet Protocol multicast groups IGMP is used by IP hosts and the adjacent multicast routers to establish multicast group members There are three versions for IGMP that is IGMPv1 IGMPv2 and IGMPv3 MLD short for Multicast Listener Discovery protocol is a component if the Internet Protocol version 6 IPv6 suite MLD is used by IPv6 to discover mul...

Page 130: ...side and he want to get IGMP snooping enabled then this LAN to LAN multicast feature should be enabled MLD Default Version enter the supported MLD version 1 2 default is MLDv2 Query Interval enter the periodic query interval time sec the multicast router sending the query message to hosts to understand the group membership information Query Response Interval enter the response interval time sec La...

Page 131: ...u ways to configure wireless access When you click this item the column will expand to display the sub items that will lead you to configure your router Basic Secturity MAC Filter Wireless Bridge Advanced and Station Info are included here ...

Page 132: ...able this function Wireless multicast Forwarding WMF check to enable or disable wireless multicast forwarding SSID The SSID is the unique name of a wireless access point AP to be distinguished from another For security purpose change the default wlan ap to a unique ID name to the AP already built in to the router s wireless interface It is case sensitive and must not excess 32 characters Make sure...

Page 133: ...ght advertise the same SSID but a different capability set allowing access to be provided via Web Portal WEP and WPA simultaneously Where APs are shared by multiple providers Virtual APs provide each provider with separate authentication and accounting data for their users as well as diagnostic information without sharing sensitive management traffic or data between providers You can enable the vi...

Page 134: ...ation L Open WEP Encryption select to enable or disable WEP Encryption Here select Enable Encryption Strength select the strength 128 bit or 64 bit Current Network Key select the one to be the current network key Please refer to key 1 4 below Network Key 1 4 Enter 13 ASCII characters or 26 hexadecimal digits for 128 bit encryption keys Enter 5 ASCII characters or 10 hexadecimal digits for 64 bit e...

Page 135: ...ter the port number of RADIUS authentication server here RADIUS Key Enter the password of RADIUS authentication server WEP Encryption select to enable or disable WEP Encryption Here select Enable Current Network Key select the one to be the current network key Please refer to key 2 3 below Network Key 1 4 Enter 13 ASCII characters or 26 hexadecimal digits for 128 bit encryption keys Enter 5 ASCII ...

Page 136: ...re two Algorithms AES Advanced Encryption Standard and TKIP Temporal Key Integrity Protocol which help to protect the wireless communication L WPA PSK WPA2 PSK WPA WAPI passphrase enter the WPA WAPI passphrase you can click here to display to view it WPA Group ReKey Internal The period of renewal time for changing the security key automatically between wireless client and Access Point AP The unit ...

Page 137: ...rity Protocol which help to protect the wireless communication L Mixed WPA2 WPA WPA2 Preauthentication When a wireless client wants to handoff to another AP with preauthentication it can perform 802 1X authentications to the new AP and when handoff happens this mode will help reduce the association time used Network Re auth Interval the interval for network Re authentication The unit is second WPA...

Page 138: ...is used to exchange the AP setting with Station and configure Ap setting This feature greatly simplifies the steps needed to create a Wi Fi network for a residential or an office setting WPS supports 2 types of configuration methods which are commonly known among consumers PIN Method PBC Method WPS select enable to enable WPS function As you see WPS can only be available when WPA PSK WPA2 PSK or O...

Page 139: ...136 Configure AP as Registrar Add Enrollee with PIN method 1 select radio button PIN 2 Input PIN from Enrollee Station 16837546 in this example Help it is to help users to understand PIN 3 Click ...

Page 140: ...ch the wireless client s WPS utility eg Ralink Utility Set the Config Mode as Enrollee press the WPS button on the top bar select the AP eg wlan ap from the WPS AP List column Then press the PIN button located on the middle left of the page to run the scan ...

Page 141: ... s SSID and security setting will now be configured to match the SSID and security setting of the registrar You can check the message in the red ellipse with the security parameters you set here we all use the default ...

Page 142: ...139 Add Enrollee with PBC Method 1 Select radio button Push Button and Click Or Press the physical button on router ...

Page 143: ...ng Enrollee Launch the wireless client s WPS Utility eg Ralink Utility Set the Config Mode as Enrollee Then press the WPS button and choose the correct AP eg wlan ap from the WPS AP List section before pressing the PBC button to run the scan ...

Page 144: ...he PBC button is pushed a wireless communication will be established between your router and the PC The client s SSID and security setting will now be configured to match the SSID and security setting of the router ...

Page 145: ...142 Configure AP as Enrollee Add Registrar with PIN Method 1 Set AP to Unconfigured Mode and Click Config AP button ...

Page 146: ...S utility eg Ralink Utility Set the Config Mode as Registrar Enter the PIN number 76229909 for example in the PIN Code column then choose the correct AP eg wlan ap from the WPS AP List section before pressing the PIN button to run the scan ...

Page 147: ...router s AP s SSID and security setting will now be configured to match the SSID and security setting of the registrar 4 Do Web Page refresh after ER complete AP Configuration to check the new parameters setting ...

Page 148: ...cess the wireless network L Deny deny the hosts with the following listed MACs to access the wireless network Click Add to add the MACs MAC Address enter the MAC address es The format of MAC address could be xx xx xx xx xx xx or xx xx xx xx xx xx Click Apply to apply your settings and the item will be listed below If you need not the rules check the remove checkbox and press Remove to delete it ...

Page 149: ...ccess Point the gateway communicates with both clients and bridges L Wireless Bridge the gateway communicates with other WDS devices only In this mode the gateway doesn t communicate with client devices If your wireless network includes repeaters that use WDS the gateway in wireless bridge mode will also communicate with your repeaters The gateway in wireless bridge mode will not communicate with ...

Page 150: ...mmunicate with Remote Bridge MAC Address select the remote bridge MAC addresses L Disable Does not restrict the gateway to communicating with bridges that have their MAC address listed but it is still open to communicate with all bridges that are in the same network Click Apply to apply your settings ...

Page 151: ...2 11n EWC select to auto enable or disable 802 11n Bandwidth Select bandwidth The higher the bandwidth the better the performance will be Control Sideband only available for 40MHz It allows you to select upper sideband or lower sideband Sideband refers to the frequency band either above upper sideband or below lower sideband the carrier frequency within which fall the spectral components produced ...

Page 152: ... DTIM is countdown variable that informs clients of the next window for listening to broadcast and multicast messages When the AP has buffered broadcast or multicast messages for associated clients it sends the next DTIM with a DTIM interval value AP clients hear the beacons and awaken to receive the broadcast and multicast messages The default is 1 Beacon Interval The amount of time between beaco...

Page 153: ...ciated List all the stations that are associated with the Access Point If a station is idle for too long it is removed from this list Authorized List those devices with authorized access SSID show the current SSID of the client Interface to show which interface the wireless client is connected to Refresh to get the latest information ...

Page 154: ...151 Management There are 9 items within the System section System Log SNMP Agent TR 069 Client Internet Time Mail Alert Wake on LAN Access Control Remote Access Update Software and Backup Update ...

Page 155: ...events white L Debugging debug level messages dark grey on cream The gateway records all log events at the chosen level and above For instance if you set the log level to Critical all critical alert and emergency events are logged but none of the others are recorded Display Level display the log according to the level you set when you view system log Once you set the display level the logs of the ...

Page 156: ...153 Click to see the System log of this router The logs will be listed as configured above Click refresh to get the latest information Click Apply to save your settings ...

Page 157: ...to the manager Also agent will send Trap message to the manager when agent finds some exceptions Trap message is the message automatically sent by the managed device without request to the manager about the emergency events SNMP Agent enable or disable SNMP Agent WAN Access enable or disable WAN access which allows PCs in WAN side read or set the SNMP related MIB pamareters Read Community Type the...

Page 158: ...cated for end users For this reason TR 069 was developed It provides the possibility of auto configuration of the access types Using TR 069 the terminals can get in contact with the Auto Configuration Servers ACS and establish the configuration automatically and let ACS configure CPE automatically Inform select enable to let CPE be authorized to send Inform message to automatically connect to ACS ...

Page 159: ...or ACS server to make connection request Connection Request User Password Enter the password for ACS server to make connection request GetRPCMethods supported by both CPE and ACS display the supported RFC listing methods Click Apply to apply your settings ...

Page 160: ... than those in the drop down list simply enter its IP address in their appropriate blanks provided as shown above Your ISP may also provide an SNTP server for you to use Choose your local time zone from the drop down menu After a successful connection to the Internet the router will retrieve the correct local time from the NTP server you have specified If you prefer to specify an NTP server other ...

Page 161: ...o that the server can be properly maintained SMTP Server Enter the SMTP server that you would like to use for sending emails Username Enter the username of your email account to be used by the SMTP server Password Enter the password of your email account Sender s Email Enter your email address SSL check to whether to enable SSL encryption feature Port the port default is 25 Recipient s Email WAN I...

Page 162: ...t Select MAC address of the computer that you want to wake up or turn on remotely Add After selecting click Add then you can perform the Wake up action Edit Delete Click to edit or delete the selected MAC address Ready Yes indicating the remote computer is ready for your waking up No indicating the machine is not ready for your waking up Delete Delete the selected MAC address ...

Page 163: ...ault username and password are admin and admin respectively L Remote username for the remote user to login corresponding default username and password are support and support respectively L Local username for the general user corresponding default username password are user and user respectivley Username the default username for each user level Old Password Enter the old password New Password Ente...

Page 164: ...161 Remote Access It is to allow remote access to the router to view or configure Remote Select to enable or disable Remote Access functionality ...

Page 165: ... upgrading Your router s firmware is the software that allows it to operate and provides all its functionality Think of your router as a dedicated computer and the firmware as the software it runs Over time this software may be improved and revised and your router allows you to upgrade the software it runs to take advantage of these changes Clicking on Browse will allow you to select the new firmw...

Page 166: ...s It is advisable to backup your router s settings before making any significant changes to your router s configuration Click Backup Settings a window appears click save then browse the location where you want to save the backup file Click Browse and browse to the location where your backup file is saved the click Open Then in the above page click Update Settings the following process indicating s...

Page 167: ...If you wish to restart the router using the factory default settings for example after a firmware upgrade or if you have saved an incorrect configuration select Factory Default Settings to reset to factory default settings Or you just want to restart after the current setting the select the Current Settings and Click Restart ...

Page 168: ...admin If this fails you can restore your router to its factory settings by pressing the reset button on the device rear side Problems with WAN interface Problem Suggested Action Frequent loss of ADSL line sync disconnections Ensure that all other devices connected to the same telephone line as your router e g telephones fax machines analogue modems have a line filter connected between them and the...

Page 169: ... should be on for the port that has a PC connected If it does not lit check to see if the cable between your router and the PC is properly connected Make sure you have first uninstalled your firewall program before troubleshooting Verify that the IP address and the subnet mask are consistent for both the router and the workstations ...

Page 170: ...act the dealer from where you purchased your product Contact Billion Worldwide http www billion com MAC OS is a registered Trademark of Apple Computer Inc Windows 7 98 Windows NT Windows 2000 Windows Me Windows XP and Windows Vista are registered Trademarks of Microsoft Corporation ...

Reviews: