background image

 IAN  277483

 KITCHEN TIMER


 TIMER 

 Instrucţiuni de utilizare şi de siguranţă


 КУХНЕНСКИ  ТАЙМЕР 

 Инструкции за обслужване и безопасност


 KURZZEITMESSER 

 Bedienungs- und Sicherheitshinweise


 SAT ZA ODBROJAVANJE  

VREMENA 

 Upute za posluživanje i za Vašu sigurnost


 KITCHEN  TIMER 

 Operation and Safety Notes

Summary of Contents for 277483

Page 1: ...HEN TIMER TIMER Instruc iuni de utilizare i de siguran KURZZEITMESSER Bedienungs und Sicherheitshinweise SAT ZA ODBROJAVANJE VREMENA Upute za poslu ivanje i za Va u sigurnost KITCHEN TIMER Operation a...

Page 2: ...Y Operation and Safety Notes Page 5 HR Upute za poslu ivanje i za Va u sigurnost Stranica 20 RO Instruc iuni de utilizare i de siguran Pagina 35 BG 50 DE AT CH Bedienungs und Sicherheitshinweise Seite...

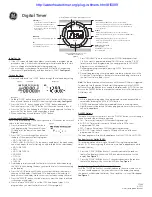
Page 3: ...A B 2 1 3 4 5 6 7 8 9 10 11 11 12 13 14...

Page 4: ...C D 15 16 17 18 19 20...

Page 5: ...for batteries Page 9 Before initial use Page 11 Setting up the device Page 12 Operation Page 12 Modes of the device Page 12 Clock mode Page 12 Timer mode Page 13 Memory function Page 15 Memory functi...

Page 6: ...afety information and instructions for use Only use the unit as described and for the specified appli cations If you pass the product on to anyone else please ensure that you also pass on all the docu...

Page 7: ...Stand 12 RESET hole 13 Magnet 14 Battery compartment cover 15 Time 16 Hundredths of a Second 17 Stopwatch 18 Timer 1 19 Timer 2 20 Timer 3 Technical data Operating voltage 3V direct current Battery ty...

Page 8: ...self with all of the safety information and instructions for use When passing this prod uct on to others please also include all the documents Check the product for damage before use Never use a damag...

Page 9: ...ppliance Cleaning and user maintenance should not be performed by children without supervision Safety instructions for batteries DANGER TO LIFE Batteries are not intended for children If accidentally...

Page 10: ...the event of contact with battery acid thoroughly flush the affected area with plenty of clean water and seek immediate medical attention Only use the same type of batteries Do not mix used and new b...

Page 11: ...ore inserting the battery Promptly remove drained batteries from the product Q Before initial use Before initial use remove the protective film from the device display 1 An insulating strip protrudes...

Page 12: ...the device The digital time has two modes which are displayed at the top of the display 1 Press the CLOCK TIMER key 5 to switch back and forth between the Clock and Timer modes Clock mode In Clock mod...

Page 13: ...24 HR mode Activating the stopwatch In Clock mode press the START STOP MEMORY key 6 The stopwatch begins in the bottom Section of the display 1 and shows the expired Seconds Minutes and hours The hun...

Page 14: ...set time Set the timers next to the T2 9 and or T3 keys 8 in the same way Activating set timers The timer is in Timer mode and the selected timer displays the selected time Press the T1 key 10 again t...

Page 15: ...ction of individual timers Each timer saves the most recently selected time Pressing the T1 T2 or T3 key 10 9 or 8 in Timer mode opens the most recently selected time for the appropriate timer in the...

Page 16: ...t then the inserted batteries are discharged and must be replaced Open the battery compartment cover 14 on the rear side of the device by pushing it downwards Remove the old batteries Use a thin point...

Page 17: ...re The device should only be cleaned on the outside with a soft dry cloth Q Disposal The packaging is made of environmentally friendly materials which may be disposed of through your local recycling f...

Page 18: ...ct quality guidelines and meticulously examined before delivery In the event of product defects you have legal rights against the retailer of this product Your legal rights are not limited in any way...

Page 19: ...defects in material or manufacture This warranty does not cover product parts subject to normal wear thus possibly considered consumables e g batteries or for damage to fragile parts e g switches rech...

Page 20: ...Stranica 26 Postavljanje ure aja Stranica 27 Kori tenje Stranica 27 Na in rada ure aja Stranica 27 Modus to no vrijeme CLOCK Stranica 27 Modus tajmer Stranica 28 Funkcija memorije Stranica 30 Memorijs...

Page 21: ...kori tenje i sigurnosnim uputama Koristite ovaj proizvod u skladu s navedenim uputama te u nave dene svrhe Ukoliko proizvod dajete nekoj drugoj osobi predajte toj osobi tako er i sve upute Propisana...

Page 22: ...RESET 13 Magnet 14 Poklopac pretinca za baterije 15 To no vrijeme 16 Stotinka sekunde 17 toperica 18 Tajmer 1 19 Tajmer 2 20 Tajmer 3 Tehni ki podaci Radni napon 3V istosmjerna struja Tip baterije 2...

Page 23: ...proizvod dajete nekoj drugoj osobi predajte joj i pripadaju u dokumentaciju Prije upotrebe proizvoda provjerite postoje li na njemu o te enja Ne upotrebljavajte o te en proizvod Ure aj ne smije biti i...

Page 24: ...i djeca bez nadzora odraslih Q Sigurnosne upute za baterije OPASNOST PO IVOT Baterije nisu namijenjene za djecu U slu aju gutanja odmah potra ite lije ni ku pomo OPASNOST OD EKSPLOZIJE Nikada ne punit...

Page 25: ...odmah isperite pogo ena mjesta istom vodom i odmah potra ite lije ni ku pomo Uvijek koristite baterije istog tipa Ne mije ajte stare baterije s novima Izbjegavajte ekstremne uvjete i temperature koje...

Page 26: ...e odmah izvadite iz ure aja Q Prije prve upotrebe Prije prve upotrebe skinite za titnu foliju sa zaslona 1 ure aja Ispod poklopca pretinca za baterije 14 iz pretinca str i izola cijska traka Otvorite...

Page 27: ...italni tajmer ima dva na ina rada koji se prikazuju gore na zaslonu 1 Pritistnie tipku CLOCK TIMER 5 kako biste prebacivali sat CLOCK i tajmer prikaz TIMER s jednoga na drugi Modus to no vrijeme CLOCK...

Page 28: ...12 24h 3 kako bi prebacivali izme u 12 i 24 satnog modusa Aktiviranje toperice Pritisnite u modusu to no vrijeme tipku START STOP MEMORY 6 U donjem dijelu zaslona 1 uklju uje se toperica i prika zuje...

Page 29: ...eno vrijeme Podesite tajmer pokraj tipke T2 9 odnosno tipke T3 8 na isti na in Aktiviranje pode enog tajmera Tajmer se nalazi u modusu tajmer i odabrani tajmer prikazuje odabrano vrijeme Iznova priti...

Page 30: ...10 9 odnosno 8 u modusu tajmer se na zaslonu pojavljuje 1 posljednje odabrano vrijeme za odgovara ju i tajmer Pritisnite iznova odgovaraju u tipku T1 T2 odnosno T3 da biste aktivirali tajmer koji pri...

Page 31: ...strani ure aja tako da ga gurate prema dolje Izvadite stare baterije Upotrebljavajte tanki i iljati predmet kako biste podigli baterije iz pretinca za baterije Napomena Pri umetanju vodite ra una o is...

Page 32: ...rijala koje mo ete zbrinuti na lokalnim mjestima za recikla u O mogu nostima zbrinjavanja dotrajalog proizvoda mo ete se raspitati kod va e op inske ili gradske uprave U interesu za tite okoli a ne ba...

Page 33: ...ka prava ovim na im jamstvom koje je predstavljeno u nastavku ostaju netaknuta Za ovaj proizvod dobivate jamstvo u trajanju od 3 godine od da tuma kupnje Jamstveni rok po inje s datumom kupovine Molim...

Page 34: ...HR normalnom tro enju i stoga se mogu smatrati kao normalni po tro ni dijelovi npr baterije ili za o te enja na krhkim dijelovima npr prekida u punjivim baterijama ili takvi koji su izra eni od stakl...

Page 35: ...e de punerea n func iune Pagina 41 Amplasare aparat Pagina 42 Utilizare Pagina 42 Modurile de utilizare ale aparatului Pagina 42 Modul ceas CLOCK Pagina 43 Modul Timer Pagina 44 Func ia memorie Pagina...

Page 36: ...dus familiariza i v mai nt i cu instruc iunile de utilizare i de siguran Folosi i produsul numai n modul descris i numai n domeniile de utilizare indicate Preda i toate documentele aferente n cazul n...

Page 37: ...MEMORY 7 Tasta CLEAR 8 Tasta T3 9 Tasta T2 10 Tasta T1 11 Suport de a ezat 12 Orificiu pentru RESET 13 Magnet 14 Capac compartiment baterii 15 Ora 16 Centisecunde 17 Cronometru 18 Timer 1 19 Timer 2...

Page 38: ...lizare Indica ii generale de siguran nainte de prima utilizare familiariza i v cu produsul i consulta i toate instruc iunile de uti lizare i de siguran Preda i toate documen tele aferente n cazul n ca...

Page 39: ...e ghea i sau au fost instrui i referitor la utilizarea sigur a aparatului i pericolele ce pot rezulta din acest lucru Copiii nu au voie s se joace cu aparatul Cur area i ntre inerea nu trebuie realiza...

Page 40: ...i solicit ri meca nice Pericol cauzat de scurgerea bateriilor n cazul scurgerii bateriilor scoate i le ime diat din aparat pentru a evita deterior rile Evita i contactul cu pielea ochii i mucoa sele n...

Page 41: ...ii indicat La introducerea bateriilor ave i grij la polaritatea corect Acesta este indicat pe compartimentul pentru baterii Dac este necesar cur a i bateriile i con tactele aparatului nainte de a le i...

Page 42: ...plasare aparat Pute i a eza aparatul pe o suprafa echilibrat dreapt pli nd n jos suportul 11 vede i fig B n mod alternativ pute i fixa aparatul cu magne i 13 de suprafe ele magnetice Q Utilizare Modur...

Page 43: ...ntru a ob ine o setare mai rapid a desf ur rii automate a cifrelor Ap sa i scurt tasta CLOCK TIMER pentru a confirma ora setat Ora este afi at f r iluminare intermitent Ap sta i tasta M 12 24 pre 3 pe...

Page 44: ...corespunz toare pentru a ob ine o setare mai rapid a desf ur rii automate a cifrelor Ap sa i scurt tasta T1 pentru a confirma setarea dumneavoastr Ecranul timerului 1 se opre te din iluminarea intermi...

Page 45: ...d ntreruperea desf ur rii cronometrului Ap sa i tasta de l ng timerul respectiv tasta T1 T2 resp T3 pentru a opri i a reactiva desf urarea contorului respectiv Q Func ia memorie Func ia memorie pentru...

Page 46: ...entru a seta cronometrul 1 p n la 3 la 0 Q Schimbarea bateriilor Indica ie Atunci c nd lizibilitatea ecranului 1 este redus da torit contrastului redus bateriile sunt uzate i trebuie schimbate Deschid...

Page 47: ...uni de func ionare n aceste cazul introduce i un obiect sub ire ascu it de ex o agraf de birou n orificiul de RESET 12 i aplica i o u oar presiune Aparatul afi eaz apoi pentru un scurt timp toate afi...

Page 48: ...punctelor de colectare indicate Este interzis eliminarea bateriilor la gunoiul menajer Ele pot con ine metale grele toxice i se supun tratamen tului de eurilor periculoase Simbolurile chimice ale meta...

Page 49: ...e fabrica ie v repar m sau nlocuim gratuit produsul la alegerea noastr produsul Dreptul de garan ie se stinge dac produsul este deteriorat utili zat sau ntre inut n mod necores punz tor Garan ia se ap...

Page 50: ...50 BG 51 51 52 52 53 53 54 57 57 57 57 CLOCK 58 TIMER 59 Memory 61 Memory 61 Memory 61 62 62 63 63 64...

Page 51: ...51 BG...

Page 52: ...52 BG 1 2 H 3 M 12 24 4 S 5 CLOCK TIMER 6 START STOP MEMORY 7 CLEAR 8 T3 9 T2 10 T1 11 12 RESET 13 14 15 16 17 18 1 19 2 20 3 3V 2 x 1 5V LR44...

Page 53: ...53 BG 99h 59min 59s 1s 1s 99h 59min 59s 1 2 LR44 1...

Page 54: ...54 BG 8 Q...

Page 55: ...55 BG...

Page 56: ...56 BG...

Page 57: ...57 BG Q 1 14 11 13 Q 1...

Page 58: ...58 BG CLOCK TIMER 5 CLOCK TIMER CLOCK 1 C CLOCK TIMER 5 3 1 S 4 M 12 24 3 2 S M H CLOCK TIMER M 12 24h 3 12 24...

Page 59: ...59 BG START STOP MEMORY 6 1 START STOP MEMORY 0 CLEAR 7 TIMER TIMER 3 D T1 10 3 S 4 M 12 24 3 2 S M H...

Page 60: ...60 BG T 1 1 T2 9 T3 8 Timer T1 10 0 TIME S UP T1 START STOP MEMORY 6 CLEAR 7 0 T2 9 T3 8 T1 T2 T3...

Page 61: ...61 BG Q Memory Memory T1 T2 T3 10 9 8 Timer 1 T1 T2 T3 T1 T2 T3 Memory START STOP MEMORY 6 START STOP MEMORY 3 T T1 T2 T3 START STOP MEMORY...

Page 62: ...62 BG 3 CLEAR 7 1 3 0 Q 1 14 Q 1...

Page 63: ...63 BG RESET 12 Q Q...

Page 64: ...64 BG 2006 66 E Cd Hg Pb 3...

Page 65: ...65 BG 3...

Page 66: ...Batterien Seite 70 Vor der Inbetriebnahme Seite 73 Ger t aufstellen Seite 73 Bedienung Seite 73 Betriebsarten des Ger ts Seite 73 Modus Uhrzeit CLOCK Seite 74 Modus Timer Seite 75 Memory Funktion Sei...

Page 67: ...r heitshinweisen vertraut Benutzen Sie das Produkt nur wie beschrieben und f r die angegebenen Einsatzbereiche H ndigen Sie alle Unterlagen bei Weitergabe des Produkts an Dritte mit aus Bestimmungsgem...

Page 68: ...te 10 T1 Taste 11 Aufsteller 12 RESET Loch 13 Magnet 14 Batteriefachdeckel 15 Uhrzeit 16 Hundertstelsekunden 17 Stoppuhr 18 Timer 1 19 Timer 2 20 Timer 3 Technische Daten Betriebsspannung 3V Gleichstr...

Page 69: ...ten Benutzung des Produkts mit allen Bedien und Sicherheits hinweisen vertraut H ndigen Sie alle Unterla gen bei Weitergabe des Produkts an Dritte ebenfalls mit aus Kontrollieren Sie das Produkt vor d...

Page 70: ...ufsichtigt oder bez glich des siche ren Gebrauchs des Ger tes unterwiesen wurden und die daraus resultierenden Ge fahren verstehen Kinder d rfen nicht mit dem Ger t spielen Reinigung und Benutzer wart...

Page 71: ...Setzen Sie Batterien keiner mechanischen Belastung aus Gefahr des Auslaufens der Batterien Im Falle eines Auslaufens der Batterien entfernen Sie diese sofort aus dem Ger t um Besch digungen zu vermei...

Page 72: ...ntfernen Sie die Batterien wenn sie l ngere Zeit nicht verwendet worden sind aus dem Ger t Gefahr der Ger tebesch digung Ausschlie lich den angegebenen Batterie typ verwenden Achten Sie beim Einlegen...

Page 73: ...erstreifen Schlie en Sie den Batteriefachdeckel wieder Ihr digitaler Kurzzeitmesser ist nun betriebsbereit Ger t aufstellen Sie k nnen das Ger t auf waagerechten ebenen Oberfl chen aufstellen indem Si...

Page 74: ...R Taste 5 3 Sekunden lang gedr ckt Das oberste Feld des Displays 1 blinkt Dr cken Sie die S Taste 4 die M Taste 12 24h 3 bzw die H Taste 2 um die angezeigten Werte f r Sekunde S Minute M bzw Stunde H...

Page 75: ...ie Stoppuhr durch Dr cken der CLEAR Taste 7 wieder auf 0 stellen Modus Timer Im Modus Timer erscheinen 3 Zeitfelder In allen drei Feldern wird ein Timer bereitgestellt Abb D Gew nschte Zeit einstellen...

Page 76: ...t die T1 Taste 10 um den obersten Timer zu aktivieren Der Z hler z hlt nun abw rts bis auf 0 Nach Ablauf der eingestellten Zeit ert nt f r die Dauer von einer Minute ein Signalton Das Display des Time...

Page 77: ...aste 10 9 bzw 8 wird im Modus Timer die f r den jeweiligen Timer zuletzt gew hlte Zeit im Display 1 auf gerufen Dr cken Sie die jeweilige T1 T2 bzw T3 Taste erneut um den dieser Taste zugeh rigen Time...

Page 78: ...m ssen getauscht werden ffnen Sie den Batteriefachdeckel 14 auf der R ckseite des Ger ts indem Sie ihn nach unten schieben Entnehmen Sie die alten Batterien Verwenden Sie einen d nnen spitzen Gegensta...

Page 79: ...le Anzeigen des Displays und stellt sich neu ein Q Reinigung und Pflege Reinigen Sie das Ger t nur u erlich mit einem weichen trockenen Tuch Q Entsorgung Die Verpackung besteht aus umweltfreundlichen...

Page 80: ...schen Symbole der Schwermetalle sind wie folgt Cd Cadmium Hg Quecksilber Pb Blei Geben Sie deshalb verbrauchte Batterien bei einer kommunalen Sammelstelle ab Garantie Das Produkt wurde nach strengen Q...

Page 81: ...kostenlos repariert oder ersetzt Diese Garantie verf llt wenn das Produkt besch digt nicht sachgem benutzt oder gewartet wurde Die Garantieleistung gilt f r Material oder Fabrikationsfehler Diese Gar...

Page 82: ...GmbH Co KG Stiftsbergstra e 1 DE 74167 Neckarsulm GERMANY Model No HG00151 Version 11 2016 Last Information Update Stanje informacija Versiunea informa iilor Stand der Informationen 09 2016 Ident No H...

Reviews: