Audison bit one, Advanced Manual
The Audison bit one is an advanced audio signal processor that enhances the performance of your car's audio system. If you have any Frequent Asked Questions about its installation or usage, we have a comprehensive manual available for free download at manualshive.com. Obtain detailed instructions and optimize your audio experience today.
Share
Download


Reviews:
No comments
Related manuals for bit one

nanoclocks GL
Brand: Rosendahl Pages: 14
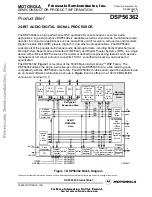
DSP56362
Brand: Motorola Pages: 4

Digital DNA MSC8101
Brand: Motorola Pages: 116

DSP56300
Brand: Motorola Pages: 112

DSP56012
Brand: Motorola Pages: 270
DSP56009
Brand: Motorola Pages: 286

DSP56303
Brand: Motorola Pages: 320

DSP56309
Brand: Motorola Pages: 425

DSP56K
Brand: Motorola Pages: 637

DSP56305
Brand: Motorola Pages: 664

PmPPC440
Brand: Artesyn Pages: 99

WFP11S
Brand: Waring Pages: 56

VEGA
Brand: Auralic Pages: 28

78515
Brand: Unold Pages: 76

CE-FP001
Brand: Continental Refrigerator Pages: 6

AMFP4001
Brand: Abode Pages: 20

WM-1906 MX
Brand: Wartmann Pages: 60

LE DUO SALAD AND JUICE
Brand: MAGIMIX Pages: 12


