TI044
400-044-001-B 9/1/07 1/4
TI044
Installation and User Guide
Industrial Indoor/Outdoor Solar Timer
The TI044 is a heavy-duty indoor/outdoor timer designed to control the
following loads:
The TI044 is equipped with two normally-open (NO) dry contacts
identified as
Load 1
and
Load 2
for connecting two independently
operated loads:
•
Load 1
follows the schedule that you have programmed into the
timer when placed in automatic mode. The load can also be
activated or deactivated manually similar to the operation of a
regular switch.
A single-pole switch can be connected to the timer to control
Load 1
as in a 3-way installation. For example, the timer can be installed
outside whereas the switch can be located remotely (e.g., inside the
house).
•
Load 2
always follows the sunset/sunrise program; i.e., it is
activated at sunset and deactivated at sunrise. It is usually used for
night lighting.
n
Cut power at the circuit breaker to avoid electric shock.
o
Connect the power supply between
power line
and
power neutral
terminals.
p
Connect the load and its power supply in series between
Load 1 in
and
Load 1 out
or between
Load 2 in
and
Load 2 out
depending
on the application.
NOTE
: For a 3-way installation, connect a standard single-pole switch to
the
3-way
terminals of the timer as shown on the wiring diagram.
q
Apply power at the circuit breaker.
3.1
Load 1
Load 1 can operate in Manual or Automatic mode. To switch between
the two modes, press and hold the
MODE
button for 3 seconds.
Manual Mode
In Manual mode, the TI044 operates like a regular switch to control
Load 1. Briefly press the
MODE
button to activate or deactivate the
load. (If you have connected a remote switch to the timer for a 3-way
installation, the switch can also be used to activate or deactivate
Load 1.) The mode indicator (
MAN
)
and the state (
ON
or
OFF
) are
displayed.
Automatic Mode
In Automatic mode, the TI044 controls Load 1 according to the
programmed schedule (see section 6). The mode indicator (
AUTO
),
the state (
ON
or
OFF
) and the current program number are
displayed.
To temporarily override the programmed schedule, press the
MODE
button or use the remote switch (if connected). The new state
indicator will flash to show that this state is temporary. The override
remains in effect until you press the
MODE
button (or use the remote
switch) or until the beginning of the next program.
3.2
Load 2
Load 2 follows the sunset/sunrise program (regardless of the
operating mode of the timer). For example, if Load 2 is a light, the
light will turn On at sunset and turns Off at sunrise.
NOTE
: To use Load 2, you first need to enter the city coordinates and
set the date (see section 6).
n
Applications
1.
Load type
Maximum load
Examples
Resistive load
3600 W
(30 A @ 120 V)
•
incandescent lights
•
halogen lights
•
block heaters
Inductive load
1200 W
(10 A @ 120 V)
•
fluorescent lights
•
compact fluorescent lights (CFL)
•
sodium lamps
•
electronic ballasts
Motor
1.5 hp @ 120 V
•
pumps
•
fans
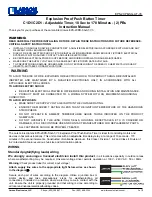
o
Installation
2.
manual or
automatic
operation
night
lighting
120 V
power
supply
Single-pole switch
(for 3-way installation)
p
Operation
3.
• Briefly press the
button to turn the
load On or Off
(applies to Load 1
only).
• Press the button for
3 seconds to switch
between Automatic
mode and Manual
mode (applies to
Load 1 only).
Mode display
(applies to Load 1 only)
On/Off display
(applies to Load 1 only)
Program number
sunset/sunrise program
400-044-001-B ENG.fm Page 1 Tuesday, January 9, 2007 8:12 AM