background image

ARTURIA – minimoog V – QUICK START


1

1  MINIMOOG V - QUICK START 


This chapter will help you get to know the main aspects of how the minimoog V works. 
You will be presented an overview of the different parts of the synthesizer while using the 

program for the first time. You will find a detailed description of all visible settings and 
controllers in the chapters that follow. 


Chapter 6, 

A few elements of sound design 

is specially recommended for users who have never 

worked with a subtractive synthesizer before and who wish to learn the basics in this 

domain. 


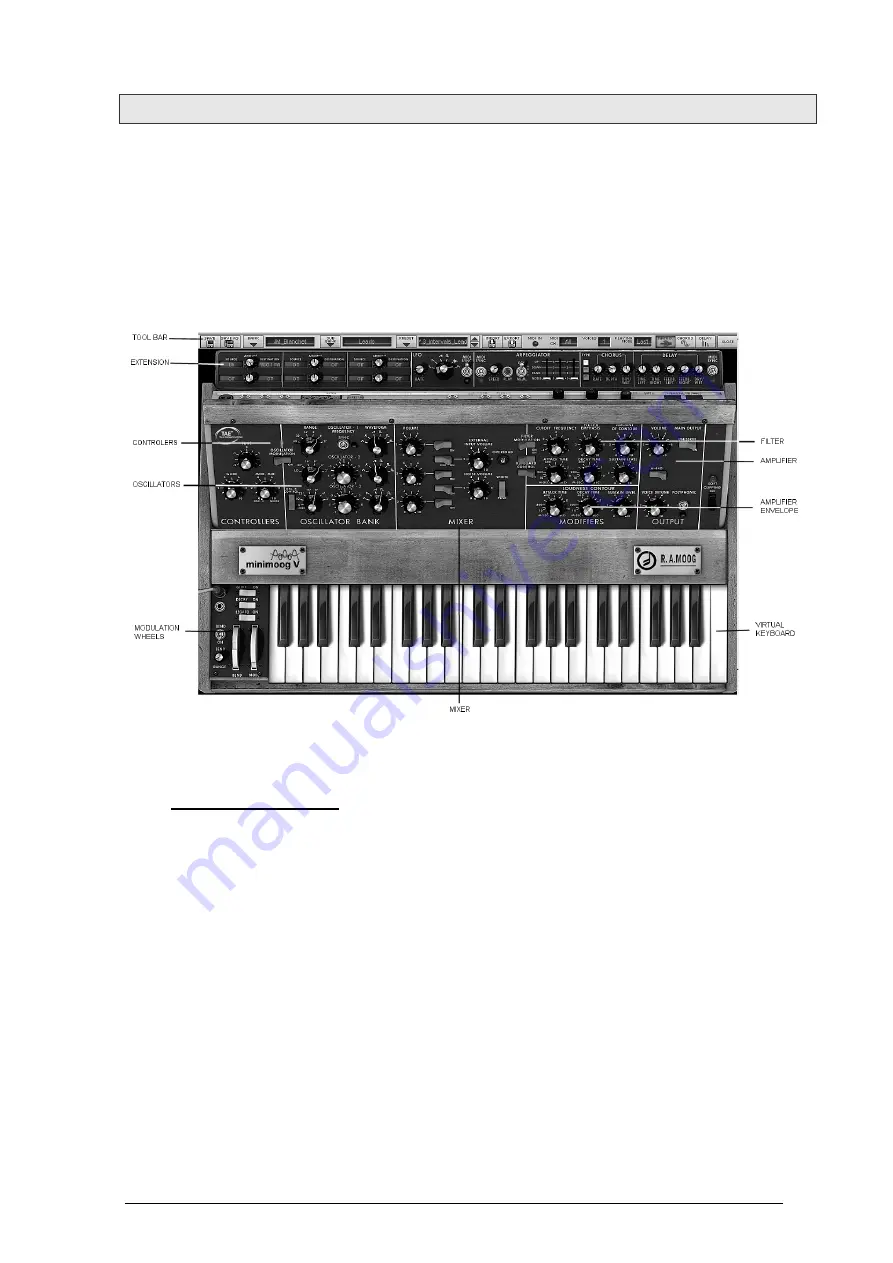
Overview of the minimoog V 


1.1 U

SING THE PRESETS


Use of presets is one of the major areas of evolution when the minimoog V is compared 
to the original, which couldn’t save sounds!  

With the minimoog V, a preset (memorized sound) contains all of the parameter settings 
of the synthesizer plus the «extension» part and the different real-time and effect 
controllers necessary to reproduce the sound.  

 
To get to know a few of the different sounds contained in the minimoog V, we will select 

the «Bass1» preset. 


To do this, click on button above the «BANK» LCD display which indicates «Arturia» 
(this display shows the name of the current bank in use). When you click, you will see 

a dropdown menu indicating the available banks. Choose the «JM_Blanchet» bank. 

 
When this menu is open, it expands the sub-menus allowing you to reach the «SUB 

BANK» and «PRESETS» of a sound designer with a single click.  


Choose the «SUB BANK» called «Basses» and finally select «JMB_Classic1» in the 
«PRESETS». 

Summary of Contents for Minimoog V

Page 1: ...ution when the minimoog V is compared to the original which couldn t save sounds With the minimoog V a preset memorized sound contains all of the parameter settings of the synthesizer plus the extension part and the different real time and effect controllers necessary to reproduce the sound To get to know a few of the different sounds contained in the minimoog V we will select the Bass1 preset To ...

Page 2: ...ion in the bank For example to see all of the bass presets click on All in the bank selection and then on Basses 1 1 1 Modifying this preset For this we ll start with a very simple manipulation Modify the brightness of the JMB_Classic1 sound using the Cutoff Frequency potentiometer of the filter Turn this potentiometer and you will hear the tone of the sound becoming more or less brilliant Set thi...

Page 3: ...be saved in the selected preset without changing the name If the current preset is a factory preset the factory preset will not be overwritten To choose another destination for this sound click on the Save as icon and select a destination For example select new in the choice of bank 2 new emplacements for bank and sub bank and a new preset are immediately created The names new bank new sub bank an...

Page 4: ...s access to extensions offering a modulation matrix an arpeggiator and effects These different functions will enrich the base settings of the minimoog V The extension of the Open mode To access the Open mode click on the wooden crosspiece situated above the synthesis settings or on the Open button on the right of the toolbar To return to the Close mode simply click again on the wooden crosspiece o...

Page 5: ...ncy The third can also be used as a modulator when it s is directed to the filter or oscillators A Mixer allows you to mix the signals coming from the oscillators or the noise module A low pass 24 dB resonant filter An ADS envelope modulating the low pass filters 1 amplifier VCA allowing the amplification of the signal coming from the filter to direct it to the stereo output An ADS envelope modula...

Page 6: ...ter when the note is sent In the same manner change the value of decay Decay time the brightness will diminish faster or slower as you hold the note The Attack time parameter of the filter envelope You will probably have noticed that an envelope also modulates the amplitude of the sound Loudness Contour Increase the Attack time so that the volume of the sound increases progressively Do the same wi...

Page 7: ...ition in the range to be used in LFO mode This removed the possibility of using 3 simultaneous oscillators as well as a slow modulation on the filter cut off frequency for example With the added LFO module added in the extension of the Open mode you can keep the 3rd oscillator as a base for sound and add an additional source of modulation to be used on one of the 32 available locations Let s apply...

Page 8: ...TOR SECTION The Arpeggiator section lets you easily create an arpeggio from a chord played on the keyboard An arpeggio is a series of single notes of the same length that spell out a chord and play one after the other Arpeggiator settings are available on the right of the modulation matrix Let s take the example the JMB_Classic2 preset to see how to use the arpeggiator Click on the PLAY button of ...

Page 9: ...ersion to a more sophisticated chorus designed for sharper detuning effects The chorus 1 6 2 The delay The delay effect adds stereo echoes to the sound It has independent settings for the speed and the number of echoes on the right and left sides It is also possible to create a great number of rhythmic combinations between the echoes The speed of the delay can also be synchronized with the MIDI te...

Page 10: ... an example Click on the Cutoff frequency knob while holding the Ctrl key down A MIDI assign dialog appears Click on Learn and move the MIDI controller of your choice The knob in minimoog V will move at the same time You can then record the movement of your MIDI controller on your MIDI sequencer or simply make it evolve on the fly during a live presentation MIDI assigning of the Cutoff frequency k...

Reviews: