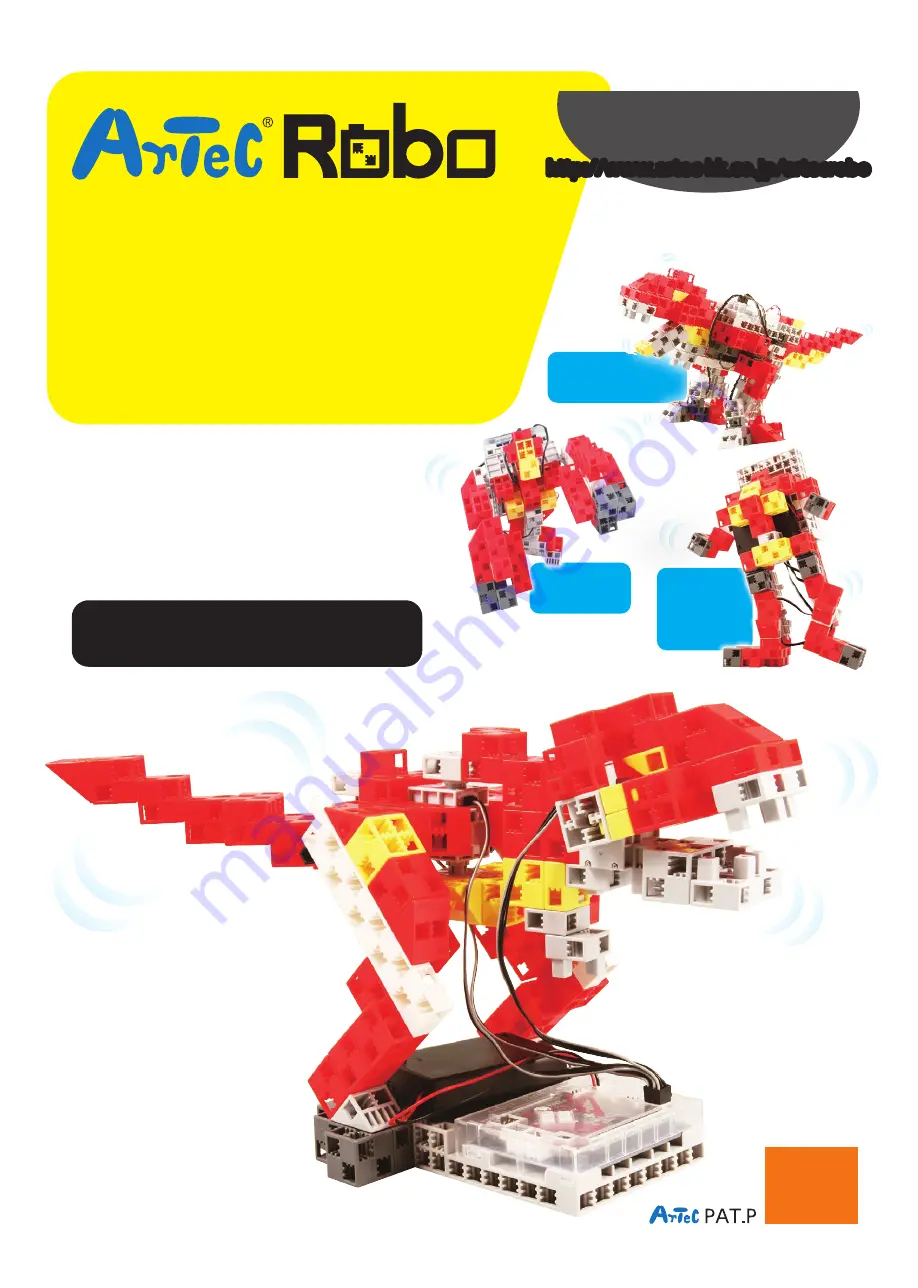
background image

Model 4:

Biped

Walking

Robot

Model 3:

Robo Kong

Model 1:

Bipedal T. REX 

T. REX

For ages 

8

+

Assembly

Instructions

http://www.artec-kk.co.jp/artecrobo

Download software and 

guides from our homepage!

http://www.artec-kk.co.jp/artecrobo

Get instructions for

even more robots!

Model 2: Real Action T. REX 

Summary of Contents for T.REX

Page 1: ...ong Model 1 Bipedal T REX T REX For ages 8 Assembly Instructions http www artec kk co jp artecrobo Download software and guides from our homepage http www artec kk co jp artecrobo Get instructions for even more robots Model 2 Real Action T REX ...

Page 2: ...Studuino Icon Programming Environment Guide download from http www artec kk co jp artecrobo for instructions on how to calibrate your servomotor Building your robot without calibrating your servomotor may cause damage or improper functionality Do not change the connector or the servomotor after calibration Servomotor calibrations are unique to each servomotor After calibration we recommend putting...

Page 3: ...shown in the picture Assemble the blocks as shown in the picture Attach part to part as shown 4 Assemble the blocks as shown in the picture Assemble the blocks as shown in the picture Assemble the blocks as shown in the picture Attach part to part as shown ...

Page 4: ... the picture Assemble the blocks as shown in the picture Assemble the blocks as shown in the picture Attach part to part as shown Add the block shown in the picture to a servomotor Attach part to part as shown Arrange parts and as shown in the picture do not insert the studs 6 ...

Page 5: ...s shown in the picture to Attach part to part as shown Assemble the blocks as shown in the picture 8 Assemble the blocks as shown in the picture Attach part to part as shown Assemble the blocks as shown in the picture Assemble the blocks as shown in the picture ...

Page 6: ... part as shown Attach part to part as shown 32 Attach part to part as shown 10 33 Add the blocks shown in the picture to the servomotor 35 Add the blocks shown in the picture to 36 Attach part 35 to part 33 as sho Right Left 34 Assemble the blocks as shown in the picture ...

Page 7: ...8 as sho 40 Attach part 39 to part as show 38 Add the blocks shown in the picture to 12 41 Attach part to part 40 as show 43Add the battery box to the circuit board mount and connect the wires as shown 42 Add the blocks shown in the picture to the circuit board mout ...

Page 8: ...11 Right Left Finished 14 Programming Your Robot Download your programming software from the Artec homepage at http www artec kk co jp studuino download_en html Click on Start Artec and open Studuino Programming Environment Choose Icon Programming Environment Use a USB cable to connect your circuit board mount to your PC ...

Page 9: ...your port settings Tick the boxes for D9 D10 and D11 in the Port Settings dialog box Place the icons you see in the picture below Click Repeat indefinitely in the Repeat Settings dialog 16 1 2 3 4 5 6 7 8 9 10 11 ...

Page 10: ...sure that the cables have been properly inserted Read 6 Using Servomotors in the Studuino Icon Programming Environment Guide download from http www artec kk co jp artecrobo for instructions on how to calibrate your servomotor Having trouble 17 12 13 14 15 16 K1016 is a registered trademark of Artec Co Ltd in multiple countries including Japan South Korea Canada and the USA ...

Reviews: