


M510 Access Point
Quick Setup Guide
NOTE: The minimum software revision for the M510 is
SmartZone (SZ) 5.0 or later, or standalone AP firmware
110.0 or later.
This Quick Setup Guide provides step-by-step instructions on
how to set up your Ruckus M510 Dual Band 802.11ac Wi-Fi
+ LTE Access Point. After completing the steps described in
this guide, you will be able to place the Access Point (AP) at
your site and provide wireless network access to users. For
detailed information on planning the installation, performing a
site survey and operating the M510, refer to the
Ruckus
Wireless Indoor Access Point User Guide
, available at
https://
support.ruckuswireless.com
.
This Guide in Other Languages
•
请从以下网站获得该指南的简体中文版
.
• Vous trouverez la version française de ce guide à l'adresse
suivante
https://support.ruckuswireless.com
•
このガイドの日本語版は
でご覧ください。
•
이
가이드의
한국어
버전은
웹
사이트
(
)
에서
확인하시기
바랍니다
.
• Veja a versão em português (Brasil) deste guia em
• Puede ver la versión en español (América Latina) de esta
https://support.ruckuswireless.com.
Before You Begin
Before deploying Ruckus Wireless products, please check for
the latest software and the release documentation.
• Release Notes and other user documentation are available
at
http://support.ruckuswireless.com/documents
• Software upgrades are available at
support.ruckuswireless.com/software
.
• Open source information is available at
• Software license and limited warranty information are
http://support.ruckuswireless.com/warranty
Before deploying your Ruckus Wireless Access Point, verify
that all items listed in
Package Contents
are included in the
package. If any item is damaged or missing, notify your
authorized Ruckus Wireless sales representative. Also,
make sure that you have the required hardware and tools.
M510 Package Contents
The M510 Access Point installation package includes all of the
following:
• M510 Dual-Band 802.11ac Wave 2 Access Point with LTE
Backhaul
• GPS antenna
• 2 LTE antennas
• T-bar mounting bracket
• T-bar mounting clip
• Service Level Agreement/Limited Warranty Statement
• Declaration of Conformity
• Regulatory Statement
• Cloud Management Insert
• Ruckus Wireless AP Getting Started Guide
• This Quick Setup Guide
FIGURE 1 M510 Access Point
Sold Separately
The following optional accessories are sold separately.
• 12V DC power supply
• Flange Mount Bracket Kit
Required Hardware and Tools
• No. 2 Phillips screwdriver and T8 Torx driver for wall
mounting anchor kit
• an 802.3af or 802.3at -compliant Power over Ethernet (PoE)
switch or PoE injector
• Electric drill with drill bits and customer-supplied wall
anchors, flat washers, and hex nuts for flat-surface
mounting
Initial Setup
Perform the initial setup depending on your deployment
scenario.
The M510 can be connected to WAN via LTE or via Ethernet
(with the LTE connection as a backup for WAN failover).
If the AP detects both methods are available, Ethernet will
have higher priority over LTE. When the Ethernet WAN link
goes down, LTE will take over. If the WAN Ethernet port is not
connected, the LTE interface will be the default uplink.
If you are using Ethernet as the primary WAN link with LTE as
a backup, perform the tasks below with one extra step:
connect an Ethernet cable to your local network, and
configure that port as the WAN port.
Attach the two LTE antennas and (optionally) the GPS
antenna, and perform the initial setup according to your
deployment scenario:
• Standalone AP
• Manual Controller Discovery
• Cloud Managed AP
Standalone AP Initial Setup
To perform initial setup to run the AP in standalone mode:
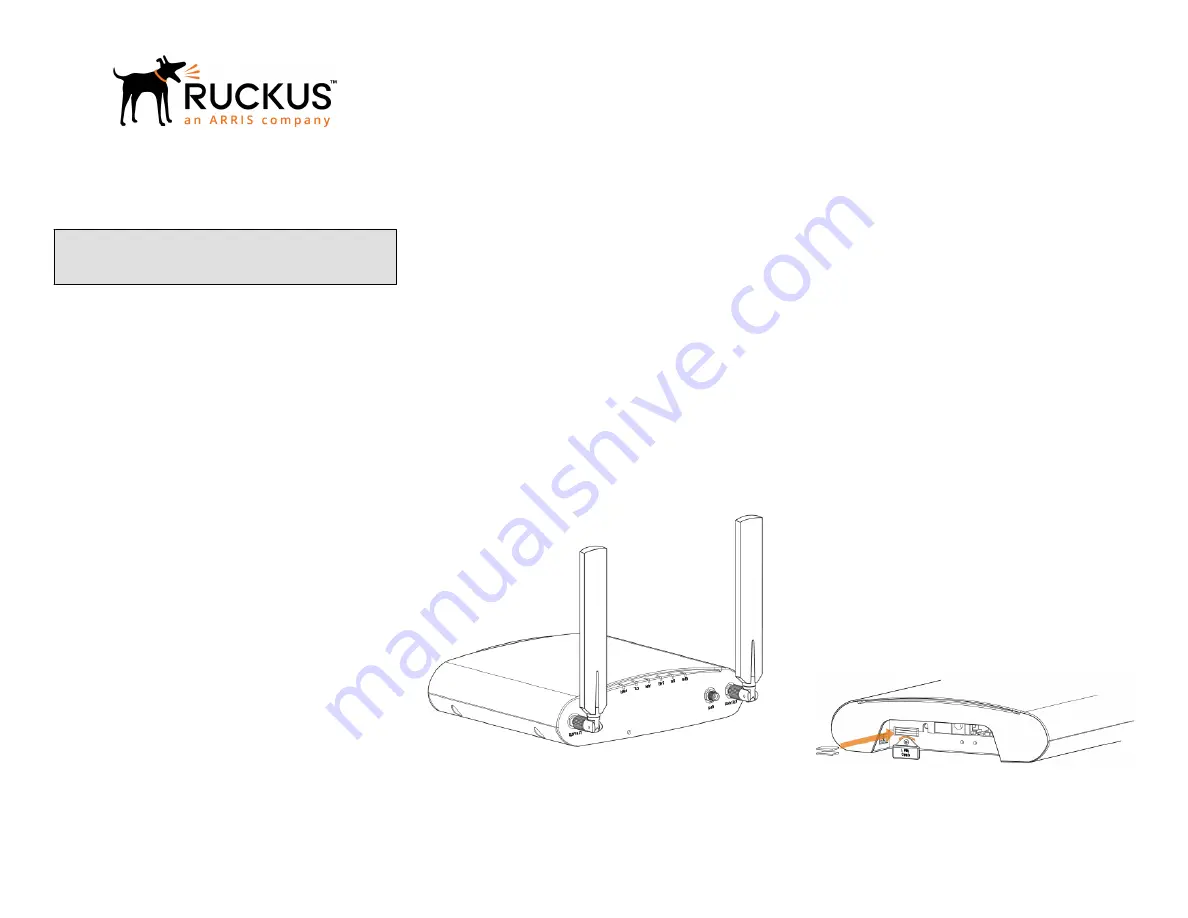
1. Plug an activated SIM card into the primary slot, and
optionally, a second SIM card into secondary slot for
redundancy.
FIGURE 2 Rotate SIM card cover, and insert SIM card(s)
2. Connect the M510 to a 12V DC power source. Two DC
power options are available: barrel connector for power
supply accessory, or terminal block.
Copyright
®
2018 Ruckus Wireless, Inc.
Page 1 of 4
Published January 2018, Part Number 800-71642-001 Rev A


