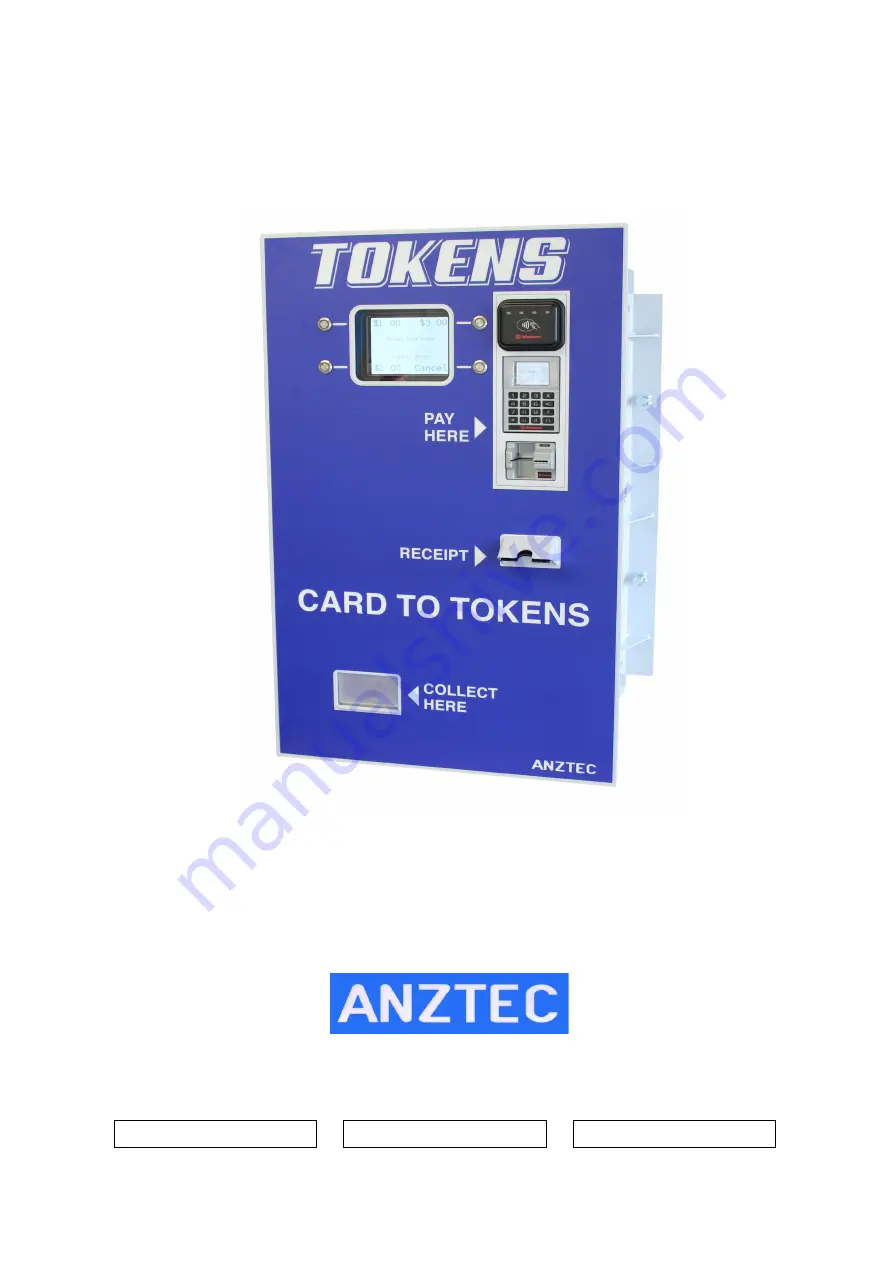
background image

QC-6601P 


Instruction Manual 


Anztec Limited, 7C Birmingham Drive, Christchurch, New Zealand  Phone +64 3 338 3139, 

www.anztec.com  email:[email protected] 


Software Ver. 

Serial # 

Key # 

Summary of Contents for QC-6601P

Page 1: ...QC 6601P Instruction Manual Anztec Limited 7C Birmingham Drive Christchurch New Zealand Phone 64 3 338 3139 www anztec com email sales anztec com Software Ver Serial Key ...

Page 2: ...effort has been made to ensure that the information contained in this literature is accurate Anztec reserves the right to amend the size and specifications of this machine in line with its policy of continuing improvement and development ...

Page 3: ...ssing the Web Interface 13 Login screen 14 Configuration 15 Configure Network 16 Configure Card Values 18 Configure Clock 19 Configure System 20 Configure Site 21 Configure Pushover 22 Configure Reports 22 Configure Receipt 23 Configure Ecommerce 25 Configure Hardware 26 Meters 27 Short Term Meters 27 Long Term Meters 27 Historical Turnover Meters 27 Ecommerce Status 29 Alerts 30 User 31 Password ...

Page 4: ...d when Components removed from machine for repair or replacement Inspection Check exterior of the machine regularly for tampering Check for installations that are unsecured or substandard This includes associated equipment such as cables and network routers modems Look regularly for non standard items fitted to the exterior such as card skimming devices Look regularly for non standard items fitted...

Page 5: ...of those coins or tokens and additional bonus payout features The Accountancy meters that are available are also dependant on configuration If you require further information on the configuration of the equipment you have received please contact your supplier Warning Never remove unplug or replace any components inside this machine without first turning off the mains power Failure to comply may re...

Page 6: ...the cord into the internal three pin socket on the power supply Plug the other end into a standard mains supply outlet Use the P clip supplied to strain relief the power cord 3 Plug your network cable into the RJ45 network socket after feeding through the cable entry in the base of the machine as above 4 Switch the unit on using the Mains Switch on the Power Supply Front Panel 5 Fit printer paper ...

Page 7: ...tendant Menu To enter the Attendant Menu on the QC 6601P unlock and open the main door and then press the key Once this is done the Attendant Menu will appear on the attendant LCD inside the machine Use the A and B buttons on the keypad scroll up and down through the Attendant Menu Press the number button on the keypad that corresponds to the Attendant Menu sub menu you wish to enter A list of the...

Page 8: ... ensure you know the number of inserted tokens 2 Enter the Attendant Menu and using the A and B buttons scroll up and down through the Attendant Menu until you see the Refills option and then press button 1 3 The Refills Hopper menu will appear 4 Press Button 1 5 Enter the number of tokens for the selected hopper and press 6 Press to confirm or to cancel 7 Repeat steps 5 to 7 to refill the other h...

Page 9: ... while in the Attendant Menu The following information will be printed Current Hopper Levels Hopper Refills Purchases Hopper Payouts Totals 1 Press button 2 to enter Print Accountancy Menu 2 Press button 1 to print Short Term Meters 2 to print Long Term Meters or 3 to print User Defined meters 3 To exit this menu and return to the Attendant Menu press the button ...

Page 10: ... Menu 2 Enter the PIN and press the button clear the Short Term Meters 3 To exit this menu and return to the Attendant Menu press the button Event Log The QC 6601P has the ability to display recent events while in the Attendant Menu 1 Press Button 4 while in the Attendant Menu to enter the Event Log 2 Using the A and B buttons scroll up and down through the events to view 3 To exit this menu and r...

Page 11: ... button 5 while in the Attendant Menu to enter the Hopper Count Menu 2 Select either Hopper 1 Hopper 2 or Hopper 3 3 The Hopper will begin to pay out tokens or coins 4 Press to stop the count and then to cancel or to resume 5 The Hopper count will show Completed when hopper is empty It is advisable to manually check the hopper is completely empty Note Care must be taken when re inserting hoppers a...

Page 12: ...e Attendant Menu 1 Press button 0 while in the Attendant Menu 2 The initial screen shows the machine type and serial number 3 Use the A and B buttons to scroll up and down through this menu to show the status of Hop 1 Ready Hop 2 Ready Printer Enabled Card Connected 4 To exit this menu and return to the Attendant Menu press the button ...

Page 13: ...rom an off site location through a router you will need to ensure translation between the outside IP address and the internal IP address is enabled this is often referred to as port forwarding In this case you will need to enter the external IP address of the site into the browser address bar Note that when using this configuration it is a good idea to make the IP address of the QC 6601P static Th...

Page 14: ... above in the section titled Accessing The Web Interface Once connected the initial login screen will be displayed as shown below Enter your user name and password and click on the Login button Once logged in you will be presented with a range of options accessible through the menu sidebar ...

Page 15: ...he left hand side menu to display the configuration options The following options are available Configure Network Configure Card Values Configure Clock Configure System Configure Site Configure Pushover Configure Reports Configure Receipts Configure Ecommerce Configure Hardware ...

Page 16: ...QC 6601P Rev 1 0 Page 16 Configure Network The Configure Network page contains all network related settings ...

Page 17: ... having it manually set or by retrieving it from a time server To have the clock automatically set at startup check the Use Time Server box and enter a time server address Select a time zone and check the Daylight Saving box if required Click on the Apply Changes button to implement any changes you have made Pushover To receive Pushover notifications from the Anztec Wash Management System you must...

Page 18: ...ve the settings for a particular button set the drop down Selection Number box to the desired button number Note the front panel button numbering as shown below Button number 4 must be set to a zero value if your configuration has this button set to be the Cancel button Change any settings and then hit the Apply Changes button The changes will be reflected in the Card Transaction Value table The s...

Page 19: ...ev 1 0 Page 19 Configure Clock The current date and time can be set by completing the relevant fields on this page Time is represented in 24 hour format Click on the Apply Changes button to implement the changes ...

Page 20: ... opting and press the Reset System button Configuration information displays the model serial number and software version of the Merlin Interface Board along with its bootloader version System Update allows you to update the Merlin board software Enter the update file name in the box provided and press the Download File button Once the file has downloaded the Program File button will become visibl...

Page 21: ...QC 6601P Rev 1 0 Page 21 Configure Site Use the text boxes provided to details of the host site Click on the Apply Changes button to store the changes ...

Page 22: ...anges button to implement the changes Configure Reports Use this menu to enter recipients for the various email reports that may be generated Up to 10 recipients may be specified When adding a new recipient or editing and existing one it is necessary to click the Update button to save the changes The check boxes adjoining the recipient address determine which report s the recipient will receive Th...

Page 23: ...or disable the details required in your receipt by checking the boxes adjacent to each line Enter receipt details into the text boxes relating to each line on the receipt After entering the details press the Apply Changes button to save any new or altered details Receipt details can be confirmed by printing a test receipt Press the Print Test Receipt button and a receipt will be printed by the QW ...

Page 24: ...QC 6601P Rev 1 0 Page 24 Below is an example of a test print of a receipt ...

Page 25: ...nage It is important that the Ecommerce Currency dropdown box is correctly set If this is not set a message reading EC Currency Not Set will appear on the Network Status Display located on the back wall of the machine Click on the Apply Changes button to implement the changes To enable ecommerce communications logging make sure the Comms Logging box is checked The Comms Logging function creates a ...

Page 26: ...menu to configure any alternative hardware devices that the machine may be configured for In the case below the only configurable machine option is the printer type Once all options are set correctly click on the Apply Changes button to store the changes ...

Page 27: ...ter groups viewable via this function are Current Hopper Levels Short Term Hopper Refills Short Term Purchases Short Term Hopper Payouts Short Term Totals The Short Term Meters can be reset by pressing the Reset Meters button located at the bottom of the page Long Term Meters The Long Term meter groups viewable via this function are Current Hopper Levels Long Term Hopper Refills Long Term Purchase...

Page 28: ...TXT contains the log entries for January 2018 Log files may be viewed on the browser or downloaded and saved on the host PC Press the Download button to download and save the log file in TXT format This type of file is best viewed with Microsoft Word Pad or similar text file viewing software To view the log without downloading press the View button and use the previous and next page button to scro...

Page 29: ...nd Extended Ecommerce Status The status information displayed is generated by the installed Payment Express card readers The information in the Ecommerce Status section is updated in real time every 3 seconds but the Extended Ecommerce Status is only refreshed at power up ...

Page 30: ...he alert system will function once implemented To send an alert via Email and or Pushover when the corresponding event occurs click on the appropriate checkbox Click the Apply Changes button at the bottom of the page to store the new configuration Alerts can be selected from the following categories Alert Notification Settings Hopper Alerts System Alerts Purchase Alerts Ecommerce Alerts ...

Page 31: ...owed access to a different subset of the available pages depending on their privilege level After making alterations to a user click on the update button to save the settings Password Using this menu option the currently logged in user is able to change their password To do this enter the current and new password repeat the new password to confirm and press the change password button ...

Page 32: ...1P has an auto loading system for the paper With the machine power on insert the paper as shown into the back of the printer it will automatically feed into the printer once the paper is sensed Note The printer can accept standard thermal paper rolls 58mm to 60mm in width and up to 100mm in diameter ...

Page 33: ...he wall Re bolt the clamping brackets loosely to the cabinet Push the clamping brackets up against the wall and tighten the bolts on the cabinet to lock it into place The forward facing bolts on the clamping brackets can be adjusted for extra tension Plug power cord into power supply switch on and the unit is installed Wall thickness 100mm 200mm Front Panel Rear door Clamping Bracket Locking Bolts...

Page 34: ...QC 6601P Rev 1 0 Page 34 Recommended Wall Cutout Recommended Wall Cutout and Mounting Height 455mm 810mm 860mm ...

Reviews: