2
CHRONOGRAPH TWO EYE
OS11
TIME SETTING
1. Pull crown out to position 3.
2. Turn crown to set the desired time.
3. Return crown to position 1.
DATE SETTING
1. Pull crown out to position 2 (the watch continues to run).
2. Turn crown until yesterday’s date appears.
3. Pull crown out to position 3 (the watch stops).
4. Turn crown until correct date appears.
5. Continue to turn crown until correct time appears.
6. Return crown to position 1.
CHRONOGRAPH OPERATION
1. Press A to start/stop the chronograph.
2. Press B for reset.
ADJUSTING THE CHRONOGRAPH
1. Pull crown to position 3.
2. Press A to reset the second hand to “0.”
3. Press B to reset the chronograph minute hand.
4. Return crown to position 1.
ENGLISH
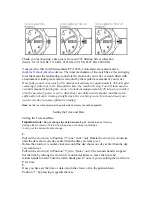
Minute hand
Chronograph
minute hand
Chronograph
second hand
Hour hand
Date
3
2
1
Second
hand
A
b
NOTE: If you do not find your watch movement here, please go to www.
adidas.com/watches.
3
2
1
A
B