A
A
A
C
C
C
S
S
S
6
6
6
1
1
1
1
1
1
0
0
0
0
0
0
Quick Start Guide
Quick Start Guide
Welcome
Thank you for purchasing the ACS 61100 PCI Express to SATA II RAID
adaptor. This model provides the latest functionality and performance for
Windows, Linux and MAC operating systems. And with a Java based GUI
the RAIDGuard X server and client software offers improved functionality
and manageability.
What's in the box…
This guide
ACS-61100 RAID PCI-Express to SATA
controller card.
Installation CD-ROM including: user manuals
for RAIDGuardX and 61100; JRE, Drivers and
RAIDGuardX Client and Server.
Mini Multi-Lane iPass cables (50cm),
including SGPIO connector.
1
What you’ll need…
SATA II Hard Disk Drives (the number will
vary depending on the RAID configuration).
Host computer with spare PCI-e slot.
Disk storage and power connection for each
drive.
Static grounding strap or electrostatic discharge
(ESD) safe work area.
Optional items…
Battery backup module to back up cached data in
the event of a power failure.
LCD Control Panel for Card status and advanced
configuration.
2
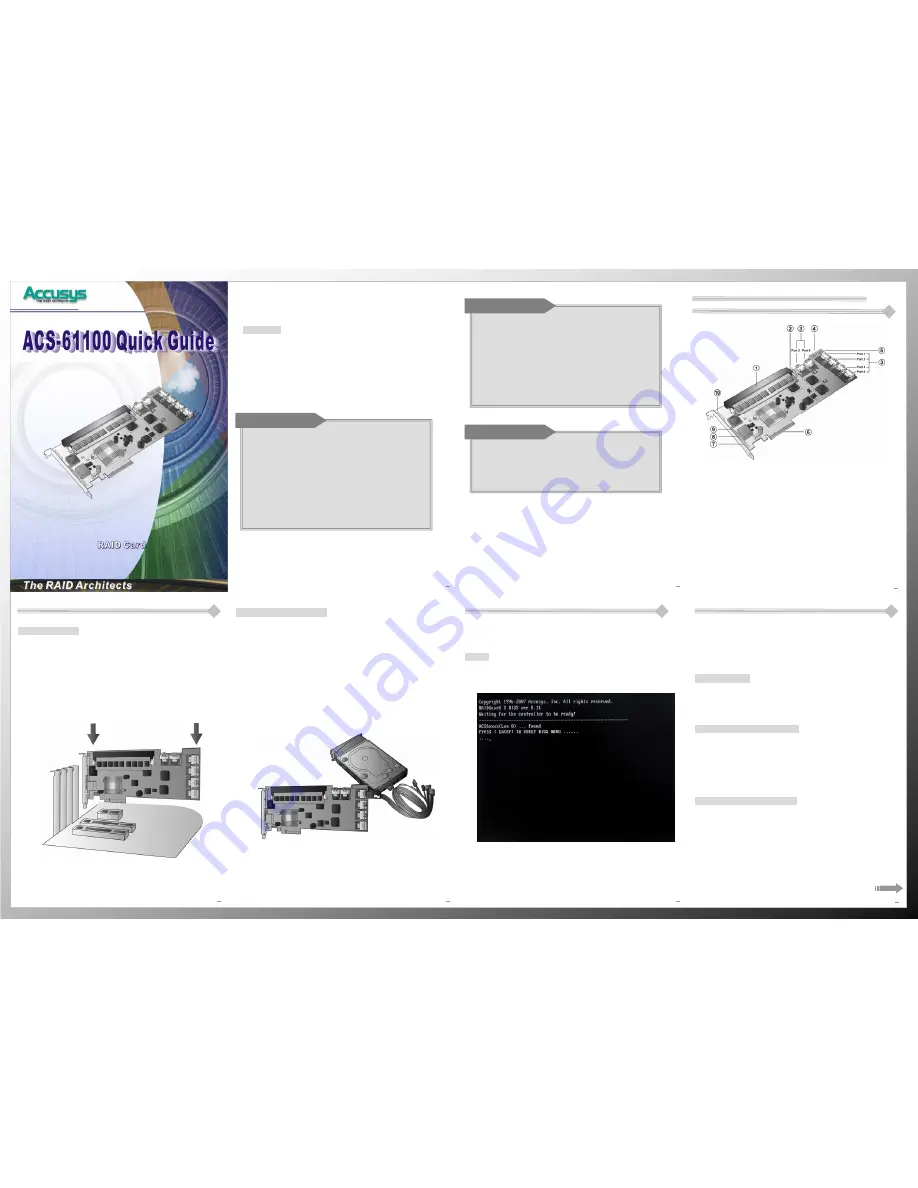
Familiarizing yourself with the
ACS-61100 RAID Card
1.
DDRII memory connector
6. PCI-Express x 8 connector
2. I2C connector
7. Serial port connector
3. Mini SAS connectors
8. Button port connector
4. Disk access LED connector
9. LCD panel connector
5. Disk fault LED connector
10. Battery module connector
3
Card Installation
Card Installation
1.
Remove the blanking plate from the PCI-e slot.
2.
Position the connector of the card over the expansion slot.
3.
Press the connector of the card gently but firmly into the expansion
slot until it is correctly and securely seated.
4.
Secure the metal bracket of the card to the system case with a screw.
5.
Go to the
Hard drive
connection.
4
Initial Setup
The easiest way to start is to run the
Quick Array Configuration
from the
BIOS.
BIOS
1.
Start the server and watch the screen. When it gets to the position shown
below press
Enter
.
2.
Enter the password (the default is 00000000 (8 zeros) and press
Enter
.
3.
Go to
RAID Configuration > Create Array > Quick Array
Configuration
. The BIOS will recognize how many drives are installed
and provide the best solution. Type
"Y"
to begin configuration.
6
Software Installation
The details below are applicable only to the
Microsoft Windows
operating
system. For other operating systems see the User Manual.
First insert the CD into the CD-ROM drive of the server and/or client.
Choose the required application from the on-screen menu.
Installing Java
It is necessary to install Java Runtime Environment v1.5.09 or later. For the
latest version see www.java.com.
From the on-screen menu choose to install
Java
.
Installing RAIDGuardX server
RAIDGuard X server is the application that runs on the host server that the
61100 is connected to. Once it is installed correctly the controller can be
monitored from any remote computer with Java installed.
From the on-screen menu choose which operating system to install for and
follow the on-screen instructions.
Installing RAIDGuardX Client
From the on-screen menu choose which operating system to install for and
follow the on-screen instructions.
7
Hard Drive Connection
1.
Attach Mini SAS cables to the connectors on the card. One cable can
control a maximum of 4 HDDs.
2.
Install the disks in the desired location eg within the system case or in an
independent disk rack.
3.
Connect the other end of each cable to the connectors on each of the
hard drives.
4.
Attach a power connector to each drive, either from the host system or
from an independent power source.
Note: The hard drives in a RAID should match in size and speed. All
drives in any array should be identical models with the same firmware
versions. Arrays only support LBA 48 bit HDDs (bigger 128GB),
however, the smallest drive will determine the size of the array.
5