Aardvark VANSAT Raven, Installation And Operation Manual
The Aardvark VANSAT Raven is a cutting-edge satellite communication system designed for seamless installation and operation. To make the most of this innovative product, we offer a comprehensive Installation and Operation Manual for free download from our website, providing easy-to-follow instructions and helpful insights.
Share
Download


Reviews:
No comments
Related manuals for VANSAT Raven

USB 2.0 / Fire Wire Combo
Brand: Hama Pages: 12

DVB-T
Brand: Hama Pages: 22

MFJ-1888
Brand: MFJ Pages: 8
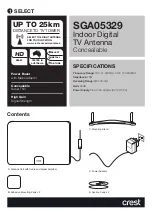
SGA05329
Brand: Crest Audio Pages: 4

am-v5g-ti
Brand: Ubiquiti Pages: 20

TA-90
Brand: Q-Mac Pages: 21

BIG BISAT
Brand: cahors Pages: 4

SAS-563B
Brand: A.H. Systems Pages: 13

WS-6933
Brand: Satlink Pages: 10

BANDSPRINGER MIDI
Brand: SOTABEAMS Pages: 2

DigiTop 27768RG
Brand: Philex Pages: 4

LP-500-2500
Brand: Antenna Experts Pages: 1

KA1 Series
Brand: KOHJINSHA Pages: 38

SmallIR
Brand: SteppIR Pages: 22

ANT4WHE
Brand: RCA Pages: 2

ANT301R
Brand: RCA Pages: 2

ANT2020X
Brand: RCA Pages: 6

ANT3901
Brand: RCA Pages: 12


