background image

X8-M

Operation Manual

V.1       2014

©3D Robotics

DCT006

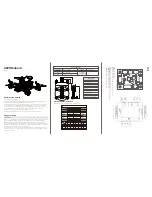
Thank you for purchasing an X8-M! This manual contains important information about your aerial 
mapping platform. Please read these instructions before your first flight. 


Plan 

     1


Fly 

     19

Process 

    30

Appendix 

    34

Online information portal: 


3DR.com/X8-M

3DR 

support: 

    [email protected]

Terms 

and 

conditions: 

   3DR.com/terms

Pix4D 

instructions: 

   support.Pix4D.com

Summary of Contents for X8-M

Page 1: ...ntains important information about your aerial mapping platform Please read these instructions before your first flight 1 Plan 1 2 Fly 19 3 Process 30 Appendix 34 Online information portal 3DR com X8 M 3DR support help 3DR com Terms and conditions 3DR com terms Pix4D instructions support Pix4D com ...

Page 2: ...ring the X8 4 Camera Setup 5 3DR EAI 5 Charging 5 Starting a Mission 5 Mounting 6 Ground Station Setup 7 Download Software 7 Connect to Radio 7 Mission Planning 8 Operating Parameters 8 Load Maps 9 Draw Polygon 10 Configure Survey 11 Save and Write Mission 18 ...

Page 3: ... propellers SFP propellers charger and accessories micro USB cable battery guard bag Pixhawk micro SD card adapter X8 ground station radio FPV OSD System If you selected to receive a FPV OSD system those components will be included with the X8 s accessories See page 27 for parts and instructions registration card and Pix4D license key ...

Page 4: ...e Always fly with a fully charged battery Charge the battery using a designated LiPo balance charger only Always monitor the battery while charging Protect the battery from extreme heat extreme cold puncturing and flammable surfaces Always transport charge and store the battery in the guard bag Inspect the battery for damage before and after flying If you observe any swelling of the package or the...

Page 5: ...fore powering on the X8 Always turn on the controller before connecting the battery When powering off the X8 disconnect the battery before turning off the controller 1 Turn on the controller To avoid triggering the controller s startup alarm ensure that all switches are set back away from you and the throttle stick is set fully down RC controller Throttle stick Switches ...

Page 6: ...ck or unlock the card Lock the SD card to run 3DR EAI unlock the SD card to save images to your ground station or to boot the camera with its original programming For more information about 3DR EAI see page 36 Charging Charge the camera battery before your first flight Once fully charged insert the battery into the camera status indicator Starting a Mission To prepare the camera to fly a mapping m...

Page 7: ...ncludes a cap to protect the UV filter during travel Before you fly remove the cap and check that the filter contains no dirt particles or scratches that could affect image quality If you notice any damage to the filter that could affect image quality screw off the filter and replace with the extra filter provided with the X8 Connect mini USB cable here Camera side UV filter Camera enclosure with ...

Page 8: ...es Mission Planner Help tab Ground Station Setup Pix4Dmapper LT 3DR Edition To connect the X8 to Mission Planner connect the ground station radio to the laptop and power the X8 1 Connect the ground station radio to your laptop using the micro USB cable Open Mission Planner 3 Select Flight Data to view live data from the X8 2 Select 57600 and AUTO then select CONNECT When connecting directly to Pix...

Page 9: ...h resolution visual spectrum aerial maps Pixhawk autopilot system Pix4Dmapper LT 3DR Edition Canon SX260 3DR EAI To create a map the X8 flies an autonomous mission over the survey site using the integration between the Pixhawk autopilot and custom programmed camera to capture images at a consistent distance interval Pix4Dmapper then stitches these images together into a georeferenced orthorectifie...

Page 10: ...are represented by this slider from 0 bottom to 25 top Press the ESC key to skip levels of zoom at a greater detail than you need for mission planning Load Maps Mission Planner allows you to plan the mission away from the mapping location however it is important to assess the environmental conditions on site at the time of the mission and adjust the flight plan if necessary Alternatively you can p...

Page 11: ...use metric to plan the mission Support for imperial units in Mission Planner is coming soon check 3DR com X8 M for updates Draw Polygon To begin planning the mapping mission select the area you want to map using the Polygon tool You ll be able to adjust the size and shape of the polygon later in the mission configuration process 1 Select Flight Plan and zoom to your mapping location Mission Planne...

Page 12: ...he option for Camera top facing forward Set Default Speed 5 m s Apply Survey Speed Check the option for Use speed for this mission If unchecked the mission will use the X8 s default speed of 5 m s regardless of the speed selected in the Survey Tool Mission Planner Survey Tool Mission Planner Survey Tool ...

Page 13: ...s the X8 will make as you adjust the angle Review Wind Conditions On Site Always assess the wind conditions at your survey site at the time of the mission and adjust the mission accordingly Adjust Polygon Click and drag the red polygon points to adjust the size and shape of the polygon from the Survey Tool Configure Survey Set Angle wind Angle in high winds 7 10 m s Angle in low winds 1 6 m s Use ...

Page 14: ...battery To decrease flight time increase altitude or speed High winds humidity high altitude and extreme heat can affect power consumption and reduce flight time Consider the environmental factors at your site when configuring flight time In this example we increased speed to 8 m s to keep flight time below 14 min while allowing for moderate wind conditions When increasing speed keep in mind that ...

Page 15: ...de increases photo interval Keep altitude below 120 m and ensure that the altitude is appropriate for your flying area and local regulations Speed Decreasing speed increases photo interval Ensure that the Use speed for this mission option is checked Configure Survey Check Photo Interval Mission Planner Survey Tool ...

Page 16: ...y altitude and begin the mission At the end of the mission the X8 will automatically return to the launch point and land For manual takeoff and automatic landing Uncheck the Add Takeoff and Land WP s option Check the Use RTL option Take off manually and initiate the mission in flight To end the mission the X8 will land automatically at the launch point Configure Survey Set Takeoff and Landing Miss...

Page 17: ...round station signals If these signals are lost during flight the X8 will respond with the assigned failsafe behaviors See page 29 If your mission is likely to experience a loss of signal it is best practice to start from the corner of the mission farthest from the launch point Configure Survey Advanced Options Camera Config The options under the Camera Config tab allow you to configure a camera o...

Page 18: ...60 SX280 Altitude 50 100 m Camera top facing forward checked Flying speed 1 17 m s Use speed for this mission checked optional if speed set to default speed of 5 m s Photo Every greater than 2 s Flight time under 14 min depending on environmental conditions Do not accept the mission if any of the parameters exceed the X8 s operating limits Operating Parameters Configure Survey Accept Survey Accept...

Page 19: ...lect Save WP File to save the mission file to your computer To repeat this mapping mission load the saved WP file from your computer On the Flight Plan screen save the waypoint file to your computer and write the mission to the X8 Save and Write Mission ...

Page 20: ...Components 21 Assembly 22 Controls 23 Modes 24 Preflight Checks 25 LED Indicators and Tones 25 GPS Lock 25 Arming and Disarming 26 FPV System Operation 27 Flying Mapping Missions 28 Takeoff Checklist 28 Initiating 28 Monitoring 28 Failsafes 29 ...

Page 21: ...its instability in flight switch to altitude hold mode and land the copter manually The X8 will not avoid obstacles on its own including during missions As the operator it s your job to recognize and avoid obstructions while flying Always be ready to regain manual control of the copter in the event of an unsafe situation Spinning propellers can cause serious injury The safety button indicates the ...

Page 22: ...21 Aircraft Operation Components safety button camera integration cable status LED Pixhawk autopilot front arms rear arms camera mount ...

Page 23: ...opeller wrench Arms Remove the bolt and nut outside each arm Rotate the arm into position insert the bolt through the plates and the arm and secure the arm in place with the nut The X8 arrives in travel configuration Complete these steps to prepare the copter for flight travel position remove secure with bolt flight position slide each arm into position Ensure writing on all propellers faces the s...

Page 24: ...rd to control altitude and acceleration Yaw Move the left stick horizontally to rotate and control orientation Navigate by orienting the X8 with the blue arms facing forward Pitch Move the right stick vertically to fly forward and backward Roll Move the right stick horizontally to fly to the left and to the right Controls roll pitch roll and pitch center Automatically level roll left roll right Fl...

Page 25: ...ly Just release the sticks and the copter will hover in place Return to launch RTL recall and land Activate RTL during the mission to end your flight automatically RTL commands the X8 to achieve a minimum altitude of 15 meters return to the launch point hover for five seconds and land Use the right stick to adjust the position of the X8 during landing Stabilize full manual control Stabilize allows...

Page 26: ...ode Correctly executes a return to launch command LED Indicators Low battery automatic landing Loss of RC signal automatic landing System error see troubleshooting guide Loss of GPS signal automatic landing Initializing please wait Acquiring GPS please wait Armed Tones Visit 3DR com X8 M to listen to Pixhawk s status tones GPS Lock Auto RTL and loiter modes requires GPS lock When powered the autop...

Page 27: ...Press and hold the safety button until it displays solid red This indicates that the X8 is now active Stand back Motors inactive safe to handle Motors active deactivate before handling 3 To arm the motors hold the left stick down right until the motors spin Disarming 1 To disarm the motors hold the left stick down left until the motors stop 2 Press and hold the safety button until it blinks red Th...

Page 28: ...A Connect the white battery connector to the 3S port and connect the XT60 JST charger adapter to the red battery connector and yellow charger connector 3S port Transmitter Camera Remove lens cap 3 Remove lens cap The video transmitter is powered by the main flight battery and will automatically turn on when the X8 is powered To turn off the transmitter disconnect the red JST connector Remove the l...

Page 29: ...tching to auto mode Monitoring Mission Planner Flight Data Attitude 1 Heading direction 2 Bank angle 3 Altitude black and rate of climb blue bar 4 Ground speed Status 4 Distance to current waypoint current waypoint number 5 GPS status 6 Battery status 1 Ground station signal 2 GPS time 3 Currently enabled mode 1 2 3 4 1 2 3 4 5 6 Monitor the X8 closely during the mission using your line of sight a...

Page 30: ...ircraft moves outside your designated safe flying area switch to RTL Turning off the controller will automatically trigger an RTL and can be used in an emergency situation as a hard recall command Ground Station Signal Failsfe Physical obstructions and interference from nearby wireless signals can affect the X8 s connection with the ground station Use the Mission Planner Flight Data display to mon...

Page 31: ...30 3 Process On Site Quality Check 31 Spot Check 31 Download Images 31 Download Log File 32 Pix4D Rapid Check 33 Full Processing 33 ...

Page 32: ...bleshooting section on page 38 and repeat the mission playback button SD card file structure Download images Spot Check Optional The quickest way to see the images after a flight is to unlock the SD card and restart the camera The camera will load the default Canon programming and you can select the playback bottom to review the images Download Images Unlock the SD card and load into your ground s...

Page 33: ...select the DataFlash Logs tab under the heads up display and select Download DataFlash Log over Mavlink The Log window shows the X8 s recent flights Select the flight for your mission and select Download These Logs This will save the log file to your computer in the location displayed under the list of flights To retrieve the log file access your computer s file structure under Program Files Missi...

Page 34: ...heck Create Project 3 After adding the images select From File to add the geolocation data from the X8 s log file In the pop up window select 3D Robotics Flight Log as the file format and upload the dataflash log file downloaded from Mission Planner Pix4Dmapper Rapid Check Initial Processing Pix4D will generate a Quality Report that will indicate if the images are of sufficient quality to create a...

Page 35: ...34 Appendix Aerial Imaging Concepts 35 3DR EAI 36 Image Quality Troubleshooting 38 Operational Troubleshooting 39 ...

Page 36: ... Time Based Imaging The X8 is also equipped to capture images at a consistent time interval instead of using distance This function can be useful if you want to capture images over an area without planning a mission This time based imaging results in more images per area and therefore more processing time and storage cost See the intervalometer option on page 36 to enable time based imaging Overla...

Page 37: ...e script menu allows you to change the parameters associated with the script itself including changing the trigger mode and adjusting exposure To open the script menu stop the script and select the FUNC SET button These parameters are configured for the X8 and SX260 and do not require adjustment as part of standard operation Trigger Type This parameter allows you to control how the camera captures...

Page 38: ...pts and replace the existing 3DR_EAI_ SX260 lua file with the updated script file from GitHub Resources Visit 3DR com X8 M for links to resources 3DR EAI GitHub Repository github com diydrones ardupilot tree master Tools CHDK Scripts KAP UAV Exposure Control Script v3 1 chdk wikia com wiki KAP_UAV_Exposure_Control_Script CHDK v1 3 chdk wikia com wiki CHDK_1 3 0_User_Manual Download latest script f...

Page 39: ...posure If the images are overexposed but do not show any motion blur it can be due to flying in extremely bright conditions To correct this set the Allow use of ND filter parameter to YES in the script menu Allow use of ND filter default No To correct overexposure Set to Yes Processing Errors If you receive errors from Pix4Dmapper during processing increase the overlap and sidelap during survey co...

Page 40: ...error message specifying the failed check Radio Calibration Failure Perform Radio Calibration in Mission Planner or RC controller re binding Accelerometer Calibration Failure Perform Accelerometer Calibration in Mission Planner Compass Calibration Failure Perform Compass Calibration in Mission Planner GPS Failure Wait for improved GPS signal or move to a more open area 2 Take a distance triggered ...

Reviews: