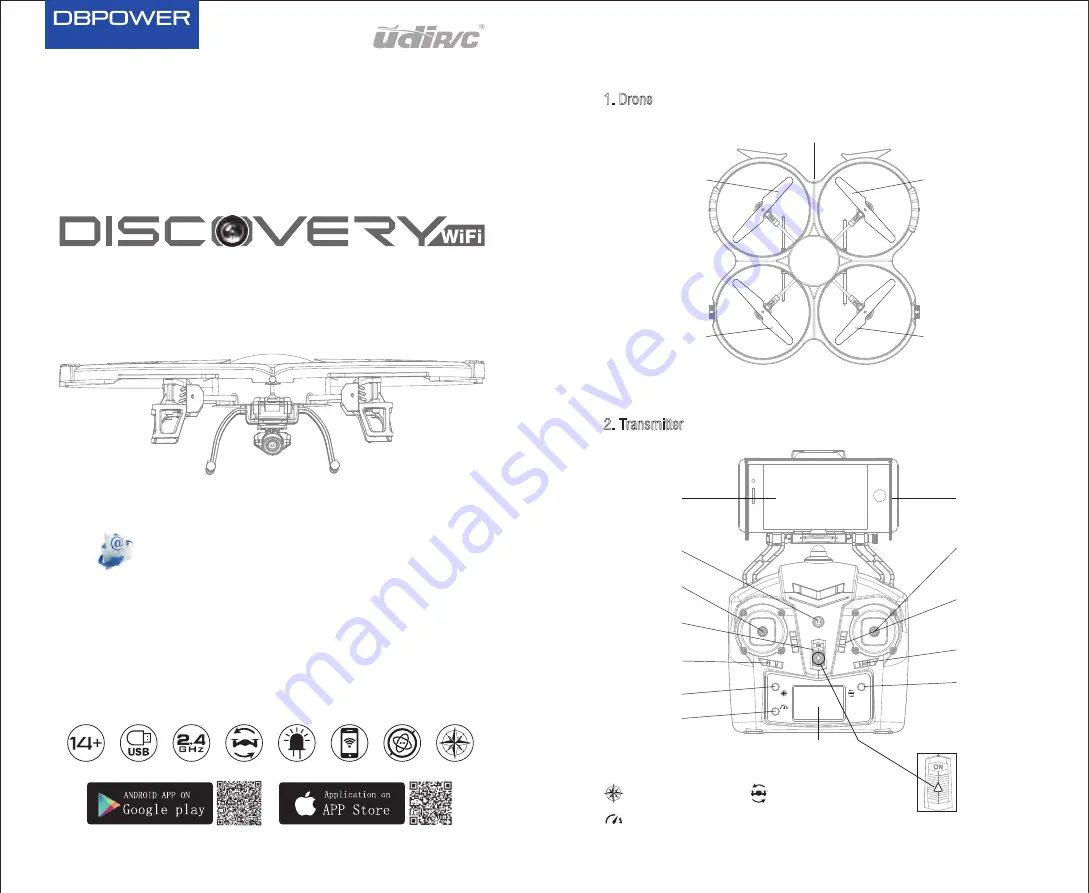
background image

2

Name of Parts

1. Drone

White Blade B

Black Blade A

Picture 1

Black Blade B

White Blade A

LED Light

Picture 2

2. Transmitter

Power Indicator

Light

Mobile Phone

Screen

Lens hood

Throttle/

Rudder Stick

Forward/

Backward/

Left/Right

Flying Stick

Forward/

Backward Trim

Left/Right

Flying Trim

Flip

Power Switch

Left/Right

Rudder Trim

Headless Mode

High/Low

Speed Mode

 LCD

Flip Icon

Headless Mode Icon

High/Low Speed Icon

Power On

Direction

U818A WIFI

ITEM NO.: U818A WiFi


[email protected] 

There are A/B letters marked on the blades, 

and they have to be installed at the same positions as the picture 1 shows.

Summary of Contents for U818A WIFI

Page 1: ...orward Backward Left Right Flying Stick Forward Backward Trim Left Right Flying Trim Flip Power Switch Left Right Rudder Trim Headless Mode High Low Speed Mode LCD Flip Icon Headless Mode Icon High Low Speed Icon Power On Direction U818A WIFI ITEM NO U818A WiFi service unicdrone com There are A B letters marked on the blades and they have to be installed at the same positions as the picture 1 show...

Page 2: ...ating parts Keep your face and body as well as all spectators away from rotating parts which may cause serious injury and damage 5 Keep away from heat The RC drone is made of metal fiber plastic electronic components etc Keep away from heat and sunshine to avoid distortion and damage 1 Flying field must spacious enough and we suggest at least 8M length 8M width 5M height 2 Make sure the battery of...

Page 3: ...eeps bright About 50 minutes later the light turns to green and keeps bright when fully charged Li Po battery is included in spare parts and please pay attention on the safe notice Never put the battery on high temperature place such as fire or heating device to avoid damage or explode Never use the battery to crash or hit hard surface Never put the battery in water Keep it in dry place Never deta...

Page 4: ... the drone hovers after taking off and can not be adjusted by trim button and cause difficult operation 1 Turn off the drone switch and then turn off the transmitter switch 2 Turn on the transmitter switch push the Throttle Stick to utmost control distance and then pull to the lowest position See Picture 7 and 8 and the transmitter enters the state of code pairing waiting Picture 10 Picture 11 Pic...

Page 5: ...s Mode 1 The drone head must face forward before entering headless mode Notice 2 The flying rudder may drift for drone crash under headless mode At this time you can exit from headless mode and re enter headless mode again and the rudder will return to normal state Right 1 When the drone is flying or stay on the groud the drone head faces to front Press Headless Mode button and the drone body ligh...

Page 6: ...olor box to download the App uidrc FPV like Picture 14 Picture 15 and Picture 16 as below Operation Instruction for Mobile Phone WiFi 1 Refer to the Flying Operation as before 2 Enter set up of the moblie phone turn on WiFi WLAN and choose udirc FPV return to desktop after successful connection 3 Click the icon of udirc FPV as Picture 17 and enter the App interface as Picture 18 udirc FPV ANDROID ...

Page 7: ...er remote control interface as Picture 19 Tip Following Flying Operation before entering mobile phone control function 1 Back to main menu 2 View photo and video 1 Touch icon to return Exit from work interface Touch icon to view photo and video 2 Click Picture 19 ...

Page 8: ...6 Recording Video 7 Up and down throttle control 8 Turn left right rotation control 6 Touch icon to record video and then touch icon again to finish video recording Press the ball and push it up and the drone will fly up pull down the ball and the drone will fly down 10 11 12 Press the ball and move it to left and the drone will rotate to left move the ball to right and the drone will rotate to ri...

Page 9: ... mode Touch icon again and exit from headless mode 9 Right left flying control 10 Forward backward control 11 Gravity induction mode 7 15 16 Press the ball and move it to left and the drone will fly to left move the ball to right and the drone will fly to right 13 14 Touch icon to enter gravity induction mode which only available for flying to left right and forward backward Press the ball and mov...

Page 10: ...rone tilts to backward 17 18 Ajust the trim to right if the drone rotates to left and adjust the trim to right till balance if the drone rotates to right 19 20 Right Left 13 VR virtual reality Mode 9 This function is only available when using a VR Headset excluded Touch the icon to enter the mobile phone split screen mode Touch the icon again to exit from VR mode ...

Page 11: ...ard reader Connect the card reader with computer After a while view the aerial photography data from my computer mobile disk Picture 26 Picture 27 Connect No 1 socket of receiving board with right front motor wire Connect No 2 socket of receiving board with left front motor wire Connect No 3 socket of receiving board with left rear motor wire Connect No 4 socket of receiving board with right rear ...

Page 12: ...deformed seriously 1 Replace blade 2 The motor holder deformed and out of verticality 2 Replace the motor holder 3 The gyro did not resetting after violent crash 3 Put the drone on the flat ground for about 10s or restart the the drone to calibrate again 4 The motor is damaged 4 Replace motor 1 The drone battery is too low 1 Recharge the drone battery 2 The battery is expired or overdischarge prot...

Page 13: ...to correct the interference by one or more of the following measures The equipment may generate or use radio frequency energy Changes or modifications to this equipment may cause harmful interference unless the modifications are expressly approved in the instruction manual Modifications not authorized by the manufacturer may void user s authority to operate this device This device complies with pa...

Reviews: