background image

10

ES-315-F Quick Start Guide

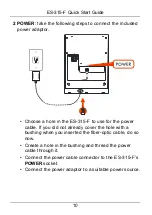
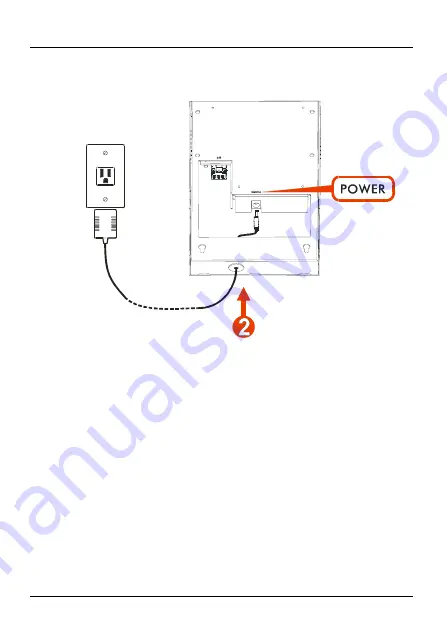
2 POWER

: take the following steps to connect the included 

power adaptor.

• Choose a hole in the ES-315-F to use for the power 

cable. If you did not already cover the hole with a 
bushing when you inserted the fiber-optic cable, do so 
now.

• Create a hole in the bushing and thread the power 

cable through it.

• Connect the power cable connector to the ES-315-F’s 

POWER

 socket.

• Connect the power adaptor to a suitable power source.

Summary of Contents for ES-315-F - QUICK GUIDE V3.70

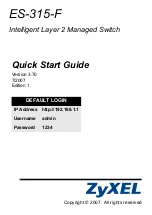
Page 1: ...Copyright 2007 All rights reserved ES 315 F Intelligent Layer 2 Managed Switch Quick Start Guide Version 3 70 7 2007 Edition 1 DEFAULT LOGIN IP Address http 192 168 1 1 Username admin Password 1234 ...

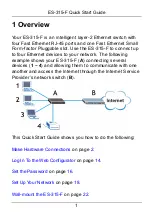
Page 2: ...your network The following example shows your ES 315 F A connecting several devices 1 4 and allowing them to communicate with one another and access the Internet through the Internet Service Provider s network switch B This Quick Start Guide shows you how to do the following Make Hardware Connections on page 2 Log In To the Web Configurator on page 14 Set the Password on page 16 Set Up Your Networ...

Page 3: ... to 1 Open the ES 315 F 2 Install an SFP transceiver 3 Attach the wire mounts 4 Insert a fiber optic cable through a bushing and wrap it around the wire mounts 5 Connect the fiber optic cable to the SFP transceiver Only qualified technicians should perform these actions 2 1 1 Open the ES 315 F 1 Remove both screws from the housing ...

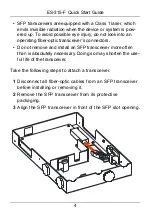
Page 4: ...r with an LC type connector Please observe the following warnings when working with transceivers Only trained and qualified personnel should install or replace transceivers SFP transceivers are sensitive to static To prevent damage from electrostatic discharge ESD use an ESD preventive wrist strap when you install or remove a SFP transceiver Avoid getting dust and other contaminants into the optic...

Page 5: ...ransceiver s connectors Do not remove and install an SFP transceiver more often than is absolutely necessary Doing so may shorten the use ful life of the transceiver Take the following steps to attach a transceiver 1 Disconnect all fiber optic cables from an SFP transceiver before installing or removing it 2 Remove the SFP transceiver from its protective packaging 3 Align the SFP transceiver in fr...

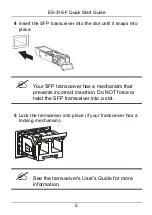
Page 6: ... it snaps into place Your SFP transceiver has a mechanism that prevents incorrect insertion Do NOT force or twist the SFP transceiver into a slot 5 Lock the transceiver into place if your transceiver has a locking mechanism See the transceiver s User s Guide for more information ...

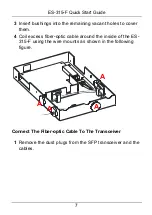
Page 7: ...cover from the wire mounts and attach them to the sides of the ES 315 F Insert Fiber optic Cable The ES 315 F has holes labelled A in the following figure through which you can insert fiber optic cable 1 Insert a bushing into a hole through which you will insert the fiber optic cable 2 Create a hole in the bushing and thread the fiber optic cable through it ...

Page 8: ...vacant holes to cover them 4 Coil excess fiber optic cable around the inside of the ES 315 F using the wire mounts as shown in the following figure Connect The Fiber optic Cable To The Transceiver 1 Remove the dust plugs from the SFP transceiver and the cables A A A A ...

Page 9: ...8 ES 315 F Quick Start Guide 2 Insert the end of the fiber optic cable into the SFP transceiver Close the ES 315 F 1 Close the cover ...

Page 10: ...ES 315 F Quick Start Guide 9 2 Replace the screws 2 2 Make LAN and Power Connections 1 LAN Using an Ethernet cable connect your computer to one of the LAN ports 1 2 3 or 4 for initial configuration ...

Page 11: ...ES 315 F to use for the power cable If you did not already cover the hole with a bushing when you inserted the fiber optic cable do so now Create a hole in the bushing and thread the power cable through it Connect the power cable connector to the ES 315 F s POWER socket Connect the power adaptor to a suitable power source ...

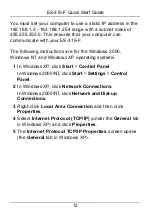
Page 12: ...Ds turn on when the corre sponding ports are properly connected and blink when there is traffic V If one of the LEDs does not behave as expected check the connection Make sure the device to which the corresponding port is connected is turned on and working normally If this does not help turn the ES 315 F off and on again 2 4 Set Up Your Computer s IP Address This section shows you how to set up yo...

Page 13: ...0 Windows NT and Windows XP operating systems 1 In Windows XP click Start Control Panel In Windows 2000 NT click Start Settings Control Panel 2 In Windows XP click Network Connections In Windows 2000 NT click Network and Dial up Connections 3 Right click Local Area Connection and then click Properties 4 Select Internet Protocol TCP IP under the General tab in Windows XP and click Properties 5 The ...

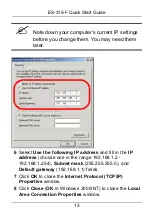
Page 14: ...ect Use the following IP address and fill in the IP address choose one in the range 192 168 1 2 192 168 1 254 Subnet mask 255 255 255 0 and Default gateway 192 168 1 1 fields 7 Click OK to close the Internet Protocol TCP IP Properties window 8 Click Close OK in Windows 2000 NT to close the Local Area Connection Properties window ...

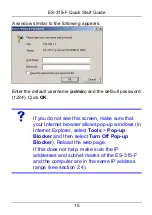
Page 15: ...5 F for initial configuration Use Internet Explorer 6 0 and later versions or Netscape Navigator 7 0 and later versions with JavaScript enabled and pop up blocking disabled Open an Internet browser such as Internet Explorer or Netscape Navigator Enter the ES 315 F s IP address in the address bar The ES 315 F s default IP address is 192 168 1 1 ...

Page 16: ... If you do not see this screen make sure that your Internet browser allows pop up windows in Internet Explorer select Tools Pop up Blocker and then select Turn Off Pop up Blocker Reload the web page If this does not help make sure the IP addresses and subnet masks of the ES 315 F and the computer are in the same IP address range see section 2 4 ...

Page 17: ...16 ES 315 F Quick Start Guide The Status screen displays 4 Set the Password For security reasons you should change the password when you first log in Take the following steps to do this ...

Page 18: ... navigation panel on the left of the screen In the menu that displays click Access Control Then click Logins 2 The following screen displays 3 Enter the login information you want to use as follows The password is case sensitive ABCD is not the same as abcd ...

Page 19: ...If you forget this information you will need to reset the ES 315 F to its factory defaults press the Reset button in for 3 5 seconds Re enter the new password in the Re type to confirm field Click Apply Enter your new login information in the window that displays Log in to the web configurator again using your new pass word Click Save 5 Set Up Your Network This section shows how to set the ES 315 ...

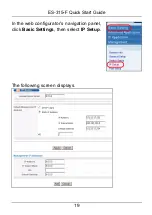
Page 20: ...ES 315 F Quick Start Guide 19 In the web configurator s navigation panel click Basic Settings then select IP Setup The following screen displays ...

Page 21: ...t mask you want to use go to section 5 2 V If you are unsure which to choose check the information about your computer s IP address you wrote down in section 2 4 If your computer was set to obtain an IP address automatically it used DHCP If not it used a static IP address If this does not help contact your network administrator or Internet Service Provider ISP 5 1 Using DHCP If you want your ES 31...

Page 22: ... address assigned to the ES 315 F by the DHCP server Return your computer s IP settings to their previous values if necessary 5 2 Using a Static IP Address If you have an IP address subnet mask gateway and DNS details to use do the following Select Static IP Address in the Default Management IP Address field Enter the information in the relevant fields Click Apply then click Save Next time you wan...

Page 23: ... configured information is lost To restart the ES 315 F hold the RESET button on the rear panel in for three to five seconds 6 Wall mount the ES 315 F Take the following steps to hang your ES 315 F on a wall 1 Select a position free of obstructions on a sturdy wall 2 Drill two holes for the screws exactly 104 mm apart 1 Be careful to avoid damaging pipes or cables located inside the wall when dril...

Page 24: ... gap of about 0 5 cm between the heads of the screws and the wall 4 Make sure the screws are snugly fastened to the wall They need to hold the weight of the ES 315 F with the connection cables 5 Align the holes on the back of the ES 315 F with the screws on the wall Hang the ES 315 F on the screws ...

Page 25: ...ry plug used for wall mounting All measurements are in millimeters mm Viewing a Product s Certification s 1 Go to www zyxel com 2 Select your product from the drop down list box on the ZyXEL home page to go to that product s page 3 Select the certification you wish to view from this page ...

Reviews: