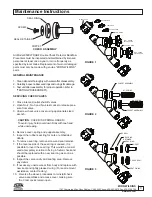
SCREW
SEAL RING
RETAINER
SEAL RING
POPPET
CHECK SEAT
SEAT O-RING
ZURN WILKINS
1747 Commerce Way, Paso Robles, CA 93446 Phone:855-663-9876 Fax:805-238-5766
POPPET ASSEMBLY
#1 SPRING
#2 SPRING
POPPET ASSEMBLY
SCREW
SEAL RING
SEAL RETAINER
POPPET
#2 TEST COCK
#3 TEST COCK
#4 TEST COCK
COVER O-RING
NO. 1 CHECK
VALVE COVER
COVER O-RING
NO. 2 CHECK
VALVE COVER
#1 TEST COCK
FIGURE 3
3
CHECK ASSEMBLY
FIGURE 1
FIGURE 2
Maintenance Instructions
All Model 950XLTDABF Double Check Detector Backflow
Preventers must be inspected and maintained by licensed
personnel at least once a year or more frequently as
specified by local codes. Replacement of worn or damaged
parts must only be made with genuine "ZURN WILKINS"
parts.
GENERAL MAINTENANCE
1. Clean all parts thoroughly with water after disassembly.
2. Carefully inspect rubber seal rings and o-rings for damage.
3. Test unit after reassembly for proper operation (refer to
"TESTING PROCEDURES").
SERVICING CHECK VALVES
1. Close inlet and outlet shut-off valves.
2. Open No.2, No.3 and No.4 test cocks to release pres-
sure from valve.
3. Unscrew check valve cover using appropriate sized
wrench.
CAUTION:
COVER IS SPRING LOADED!
To avoid injury, hold cover down firmly with one hand
while unscrewing.
4. Remove cover, spring and poppet assembly.
5. Inspect the rubber seal ring for cuts or embedded
debris.
6. To remove seal ring, remove screw and seal retainer.
7. If the reverse side of the seal ring is unused, it is
possible to invert the seal ring. This would be consid-
ered a temporary solution to fixing a fouled check and
should be replaced with a new seal ring as soon as
possible.
8. Inspect the valve cavity and seating area. Remove
any debris.
9. If necessary, unscrew seat from body and replace with
new seat and lightly greased o-ring (For seat removal
assistance, contact factory).
10. Reverse the above procedures to reinstall check
valve assemblies and access cover, making sure
the 3 test cocks remain open.
®
www.zurn.com


