background image

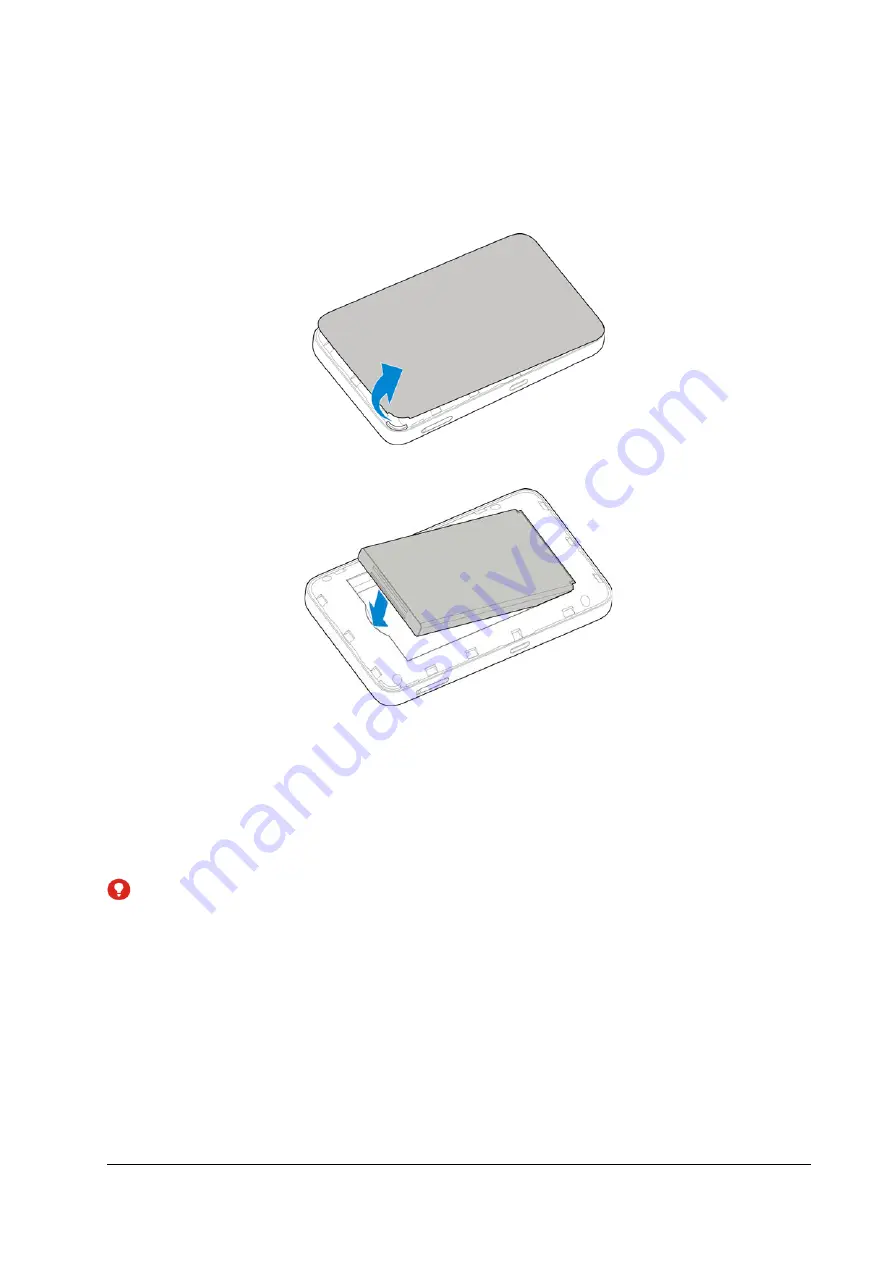
Installing the Battery 

Power off the MF993C before removing or replacing the battery. 
1.  Open the back cover from the slot at one of its corner. 


2.  Insert the battery, making sure the connectors align. 


3.  Replace the back cover. 

Installing the nano-SIM Card 

The nano-SIM card can be installed or removed while the MF993C is turned 
on. 

WARNING! 

To avoid damage to the device, do not use any other kind of SIM cards, or 
any non-standard nano-SIM card cut from a SIM card. You can get a 
standard nano-SIM card from your service provider. 
1.  Insert the tip of the tray eject tool into the hole on the nano-SIM card tray. 

2


Summary of Contents for MF993C

Page 1: ...MF993C User Manual IC ID 5200E MF993C FCC ID SRQ MF993C ...

Page 2: ......

Page 3: ...microfilm without the prior written permission of ZTE Corporation ZTE Corporation reserves the right to make modifications on print errors or update specifications in this manual without prior notice This manual has been designed with the utmost care to ensure the accuracy of its content However all statements information and recommendations contained therein do not constitute a warranty of any ki...

Page 4: ......

Page 5: ...Wi Fi 7 Using the Wi Fi Protected Setup WPS 7 Connecting via a USB Type C Cable 8 Configuring Your PC Verifying IP Address and DNS 9 Accessing the LTE Hotspot Configuration Web Page 10 Navigating the LTE Hotspot Configuration Web Pages 13 Phonebook and Text Messaging 15 Managing the Phonebook 15 Managing Text Messages 16 Managing Data Usage 18 Access Controls 19 Managing Settings 20 Cellular Setti...

Page 6: ...r Safety 25 To the User 25 Battery Safety 27 Limited Warranty 28 Limitation of Liability 29 Radio Frequency RF Exposure 29 FCC Compliance 30 IC Notice 31 IC Radiation Exposure Statement 31 Troubleshooting 33 2 ...

Page 7: ...our reference The actual device may be different 1 Power button Press and hold for about 3 seconds to power on or off Press to turn on or off the touch screen 2 Touch screen Control the functions and settings of your device 3 nano SIM card tray Pop out the tray with the eject tool to install the nano SIM card 4 Charging USB Type C jack Charge the device or connect to the USB port of a computer to ...

Page 8: ...place the back cover Installing the nano SIM Card The nano SIM card can be installed or removed while the MF993C is turned on WARNING To avoid damage to the device do not use any other kind of SIM cards or any non standard nano SIM card cut from a SIM card You can get a standard nano SIM card from your service provider 1 Insert the tip of the tray eject tool into the hole on the nano SIM card tray...

Page 9: ...ay back into place Charging Your Device You can charge your device by using the USB Type C cable or adapter Please charge your device for more than two hours when you use it the first time or when you haven t used it for a long time Use the USB Type C cable to connect your device and PC directly 3 ...

Page 10: ... the battery is extremely low you may be unable to power on the device Please charge your device first To power off press and hold the Power button to open the shutdown menu and touch OK Locking Unlocking the Screen To save battery the touch screen will turn off automatically after a certain period of time You can also press the Power button to turn off the screen immediately To turn the screen ba...

Page 11: ...our data usage at the center and a group of status icons at the top Touch Wi Fi on the left to manage Wi Fi settings and Settings on the right to view messages or configure other settings The following table shows the icons on the touch screen and what they mean Network signal strength Network type New SMS Battery power level Connected to your computer via a USB Type C cable The number of clients ...

Page 12: ...ection Scenario You can use Wi Fi or a USB Type C cable to connect to the MF993C device The following pictures are examples of device connection All of these devices can surf the Internet at the same time 6 ...

Page 13: ...ose the SSID from the sticker enter the password and connect Using the Wi Fi Protected Setup WPS If a client supports WPS you don t have to input the password manually on the client to connect with the MF993C via Wi Fi You can complete the connection on the LTE Hotspot configuration web page see Accessing the LTE Hotspot Configuration Web Page or on the touch screen From the configuration web page...

Page 14: ...Network or 5GHz Wi Fi Network 3 Touch Pair with WPS Pair with Wi Fi 4 On the client device activate the WPS function to finish the setup Connecting via a USB Type C Cable Connect the USB Type C jack on the MF993C and the USB port on your computer For first time connection follow the prompts to install the LTE Hotspot configuration web page on the computer 8 ...

Page 15: ...and figures reflect configuration for the Internet Protocol for your connections with a Windows 7 operating system 1 Right click Network and select Properties 2 Select Change adapter settings 3 Right click Wireless Network Connection if you connect to the MF993C via Wi Fi or Local Area Connection if you connect to the MF993C via LAN and then select Properties 9 ...

Page 16: ...ly and then click OK to finish the configuration Accessing the LTE Hotspot Configuration Web Page Visit the LTE Hotspot configuration web page to use some of its functions and configure the MF993C settings such as phonebook and messages passwords Wi Fi SSIDs NOTE To log in to the LTE Hotspot configuration web page you must turn off the touch screen first 10 ...

Page 17: ... NOTE It is recommended that you use Internet Explorer Firefox Safari or Google Chrome 3 Enter the password and select Login NOTE As soon as you sign in to the LTE Hotspot configuration web page follow the prompts to change the default password You can also click Modify Login Password on the web page see Navigating the LTE Hotspot Configuration Web Pages to do so If the PIN code of your nano SIM c...

Page 18: ...NOTE The nano SIM card will be locked if you enter the wrong PIN code three consecutive times Please contact your SIM card provider to get a PIN Unlock Key PUK to unlock the card 12 ...

Page 19: ...on Web Pages The LTE Hotspot configuration home page looks like the following 1 View the SSID s of the MF993C 2 View wirelessly connected clients and manage blocked devices 3 View data usage statistics 4 Access more features and settings 13 ...

Page 20: ...ular data connection 10 View the Internet connection speed and time 11 Turn off the MF993C 12 Change the login password to the LTE Hotspot configuration web page 13 Sign out of the LTE Hotspot configuration web page 14 View the status of the MF993C NOTE In most pages you can click to return to the previous page or click to get more information on the current page 14 ...

Page 21: ...tact 1 Click New 2 Select the storage location and enter the contact name and mobile number NOTE For contacts saved to the device storage you can save more information such as home office number email and group 3 Click Save To delete a contact or contacts 1 On the Phonebook page click the checkboxes on the left of the contacts you want to delete 2 Click Delete Yes To edit a contact 1 On the Phoneb...

Page 22: ...essage to view the message list Touch a message to view the content To delete a message 1 On the web page click a listing in the message list 2 In the dialogue click below the message you want to delete 3 Click Yes NOTE You can also delete received messages from the touch screen Touch Settings Message to view the message list Touch a message to view the content and touch Delete at the bottom To fo...

Page 23: ...y report or check the SMS center number Validity Set the valid period for outgoing messages Center Number Display the SMS center number Please contact your carrier for more information Delivery report Request delivery reports for outgoing messages delivered to the recipients 3 Click Apply to save the settings 17 ...

Page 24: ...hen enabled the hotspot will reset the used data to zero at the date of every month you set in Clear Date Data Type Select the data plan type You need to set the total amount of your data plan and the warning level in percentage Click to change your previous entry 4 Click Apply NOTES When the used data or time reaches your specified percentage you can get a warning message on the web page If the a...

Page 25: ...LTE Hotspot configuration home page 2 Click Wi Fi Mac Filter 3 Select Black List or White List next to Wi Fi MAC Filter Switch and click Apply With the Black List turned on devices in the Black List cannot connect to the MF993C over Wi Fi With the White List turned on only devices in the White List can connect to the MF993C over Wi Fi 4 Manage the Black List or the White List Enter the MAC address...

Page 26: ...or manually every time the hotspot restarts If you are connecting to a roaming network you need to select the check box to connect to the Internet NOTE Data roaming may incur significant roaming charges Network Selection Select the preferred types of network you wish to connect to or select Manual to let the hotspot search for available networks and then manually choose one to connect with APN Set...

Page 27: ...Settings WPS Advanced Settings and Wi Fi Mac Filter to set each group of functions See Managing Basic Wi Fi Settings Managing WPS Settings Managing Advanced Wi Fi Settings and Access Controls From the touch screen 1 From the home screen touch Wi Fi 2 Manage the following options Wi Fi Touch the switch on the right to turn Wi Fi on or off Wi Fi frequency band Use Wi Fi on 2 4 GHz 5 GHz or both Wi F...

Page 28: ...can new Wi Fi clients find the network If you want new clients to connect you must enter the SSID and password manually Security Mode Set the security mode for authentication and encryption Mode Description OPEN Authentication and encryption won t be performed There are risks that private information will be intercepted or unauthorized individuals will use the network WPA2 AES PSK A more secure ve...

Page 29: ...xperience Country Region Code Select the country in which your device is located Frequency Channel Select the channel frequency for your Wi Fi networks The recommended option is Auto which will select the channel with the least potential interference Touch Screen Settings You can manage a few options for the touch screen from the its menus From the home screen of the touch screen touch Settings De...

Page 30: ...d Router Set IP address subnet mask DHCP server parameters MTU and MSS Firewall Set port filtering port mapping UPnP and DMZ Update Check for system update or set auto check including auto check while roaming options NOTE You can also configure update options by touching Settings Update from the home screen of the touch screen Others Reset or restart the hotspot set Simple Network Time Protocol SN...

Page 31: ...sing the device at places such as oil warehouses or chemical factories where there are explosive gases or explosive products being processed Power off the device if necessary Do not use electronic transmission devices in aircraft at petrol stations or in hospitals Observe and obey all warning signs and power off the device in these conditions Do not touch the inner antenna area unless necessary Ot...

Page 32: ...rature change because dew may be generated inside and outside the device Do not use it until it becomes dry Handle the device carefully Do not drop bend or strike it Otherwise the device may be damaged Only qualified personnel can dismantle and repair the device A humidity between 5 and 95 are recommended Do not connect the charger while using the device for a long period Failing to do so will tri...

Page 33: ... not the device or the battery may overheat and cause explosion or fire Please disconnect the charger when the battery is fully charged Overcharging may shorten the battery life Do not short circuit the battery as this can cause excessive heat and fire Do not throw the battery into a fire to avoid explosion Do not disassemble squeeze or puncture the battery as this can cause explosion or fire When...

Page 34: ...e servicing or operation of the Product iv Modifications or repairs not made by ZTE or a ZTE certified individual v Power failures surges fire flood accidents actions of third parties or other events outside ZTE s reasonable control vi Usage of third party products or usage in conjunction with third party products provided that such defects are due to the combined usage vii Any other cause beyond ...

Page 35: ...te RF exposure in usage against the head with no separation and near the body with the separation of 10 mm Although the SAR is determined at the highest certified power level the actual SAR level of the while operating can be well below the maximum value This is because the device is designed to operate at multiple power levels so as to use only the power required to reach the network In general t...

Page 36: ...ation CAUTION Changes or modifications not expressly approved by the manufacturer could void the user s authority to operate the equipment This equipment has been tested and found to comply with the limits for a Class B digital device pursuant to part 15 of the FCC Rules These limits are designed to provide reasonable protection against harmful interference in a residential installation This equip...

Page 37: ...ivantes 1 Cet appareil peut ne pas causer d interférence et 2 Cet équipement doit accepter toute interférence y compris toute interférence qui pourrait entraîner un fonctionnement indésirable de l équipement Les appareils numériques de catégorie B sont conformes à la norme canadienne CIEM 003 IC 5200E MC993C IC Radiation Exposure Statement This device complies with IC radiation exposure limits set...

Page 38: ...CNR 102 la proximite humaine a l antenne ne doit pas etre inferieure a 10mmpendant le fonctionnement norma 32 ...

Page 39: ...nsure that your client can automatically obtain an IP address Enter the correct network key Wi Fi password when you connect the client to your device The client connected to the device cannot access the Internet Ensure that your nano SIM card is available Change the location and find a place with good signal Check the settings of the WAN connection mode Contact your service provider and confirm yo...

Reviews: