ZooZ ZSE08 User Manual Download Page 2


COMMAND_CLASS_MANUFACTURER_SPECIFIC (V2) 
COMMAND_CLASS_DEVICE_RESET_LOCALLY (V1) 
COMMAND_CLASS_POWERLEVEL (V1) 
COMMAND_CLASS_BATTERY (V1) 
COMMAND_CLASS_ASSOCIATION (V2) 
COMMAND_CLASS_ASSOCIATION_GRP_INFO (V1) 
COMMAND_CLASS_WAKE_UP (V2) 
COMMAND_CLASS_NOTIFICATION (V4) 

NOTIFICATION_REPORT 
NOTIFICATION_TYPE_ACCESS_CONTROL 
NOTIFICATION_EVENT_ACCESS_CONTROL_WINDOW_OR_DOOR_IS_OPENED 
NOTIFICATION_EVENT_ACCESS_CONTROL_WINDOW_OR_DOOR_IS_CLOSED 

COMMAND_CLASS_SENSOR_BINARY (V2) 
COMMAND_CLASS_CONFIGURATION (V1) 
 
BEFORE YOU RETURN IT 
Let us know if you are having any issues installing or operating the device. 
Our fast and friendly tech support is here to help, every day of the year: [email protected] 
Get more helpful tips at getzooz.com 
 
INSTALLATION 
 
WAIT! 
Include the open/close sensor to your Z-Wave network before mounting it. 


Z-WAVE INCLUSION 
 
1. Bring the Contact Sensor within direct range of your controller 
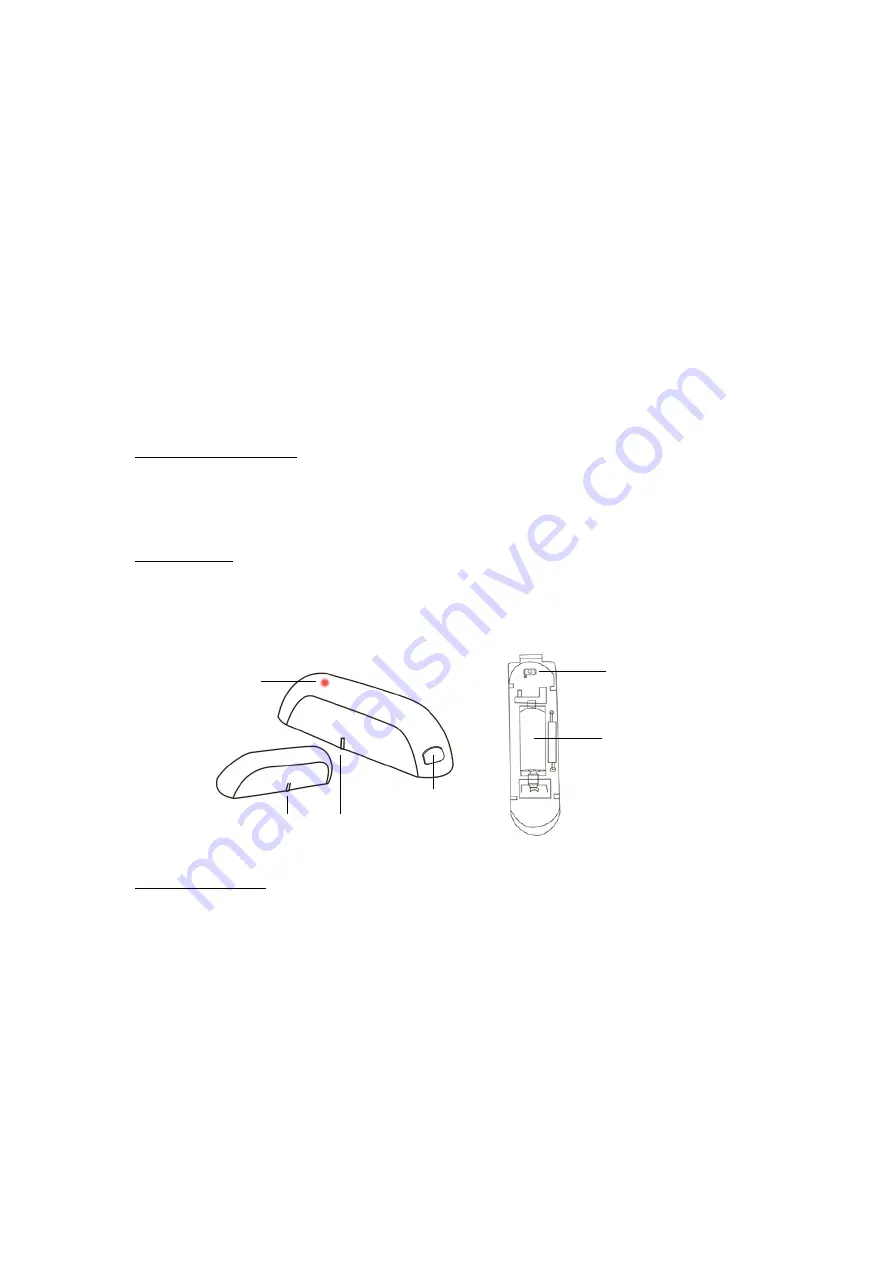
2. Carefully remove the cover from your Contact Sensor 
3. Remove the plastic pull-tab from the battery slot. The LED indicator will blink slowly 
4. Put your Z-Wave controller into inclusion mode 
5. Press and release the Z-Wave button on the Contact Sensor 3 TIMES quickly. The LED 
indicator will flash quickly 
6. A new open/close (door/window) sensor will appear on your controller's device list 
 
Troubleshooting Tips 
If you are unable to include the Z-Wave Contact Sensor to your controller, please try one of 
the following: 

Z-Wave button


battery


orientation marks


LED indicator


press to open cover


Summary of Contents for ZSE08

Page 1: ...enarios when included to a Z Wave gateway controller Low battery alerts Z Wave Plus with improved 500 chip for faster and safer wireless communication Discreet compact design SPECIFICATIONS Model Number ZSE08 Z Wave Signal Frequency 908 42 MHz Power 1 CR2 battery included Power Consumption 0 13W Operating Temperature 32 104 F Range Up to 100 feet line of sight Installation and Use Indoor only Dime...

Page 2: ...every day of the year ask getzooz com Get more helpful tips at getzooz com INSTALLATION WAIT Include the open close sensor to your Z Wave network before mounting it Z WAVE INCLUSION 1 Bring the Contact Sensor within direct range of your controller 2 Carefully remove the cover from your Contact Sensor 3 Remove the plastic pull tab from the battery slot The LED indicator will blink slowly 4 Put your...

Page 3: ...OTE All previously recorded activity and custom settings will be erased from the device s memory WAKE UP MODE If you change settings and parameters for the sensor you may need to wake it up manually for the changes to be recorded Press and release the Z Wave button ONCE to wake the device up The LED indicator will flash ONCE The sensor s wake up interval is set to 12 hours by default to save batte...

Page 4: ...e sensor will only trigger the associated device after 10 seconds the status change is reported if your door or window is closed the light will not go off for another 10 seconds Values 1 65536 seconds 0 seconds default setting Size 2 byte dec Trigger Action Parameter 2 You can choose if your Contact Sensor turns an associated device on or off when sending the basic set command Use value 0 to turn ...

Page 5: ...r battery change Z WAVE PLUS CERTIFIED This product can be included and operated in any Z Wave network with other Z Wave certified devices from other manufacturers and or other applications All non battery operated nodes within the network will act as repeaters regardless of vendor to increase reliability of the network WARRANTY This Limited Warranty applies to physical goods and only for physical...

Page 6: ... WHETHER BASED ON NEGLIGENCE STRICT LIABILITY BREACH OF WARRANTY BREACH OF AGREEMENT OR EQUITABLE PRINCIPLES IS EXPRESSLY LIMITED TO AT ZOOZ S OPTION REPLACEMENT OF OR REPAYMENT OF THE PURCHASE PRICE FOR THAT PORTION OF PRODUCTS WITH RESPECT TO WHICH DAMAGES ARE CLAIMED ALL CLAIMS OF ANY KIND ARISING IN CONNECTION WITH THIS AGREEMENT OR THE SALE OR USE OF PRODUCTS SHALL BE DEEMED WAIVED UNLESS MAD...

Page 7: ...rect the interference by taking one or more of the following measures Reorient or relocate receiving antenna Increase the separation between equipment and receiver Connect equipment into a separate outlet or circuit from receiver Consult the dealer or an experienced radio TV technician for additional assistance All brand names displayed are trademarks of their respective holders c Zooz 2016 ...

Reviews: