background image

6.

Play the external MIDI sequencer or keyboard.

The MRT-3 produces drum/percussion sound according to the note numbers received via the
[MIDI IN] connector. For information on note number assignments, please refer to the
"Reference" section at the end of this manual.
It is also possible to send a program change message to the MRT-3 to switch the kit. For
information on program change number assignments, please refer to the "Reference" section
at the end of this manual.

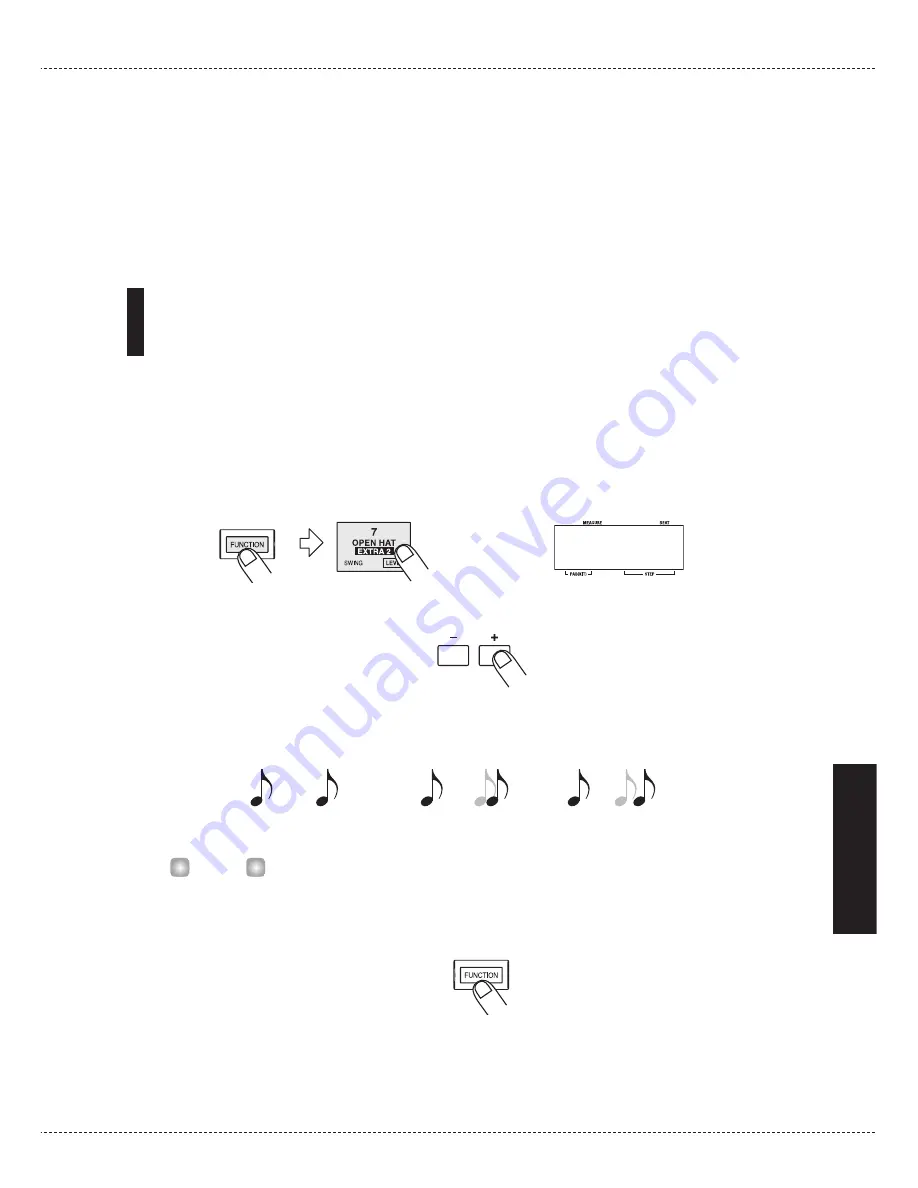
Setting the Pattern/Song Playback Swing

You can adjust the swing amount (rhythm flourish) for playback of patterns and songs. This
setting affects all patterns and songs.

1.

In pattern mode or song mode, press the [FUNCTION] key and then pad 7
(SWING).

The current swing amount setting is shown on the display (default setting: 50).

2.

Use the [VALUE +/-] keys to adjust the swing amount.

The setting range is 50 – 75. Raising the setting from the default of 50 (no swing) increases
the interval between upbeat and downbeat in a measure, resulting in a swinging rhythm.

If necessary, press the [PLAY] key to play a pattern and check the effect.

3.

When the setting is complete, press the [FUNCTION] key again.

The unit returns to the previous mode.

H

INT

Swing=50%

Swing=60%

Swing=75%

5 0

ZOOM 

MRT-3

47

Other

Functions

Summary of Contents for MRT-3

Page 1: ...Operation Manual 8 888 ...

Page 2: ...er than the specified type may damage the unit and pose a safety hazard Connect the AC adapter only to an AC outlet that supplies the rated voltage required by the adapter When disconnecting the AC adapter from the AC outlet always grasp the adapter itself and do not pull at the cable If the unit is not to be used for a long time disconnect the AC adapter from the outlet Battery operation Use four...

Page 3: ...es connected to the unit Usage Precautions Electrical interference For safety considerations the MRT 3 has been designed to provide maximum protection against the emission of electromagnetic radiation from inside the device and protection from external interference However equipment that is very susceptible to interference or that emits powerful electromagnetic waves should not be placed near the ...

Page 4: ...de 26 Editing a User Kit 26 Kit Items 28 Copying a Kit 30 Creating Songs Song Mode 32 What Is a Song 32 Recording Song Patterns 33 Changing the Tempo Within a Song 36 Changing the Song Volume 37 Selecting a Dedicated Song Kit 38 Checking the Amount of Remaining Memory for Songs 39 Copying a Song 39 Deleting a Song 40 Deleting All Songs 41 Other Functions 42 Controlling the MRT 3 With a Foot Switch...

Page 5: ...djust level tuning and panning individually to create your very own drum kit This gives you the flexibility to realize your creative vision Perfectly intuitive and simple design lets you master the unit right away even if you have never used a drum machine before Optional foot switch FS01 allows pattern start stop control or tempo switching You can also operate an assigned sound such as bass drum ...

Page 6: ...onnectors are indicated with angle brackets in this manual HINT NOTE 8 888 Display OUTPUT LEVEL knob VALUE keys KIT key LED PATTERN key LED SONG key LED TEMPO key LED REC key LED PLAY key LED STOP key LED FUNCTION key LED INSERT COPY key DELETE ERASE key Pads 1 7 LEDs PAD BANK key LED DC IN connector OUTPUT MONO jack FOOT SW jack POWER switch OUTPUT STEREO PHONES jack MIDI IN connector ...

Page 7: ...ned to left and right positions To monitor the sound with headphones plug the phones into the OUTPUT STEREO PHONES jack If you connect the optional foot switch FS01 to the FOOT SW jack you can control start stop and switch the sound of the MRT 3 with your foot To synchronize the unit with a MIDI sequencer recorder that has a MIDI clock output connect a MIDI cable from the MIDI OUT connector of the...

Page 8: ... tapping a pad to produce sound adjust the OUTPUT LEVEL knob of the MRT 3 to obtain a suitable volume Using Batteries The MRT 3 can be powered from batteries not supplied Follow the steps below to insert the batteries 1 Turn the unit over and open the battery compartment cover 2 Insert four fresh IEC R6 size AA batteries into the battery compartment The use of alkaline batteries is recommended 3 C...

Page 9: ...A song is a sequence of patterns played in subsequent steps The maximum number of steps in a song is 99 Provided that there is free memory the MRT 3 has the capability to store up to 99 songs A song includes data such as pattern number overall song tempo master tempo tempo change information volume change information dedicated kit information etc Kit number Master tempo Pattern number Pattern numb...

Page 10: ... user kits Pad Pad Bank Each pad on the MRT 3 can be used to play the currently selected sound and to record it as a phrase in a pattern To be able to play 14 sounds with the 7 pads on the unit pads are grouped in two banks A and B which can be switched with the PAD BANK key When the PAD BANK key is out bank A is selected When the key is lit bank B is selected Preset kits User kits PAD BANK A PAD ...

Page 11: ...ashes 2 Press the SONG key The indication dEMo appears on the display and the demo song starts The display indication changes and the pads light up in sync with the song The demo song is played repeatedly until you stop it 3 To stop the demo song press the PATTERN key or the SONG key D EMO Listening to the Demo Song ZOOM MRT 3 11 Listening to the Demo Song ...

Page 12: ...switch the bank press the PAD BANK key so that the key lights up The key lights up and the sound assigned to pads 1 7 changes To return to the earlier sound press the PAD BANK key once more When the PAD BANK key is out bank A is selected When the key is lit bank B is selected 4 To switch the kit played by the pads press the KIT key The KIT key lights up and the MRT 3 goes into kit mode In this mod...

Page 13: ...in the order 01P 50P 51U 70U Try hitting the pads and switching the pad bank to check out which sounds are available in the newly selected kit 6 When you have found the desired kit press the PATTERN key to return to the pattern mode Playing the Pads Manual Play ZOOM MRT 3 13 ...

Page 14: ...attern number In pattern mode the VALUE keys serve to select the pattern For example if you repeatedly press the VALUE key the patterns are switched in the order U01 U99 A01 A99 B01 B99 C01 C99 D01 D99 U01 3 To directly switch the bank press the FUNCTION key and then use the VALUE keys This switches only the bank and keeps the pattern number The FUNCTION key serves for making various settings of t...

Page 15: ...rn playback press the STOP key If you press the PLAY key instead of the STOP key the unit goes into pause mode and the PLAY key flashes If you press the PLAY key again in this condition playback resumes from the same position Changing the Tempo of Pattern Playback In pattern mode you can adjust the play tempo in the range of 40 250 BPM quarter note beats per minute 1 Press and hold the TEMPO key T...

Page 16: ... actually playing the pattern on the pads real time recording or by entering each sound individually step recording This section describes the procedure for real time recording 1 In pattern mode select an empty user pattern U01 U99 If necessary select a kit When you select an empty user pattern the indication E appears on the right side of the display If you change the kit in pattern mode while a ...

Page 17: ...ection Changing User Pattern Resolution After Recording 5 While holding down the REC key press the PLAY key The REC key and PLAY key light up The TEMPO key flashes in sync with the tempo and one measure of precount clicks is heard before recording starts During recording metronome clicks are heard and the display shows the current position in the pattern measure beat Unless specified otherwise the...

Page 18: ...ey while real time recording is in progress The REC key starts to flash If you hit a pad in this condition the sound will be heard but it is not recorded This is useful to check the phrasing and sound before actually recording To resume recording press the REC key once more 9 To erase the sound from a specific pad push the pad while holding down the DELETE ERASE key While the key is held down the ...

Page 19: ...atically back to the beginning allowing you to add other instrument sounds to complete the pattern By hitting two pads at the same time you can enter two sounds in the same position 1 In pattern mode select an empty user pattern 2 If required select the kit for recording The kit selection procedure is the same as for manual play p 12 3 Press the FUNCTION key and then pad 3 QUANTIZE The current qua...

Page 20: ...f ticks for as long as the button is held When there is not enough remaining free memory in the MRT 3 the indication FULL appears on the display and further recording is not possible Erase unneeded patterns When the end of the pattern is reached the recording loops back to the beginning and continues allowing you to add to the recording as often as desired If necessary use the PAD BANK key to chan...

Page 21: ...splay 3 Use the VALUE keys to set the quantize value shortest note to be recorded 4 Press the REC key The resolution of the recorded user pattern is changed and the unit returns to the pattern mode If you select a quantize value in step 3 that is finer than the value with which the pattern was recorded no change will be made to the pattern Changing the User Pattern Length You can change the length...

Page 22: ...e longer blank measures will be added at the end of the pattern Changing the User Pattern Beat The beat time signature of an empty user pattern can be changed as follows 1 Select the user pattern whose beat you want to change 2 Press the FUNCTION key and then pad 1 TIME SIG The beat of the user pattern selected in step 1 is shown 3 Use the VALUE keys to set the new beat The available settings for ...

Page 23: ...t an empty user pattern where E is shown on the right side of the display cannot be selected as copy source 2 Press the INSERT COPY key The INSERT COPY key flashes and the current pattern is selected as copy source When the copy source is a user pattern the indication CoPy flashes on the display When the copy source is a preset pattern a user pattern with the same number as the source is selected ...

Page 24: ...ed the unit returns to the pattern mode with the copy source pattern being selected Erasing a Single User Pattern When you no longer need a certain user pattern you can erase its contents to return it to the empty state This is useful to make room for new patterns and free up memory of the unit Once you have erased a user pattern you will not be able to restore it Make sure that you really want to...

Page 25: ... you have deleted the user patterns you will not be able to restore them Make sure that you really want to delete the patterns before carrying out the following steps 1 In pattern mode with playback stopped press the FUNCTION key The FUNCTION key flashes 2 Press the DELETE ERASE key The indications dEL and ALL alternate on the display 3 To execute the delete process press the DELETE ERASE key When...

Page 26: ...songs and you can create your own user kits The display shows the currently selected kit number 2 Use the VALUE keys to select the user kit to edit from kit numbers 51 70 3 Press the FUNCTION key The FUNCTION key flashes 4 Press pad 1 or 3 7 to select the item to change The selected pad lights up and the corresponding item can be edited The display indication depends on which item is selected The ...

Page 27: ...ected an item for individual pads in step 4 pad 1 3 5 7 use the PAD BANK key and then press the pad to specify which pad to edit The currently selected pad can be checked from the PAD BANK key lit out status and the pad number shown at the left of the display 6 Use the VALUE keys to adjust the value of the item selected in step 4 7 If you have selected an item for individual pads in step 4 repeat ...

Page 28: ...f this manual Pads 5 and 7 of pad bank A are special pads The sound assigned to these two pads cannot be produced simultaneously When one pad is hit while the other is playing the first sound stops This is useful for assigning two sounds that should not be played together such as open closed hi hat Pad 3 INST TUNE Allows tuning the pitch of the instrument sound assigned to a pad Adjustment is poss...

Page 29: ...e Soft Fixed Soft Gives a soft sound regardless of the tapping intensity MEd Fixed Medium Gives a medium sound regardless of the tapping intensity Loud Fixed Loud Gives a loud sound regardless of the tapping intensity LItE Light This setting gives the highest sensitivity norM Normal This setting gives medium sensitivity HArd Hard This setting gives low sensitivity Ehrd Extra Hard This setting give...

Page 30: ...shes on the display When the copy source is a preset kit the user kit 51U is selected as default target and the number flashes on the display 3 Use the VALUE keys to select a user kit U51 U70 as copy target Only user kits can be selected as copy targets When the copy is executed the existing contents of the user kit selected as copy target will be erased Make sure that the kit you have selected is...

Page 31: ...ncel the process press the STOP key When copying is completed the unit returns to the kit mode with the copy target kit being selected If copying was canceled the unit returns to the kit mode with the copy source kit being selected ZOOM MRT 3 31 Creating Your Own Kit Kit Mode ...

Page 32: ...n the pattern that is contained in the step For example in the song in the above illustration if the length of the pattern U01 is 2 measures and the length of patterns U02 and U03 1 measure the song will look as follows Besides the pattern number each song step can contain the following information Settings for entire song Song kit Number of kit to be used for entire song Master tempo Tempo inform...

Page 33: ...e REC key lights up indicating that the MRT 3 is ready for song recording The last two digits of the display show the step number 4 Use the VALUE keys to select the user pattern number to be assigned to the first step When you press a VALUE key the PATTERN key flashes and the display shows the pattern bank and number You can also directly switch the pattern bank by pressing the FUNCTION key and th...

Page 34: ...nd step 7 Repeat steps 5 6 to create the entire song One song can have up to 99 01 99 steps patterns 8 If you want to insert a step in a song select the step where you want to insert a pattern and press the INSERT COPY key A new step is inserted before the currently selected step and subsequent steps are shifted one count back Select the pattern for the inserted keys with the VALUE keys as necessa...

Page 35: ...rt of the song If you switch the song during playback the new song is played immediately If you want to insert a pause in the song program an empty pattern as a step 12 Press the STOP key whenever you want to terminate playback The song returns to the start position By pressing the PLAY key again you can start playback of the song again from the beginning Pressing the PLAY key instead of the STOP ...

Page 36: ...s in pattern mode you can also tap the TEMPO key twice or more to specify the tempo The MRT 3 automatically stores the tempo master tempo for each song When you switch a song the tempo that was last selected for that song will be selected Changing the Tempo Within a Song This section describes how you can change the tempo within a song that has already been recorded 1 In song mode select the song ...

Page 37: ...ting steps 3 5 7 When you have completed the tempo change input press the STOP key Changing the Song Volume This section describes how you can change the pattern volume within a song that has already been recorded 1 In song mode select the song whose volume you want to alter 2 Press the REC key The REC key lights up and the song can be edited 3 Hold down the SONG key while pressing the VALUE keys ...

Page 38: ... made setting will be valid Selecting a Dedicated Song Kit Unless specified otherwise the kits stored for the respective patterns will be used during playback of a song When the pattern is switched the kit is also switched It is also possible to specify a dedicated song kit so that this kit will be used for the entire song 1 In song mode select the song for which you want to specify a kit 2 Press ...

Page 39: ...ree memory is shown in percent on the display This indication is for information only and cannot be changed 2 Press the FUNCTION key again The unit returns to the song mode Copying a Song This section describes how you can copy a song 1 In song mode select the song you want to copy 2 Press the INSERT COPY key The INSERT COPY key flashes and the current song is selected as copy source The indicatio...

Page 40: ...d the unit returns to the song mode with the copy target song being selected If copying was canceled the unit returns to the song mode with the copy source song being selected Deleting a Song If you wish to delete a song proceed as follows 1 In song mode select the song you want to delete 2 Press the DELETE ERASE key The DELETE ERASE key flashes and the indication dEL alternates on the display wit...

Page 41: ...ails see Returning the MRT 3 to the Factory Default Condition p 48 Deleting All Songs If desired you can delete all songs Once deleted the songs cannot be restored Proceed with care to prevent inadvertently deleting songs 1 In song mode while playback is stopped press the FUNCTION key 2 Press the DELETE ERASE key The indications dEL and ALL alternate on the display 3 To execute the delete process ...

Page 42: ...for example to play the sound of a bass drum with your foot To select this function press the FUNCTION key and then pad 4 FOOT SW Then press the foot switch release it and use the PAD BANK key and pads 1 7 to select the pad sound to assign to the foot switch The intensity with which you hit the pad when making the selection is also memorized The display shows the pad number as A1 A7 B1 B7 Use FS01...

Page 43: ... pad 4 FOOT SW Then press the PLAY key the indication Cont appears on the display Use FS01 to control start stop The foot switch can be made to function in the same way as the PLAY and STOP keys Pressing the foot switch then toggles between play and stop Start play Stop Start play from beginning etc To select this function press the FUNCTION key and then pad 4 FOOT SW Then press the STOP key the i...

Page 44: ...MIDI sequencer can send MIDI Clock Start Stop and Continue signals 2 In pattern mode press the FUNCTION key and then pad 6 MIDI The clock currently used by the MRT 3 is shown on the display The meaning of the indication is as follows Int Internal The MRT 3 operates with its internal clock default setting This is the setting for using the MRT 3 on its own Midi MIDI clock The MRT 3 receives a clock ...

Page 45: ...ect a song or pattern for synchronized playback 6 Start playback at the MIDI sequencer recorder When Midi is selected as clock source The MRT 3 starts playback from the start of the sequence song in sync with the MIDI clock tempo When the MIDI sequencer recorder is stopped the MRT 3 also stops When the MIDI sequencer recorder is moved to a position within the song for playback the MRT 3 also start...

Page 46: ...e 2 In pattern mode press the FUNCTION key and then pad 6 MIDI The clock currently used by the MRT 3 is shown on the display 3 Press and hold the KIT key While the KIT key is being pressed the display shows the current MIDI receive channel setting default setting 10 4 Use the VALUE keys to select the MIDI receive channel The MIDI receive channel can be set to OFF no MIDI messages are received or 1...

Page 47: ...the swing amount rhythm flourish for playback of patterns and songs This setting affects all patterns and songs 1 In pattern mode or song mode press the FUNCTION key and then pad 7 SWING The current swing amount setting is shown on the display default setting 50 2 Use the VALUE keys to adjust the swing amount The setting range is 50 75 Raising the setting from the default of 50 no swing increases ...

Page 48: ...ting is shown on the display default setting 1 2 Use the VALUE keys to select one of the following settings 0 No precount 1 Precount of 1 measure 2 Precount of 2 measures PAd Recording starts when any pad is hit When PAd is selected holding down the REC key while pressing the PLAY key in pattern mode brings up the indication rEAdy on the display and the unit goes into recording standby mode 3 When...

Page 49: ...nd song data that you have created 1 Hold down the REC key while turning power to the MRT 3 on The display shows Init 2 To carry out the initialization process press the REC key once more To cancel the operation press the STOP key When initialization is performed all data and settings of the MRT 3 will return to the factory default condition and the unit will restart If the operation is canceled t...

Page 50: ... mode p 14 Is memory capacity limit reached Check remaining memory capacity p 39 and delete unneeded patterns and songs Song cannot be recorded Is MRT 3 set to mode other than song mode Activate song mode p 33 Is memory capacity limit reached Check remaining memory capacity p 39 and delete unneeded patterns and songs Playback sound is not in stereo Is Y cable connected to OUTPUT STEREO PHONES jack...

Page 51: ...ne jack Maximum output level 3 dBm into load impedance of 10 kilohms or higher STEREO OUT Standard stereo phone jack headphone jack Maximum output level 3 dBm into load impedance of 10 kilohms or higher Power Requirements AC adapter 9 V DC center minus 300 mA ZOOM AD 0006 Batteries IEC R6 size AA x 4 Battery life for continuous operation approx 15 hours with alkaline batteries External Dimensions ...

Page 52: ...dard variation 1 Standard variation 2 Standard variation 3 Funk Trap variation 1 Funk Trap variation 2 Funk Trap variation 3 Epic Rock variation 1 Epic Rock variation 2 Ballad variation 1 Ballad variation 2 Modern variation 1 Modern variation 2 Rap HipHop variation 1 Rap HipHop variation 2 Rap HipHop variation 3 Techno Beat variation 1 Techno Beat variation 2 Techno Beat variation 3 General Drum R...

Page 53: ...Clap SNARE 2 TOM 3 CLOSED HAT TOM 3 Pedal HiHat TOM 2 OPEN HAT TOM 2 TOM 1 CRASH TOM 1 RIDE Chinese Cymbal CUP Tambourine Splash Cymbal Cowbell Crash Cymbal 2 Vibraslap Ride Cymbal 2 60 61 62 63 64 65 66 67 68 69 70 71 72 73 74 75 76 77 78 79 80 81 82 83 84 85 86 87 88 Note INST NAME High Bongo Low Bongo Mute High Conga Open High Conga Low Conga High Timbale Low Timbale High Agogo Low Agogo Cabasa...

Page 54: ...everb Snare 2 Room Snare Power Snare Electric Snare Brush Short Brush Long Brush Slap Bend Down Inst Name Category 1 KICK 2 SNARE 1 2 3 4 5 6 7 8 9 10 11 12 13 14 15 16 17 18 19 20 21 22 23 24 25 26 27 28 29 30 31 32 33 34 35 36 37 38 39 40 41 42 1 2 3 4 5 6 7 8 Live Tom 1 Live Tom 2 Live Floor Studio Tom 1 Studio Tom 2 Studio Floor Dry Tom 1 Dry Tom 2 Dry Floor Loose Tom 1 Loose Tom 2 Loose Floor...

Page 55: ...ch Pull Sticks Square Click Metronome Click Metronome Bell Tambourine Vibraslap High Bongo Low Bongo Mute High Conga Inst Name Category 4 HI HATS 5 CYMBAL 6 EXTRA 7 GLOBAL 14 15 16 17 18 19 20 21 22 23 24 25 26 27 28 29 30 31 32 33 34 35 36 37 38 39 1 2 3 4 5 6 7 8 9 10 11 12 13 14 15 16 17 18 19 20 21 22 23 Open High Conga 1 Open High Conga 2 Low Conga High Timbale Low Timbale High Agogo Low Agog...

Page 56: ...2 2 4 4 4 4 20 20 35 35 6 6 6 6 2 2 36 36 14 26 25 14 40 3 6 10 5 15 23 4 4 7 23 36 3 7 2 1 20 20 3 3 1 3 36 1 Pattern name Display Pattern name Display KIT A51 A52 A53 A54 A55 A56 A57 A58 A59 A60 A61 A62 A63 A64 A65 A66 A67 A68 A69 A70 A71 A72 A73 A74 A75 A76 A77 A78 A79 A80 A81 A82 A83 A84 A85 A86 A87 A88 A89 A90 A91 A92 A93 A94 A95 A96 A97 A98 A99 Rock21 shuffle Rock22 shuffle Rock23 Rock24 Roc...

Page 57: ...4 14 13 21 4 4 4 19 3 19 6 22 2 20 21 KIT B51 B52 B53 B54 B55 B56 B57 B58 B59 B60 B61 B62 B63 B64 B65 B66 B67 B68 B69 B70 B71 B72 B73 B74 B75 B76 B77 B78 B79 B80 B81 B82 B83 B84 B85 B86 B87 B88 B89 B90 B91 B92 B93 B94 B95 B96 B97 B98 B99 16ROCK03 16ROCK04 16ROCK05 16ROCK06 GrvDrm01 GrvDrm02 GrvDrm03 BALD01 BALD02 BALD03 BALD04 BALD05 BALD06 BALD07 shuffle BALD08 shuffle BALD09 shuffle BALD10 shuff...

Page 58: ... 33 33 40 40 33 21 40 21 9 40 33 40 8 40 40 9 34 8 9 9 8 9 C51 C52 C53 C54 C55 C56 C57 C58 C59 C60 C61 C62 C63 C64 C65 C66 C67 C68 C69 C70 C71 C72 C73 C74 C75 C76 C77 C78 C79 C80 C81 C82 C83 C84 C85 C86 C87 C88 C89 C90 C91 C92 C93 C94 C95 C96 C97 C98 C99 TECH06 TECH07 TECH08 DnB01 DnB02 DnB03 DnB04 DnB05 DnB06 DnB07 TRIP01 TRIP02 TRIP03 AMB01 AMB02 AMB03 AMB04 INDUSTRIAL01 INDUSTRIAL02 INDUSTRIAL0...

Page 59: ...4 6 6 2 22 35 35 4 4 4 3 17 18 3 17 17 18 7 19 D51 D52 D53 D54 D55 D56 D57 D58 D59 D60 D61 D62 D63 D64 D65 D66 D67 D68 D69 D70 D71 D72 D73 D74 D75 D76 D77 D78 D79 D80 D81 D82 D83 D84 D85 D86 D87 D88 D89 D90 D91 D92 D93 D94 D95 D96 D97 D98 D99 FUNK FILL01 FUNK FILL02 FUNK FILL03 FUNK FILL04 GROOVE FILL01 GROOVE FILL02 BALAD FILL01 BALAD FILL02 BLUES FILL03 BLUES FILL04 COUNTRY FILL01 COUNTRY FILL02...

Page 60: ...r See Note 2 F2H sl sh Song Position Pointer shsl song position See Note 3 F3H ss Song Select ss song number 0 98 F8H Timing Clock FAH Start FBH Continue FCH Stop NOTE n MIDI Channel Number 0000 1111 1 Note Off Messages is recognized but will be ignored 2 Relationship between Program Numbers and Kit Numbers are assigned as Kits List attached 3 SongPositionPointer for a pattern new location is wrap...

Page 61: ...e voice Velocity Note ON o Note OFF x After Key s x Touch Ch s x Pitch Bend x 7 Volume Control 11 Expression Change 120 All Sounds Off Prog o 0 127 Change True System Exclusive x System Song Pos o Song Sel o Common Tune x System Clock o Real Time Commands o Aux Local ON OFF x All Notes OFF o Mes Active Sense x sages Reset x Notes No messages will be transmitted Mode 1 OMNI ON POLY Mode 2 OMNI ON M...

Page 62: ... 9 Switching 14 Battery operation 8 C Clock source 45 Connection example 7 D Demo song 11 F Factory default condition returning to 49 Foot switch 42 I Initialization 49 INST LEVEL 29 INST PAN 28 INST TUNE 28 Instrument list 54 K Kit level 29 Kit list 52 Kit mode 26 Kit 10 Copying 30 Editing user kit 26 Selecting 12 M Master tempo 32 MIDI components Playing MRT 3 sound 46 ZOOM MRT 3 Index 62 Index ...

Page 63: ...g 14 Real time recording 16 Step recording 19 Precount 48 Preset kit 10 Preset pattern 9 Q Quantize 17 R Real time recording 16 S Song mode 32 Song 9 32 Copying 39 Dedicated kit 32 Deleting a single song 40 Deleting all songs 41 Deleting a step 34 Inserting a step 34 Pattern recording 33 Remaining memory 39 Selecting a kit 38 Tempo change 36 Volume change 37 Step recording 19 Swing 47 Synchronized...

Page 64: ...ZOOM CORPORATION NOAH Bldg 2 10 2 Miyanishi cho Fuchu shi Tokyo 183 0022 Japan PHONE 81 42 369 7116 FAX 81 42 369 7115 Web Site http www zoom co jp MRT 3 5000 2 ...

Reviews: