Page 17
Page 16
EziSalt Saltwater Chlorinator | Installation Manual
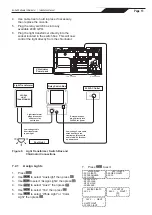
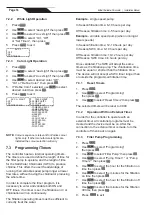
1. Press
.
2. Use
to select “Reversing” then press .
3. Use
to select set hours then press .
4. Press
to exit.
<
-REVERSING
-HELP MENU
-LANGUAGE
MAIN MENU
<
INVERSION PERIOD
5 HOURS
REVERSING TIME
During reversal, chlorination is stopped for a few
minutes. No message is displayed on the screen.
Normal operation will resume after the reversal.
7.5 Slave Mode
NOTE
: It is not recommended to use Slave Mode
unless you have experience with multiple control
devices operating your pool.
Slave mode is applicable when the chlorinator is
connected to a third-party control device that uses
a chlorine/sanitiser sensor (such as an ORP sen-
sor). When in slave mode the chlorinator passes
control of turning chlorine production on/off to the
third party controller.
NOTE
:
Slave mode is not used when connected to
a general pool automation controller such
as AquaLink. It only applies to an external
controller that commands sanitiser output.
To enable this function, the third party controller
must be connected to the “slave” connection point
in the low voltage raceway see Table 5 and Figure
10 for wiring detail.
Boost and Low modes will remain operational from the
controller. However, SWC programs will be deactivated.
Chlorination output will be maintained at 100%.
1. Connect the external controller at the slave
connection point in the low voltage raceway
see Table 3 and Figure 7 for wiring details.
2. Press
.
3. Use
to select “Slave Mode”
then press .
4. Use
to select “YES” or “NO” then press .
5. Press
to exit.
<
-SLAVE MODE
-REVERSING
-HELP MENU
-LANGUAGE
MAIN MENU
<
SLAVE MODE
ACTIVATE?
- YES
- NO
<
23:04 ON
SLAVE MODE
<
23:04 OFF
SLAVE MODE
Slave mode only controls the chlorination. Filtration
pump, AUX, lights and other functions are still valid.
Pressing
will take priority over Slave mode.
LOW / COVER / BOOST modes takes priority over
Slave mode
Section 8. Help Menu
The chlorinator will automatically notify you of any
problems by displaying error messages. To help
with the understanding of these messages, the
controller has a troubleshooting assistance menu
which gives the meanings and the action to take to
solve the problem.
1. Press
.
2. Use
to select “Help Menu” then press .
3. Use
to select the error message
then press .
4. The display will automatically scroll through
a certain number of suggested solutions to
explain what to do. Once automatic scrolling is
complete, the chlorinator automatically returns
to the “Troubleshooting” menu.
5. Press
to exit.


