background image

11 


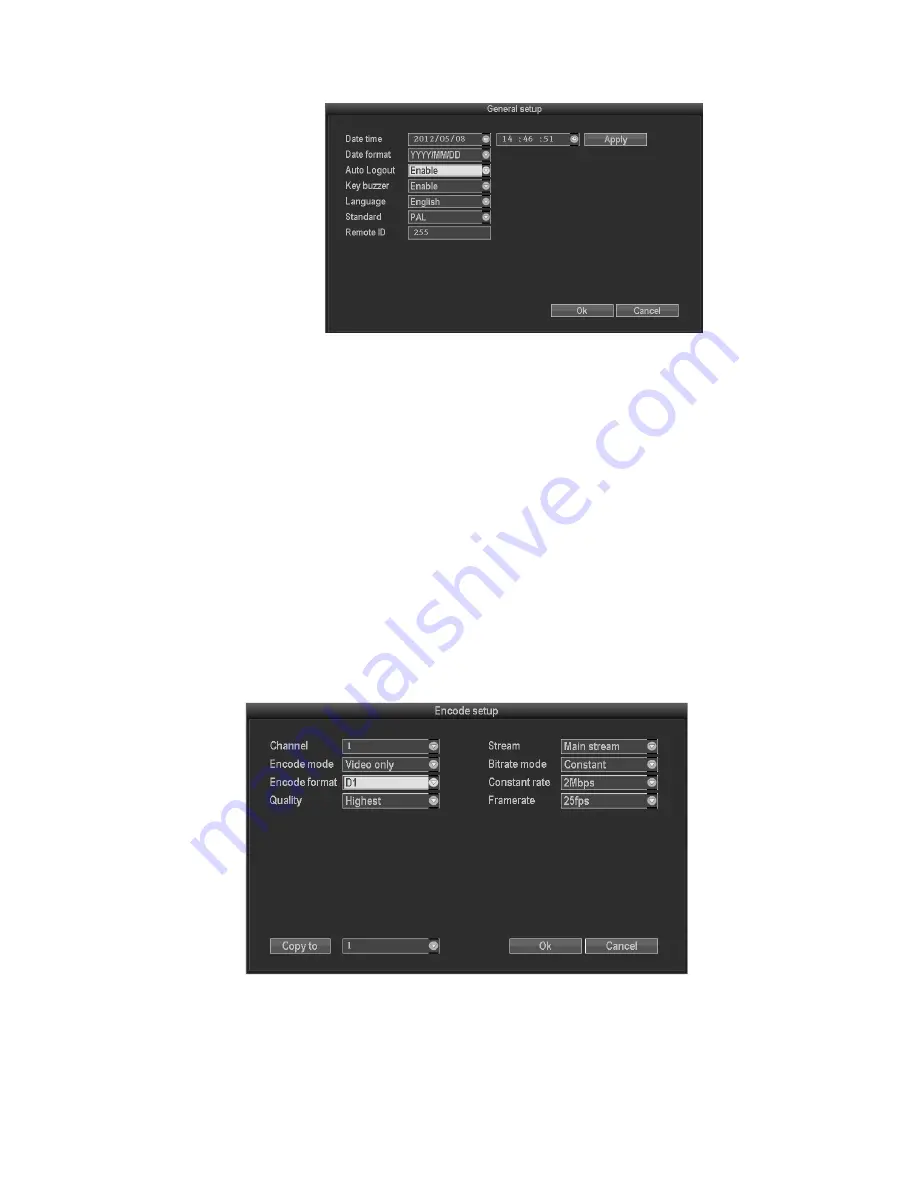
3.8.3.1 General setup 


Choose the "General setup" and turn into its setup interface. 
Time: DVR preview time. Click “refreshes” after setting, it will pop out “the recording will stop once you 
modify the time", and save the setting. 
Date Format:: Y/M/D”, “D/M/Y”, “M/D/Y”. 
Auto Logout: : DVR will log off if there is no operation within 10 minutes, it needs login again. 
Key Buzzer: Enable: there is sound with the controller or pressing key on front panel; Disable: without 
sound. 
Language: There are multiple choices according to users, Chinese and English and so on. 
Video Standard: PAL and NTSC are all available. 
DVR ID: user can use this ID to control the DVR by remoter controller. The remote controller should be 
correspond with the ID so that it can work. (Please refer to the instruction in 2.3)   
After setting finished, click "ok", the information will be saved. Click "cancel" to exit without saving.   
 
3.8.3.2 Encode setup 


Select “encode setup” in system setup.   
Channel: choose the right CH you need by clicking the select box. 
Stream: choose the right stream you need: "main stream" or "sub stream”. 
Encode mode: choose the right encode model you need: "video only "means only encoding for video; 

Summary of Contents for ZMD-DT-SFN6

Page 1: ...ZMD DT SFN6 User Manual H 264 Standalone DVR For further help please visit www zmodo com...

Page 2: ...7 3 4 Main Menu Introduction 7 3 5 Video Playback 8 3 5 1 Video Search 8 3 5 2 Playback tools 8 3 6 Manual Recording 9 3 7 PTZ Control 9 3 8 Menu 9 3 8 1 Video Search 9 3 8 2 Video Backup 10 3 8 3 Sy...

Page 3: ...precautions Model 16 channel Full D1 Operation system Embedded Linux Main chip H13531 System resource 16ch real time recording network transmission 8ch real time D1 playback Operation interface Frien...

Page 4: ...n between fan power and mother board 1 Front panel and rear panel There are instructions of how to use keys on the front panel and the interfaces on rear panel Plz check the model no with the one you...

Page 5: ...ut Interface 1 16 3 Video Out BNC Video Output Interface 4 Spot Video Spot Output 5 Audio Out Audio Output Interface 6 Line In Talkback Interface 7 Power Power Key 8 Alarm Alarm Input Output Interface...

Page 6: ...ue device number unless remote control may effect to multi devices with the same number Chapter Three Description of Operation System 3 1 Turn on off Confirm that AC voltage accessible matches with DV...

Page 7: ...ouse to edit box press key or click the left mouse button then enter keyboard appears select the desired input target characters through the arrow keys or click the left mouse button b After input the...

Page 8: ...to playback interface In the search list box choose the time bucket according up down left right key or move the mouse Click or left mouse to enter video playback Interface Cancel Back to previous men...

Page 9: ...interface and back to main menu Remarks the video which start by manual must be turned off by manual otherwise the recording will be always continue 3 7 PTZ control Choose the PTZ control from shortcu...

Page 10: ...st box click backup and ok wait for process bar until 100 and show backup success Note USB driver pen must be FAT32 format when backup the file 3 8 3 System setup In the setup menu Choose system setup...

Page 11: ...ultiple choices according to users Chinese and English and so on Video Standard PAL and NTSC are all available DVR ID user can use this ID to control the DVR by remoter controller The remote controlle...

Page 12: ...te as needed The higher frame rate the better image but with large disk space Copy to select the target channel on the right of copy to button click copy to ok then system will set the current channel...

Page 13: ...ile visit suggest to set the port above 2000 ESee after connecting internet click Esee and save the setting user will get an Esee ID You can remote DVR with this ID by www e seenet com It s free DDNS...

Page 14: ...e non display Auto Switch user can setup the time of auto switching for preview image it switches in single screen or 4 Channels screen Start using start using stop using After the setup is completed...

Page 15: ...channel in same stetting Click button cancel the setup information will be non saved but exit 3 8 3 7 PTZ setup Select PTZ setup from system setup menu Channel chose the target channel by clicking sel...

Page 16: ...make recording after alarm is triggered Alarm enable alarm close alarm Buzzer start buzzer close buzzer Copy to select the channel and click copy to ok to copy the same setting to other channel Or use...

Page 17: ...set up or delete other users Edit user edit the selected user Note except Admin no user has the right to edit other user permissions Set password setup the user logging password After the setting clic...

Page 18: ...ompleted clicks OK then system automatically reboot Note 1 Firmware name should be FWHI1504A_ Rom 4ch FWHI1508A_ Rom 8ch means software built time such as FWHI1504A_20110520 rom 2 During upgrade do no...

Page 19: ...ws current HDD status info 3 9 2 System version Device name device model H W version S W version could be checked here 3 9 3 System log Choose log type which need to check from listbox and input log t...

Page 20: ...ed to login System reboot It will reboot when click OK Chapter Four Esee User Manual 1 Connect DVR with network make sure network working fine 2 Enter router to enable UPNP As below picture It is TP L...

Page 21: ...change your network segment DNS Enter router can check DNS address After input all info click to save then to preview interface then enter network setting to see ID 4 For remote view in computer go t...

Page 22: ...trol preview mode stream option channel on off setting configuration playback user logout as below 1 1 Open preview In preview window click left mouse choose target channel If channel frame is red mea...

Page 23: ...23 on off Preview mode In preview mode switch table can click to choose mode or double click channel to single channel preview mode or switch to multi channel mode...

Page 24: ...Lifetime Customer Support Informative Knowledge Base at kb zmodo com 24 7 Live Support on www zmodo com...

Reviews: