


24
Designer Island Hood Installation
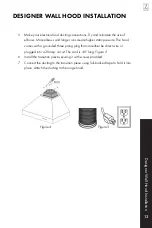
DESIGNER ISLAND HOOD INSTALLATION
6. Slide chimney pieces over the angle iron on the hood. Pull the electrical plug to
the top of the chimney sections.
Figure 4
7. Lift the hood to attach the angle iron to the ceiling bracket. Use screws provided
to attach.
8. Make your electrical and ducting connections. Use rigid duct wherever possible.
Try and minimize the use of elbows. More elbows and longer runs create higher
static pressure. The hood comes with a grounded three prong plug that can either
be directly wired or plugged into a 20 amp circuit. The cord is 68.5” long.
9. Slide top chimney piece up over the mounting bracket on the ceiling and secure
it in place with the provided screws.
Figure 5
10. Install stainless steel baffle filters. Before installing baffle filters, make sure that
you insert the grease cup under the motor blower.
With any of our wooden or copper range hoods, you can custom cut the
chimney to the desired height and the crown molding will hide any jagged
cuts and offer a seamless transition to the ceiling.
The range hood is very heavy. Use the buddy system to keep the chimney
in place while screwing in the hood into the brackets.
Figure 4
Figure 5
WARNING
WARNING
Summary of Contents for RK62342
Page 1: ...Range Hood Installation Guide and Users Manual...
Page 7: ......
Page 12: ...4 Wall Hood Installation WALL HOOD INSTALLATION Installation Tutorial Video...
Page 18: ...10 Designer Wall Hood Installation DESIGNER WALL HOOD INSTALLATION Installation Tutorial Video...
Page 25: ...17 Island Hood Installation ISLAND HOOD INSTALLATION Installation Tutorial Video...
Page 35: ...27 Under Cabinet Installation UNDER CABINET INSTALLATION Installation Tutorial Video...
Page 38: ...30 Insert Installation INSERT INSTALLATION Installation Tutorial Video...
Page 52: ...44 Single Motor Electrical Diagram SINGLE MOTOR ELECTRICAL DIAGRAM CHANGING PARTS...
Page 53: ...45 Double Motor Electrical Diagram CHANGING PARTS DUAL MOTOR ELECTRICAL DIAGRAM...
Page 103: ......