


8
W
all Hood Installation
WALL HOOD INSTALLATION
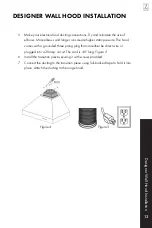
8. Install the two part chimneys on top of the hood. Slide the inside section up until
the vertical vent slots are visible, attach top portion to mounting bracket with
screws. Secure lower chimney portion to the hood with screws provided.
Figure 6
9. Install the grease cup by sliding into brackets located at the bottom of the motor.
Install baffle channel and baffle filters. Not all models include baffle channels.
Figure 7
Figure 8
Figure 6
Figure 7
Summary of Contents for RK62342
Page 1: ...Range Hood Installation Guide and Users Manual...
Page 7: ......
Page 12: ...4 Wall Hood Installation WALL HOOD INSTALLATION Installation Tutorial Video...
Page 18: ...10 Designer Wall Hood Installation DESIGNER WALL HOOD INSTALLATION Installation Tutorial Video...
Page 25: ...17 Island Hood Installation ISLAND HOOD INSTALLATION Installation Tutorial Video...
Page 35: ...27 Under Cabinet Installation UNDER CABINET INSTALLATION Installation Tutorial Video...
Page 38: ...30 Insert Installation INSERT INSTALLATION Installation Tutorial Video...
Page 52: ...44 Single Motor Electrical Diagram SINGLE MOTOR ELECTRICAL DIAGRAM CHANGING PARTS...
Page 53: ...45 Double Motor Electrical Diagram CHANGING PARTS DUAL MOTOR ELECTRICAL DIAGRAM...
Page 103: ......