background image

G4 Pro Series 

User Manual 

P a g e

 | 21 

 Copyright©2022 ZKTECO CO., LTD.  All rights reserved. 

2.8.3


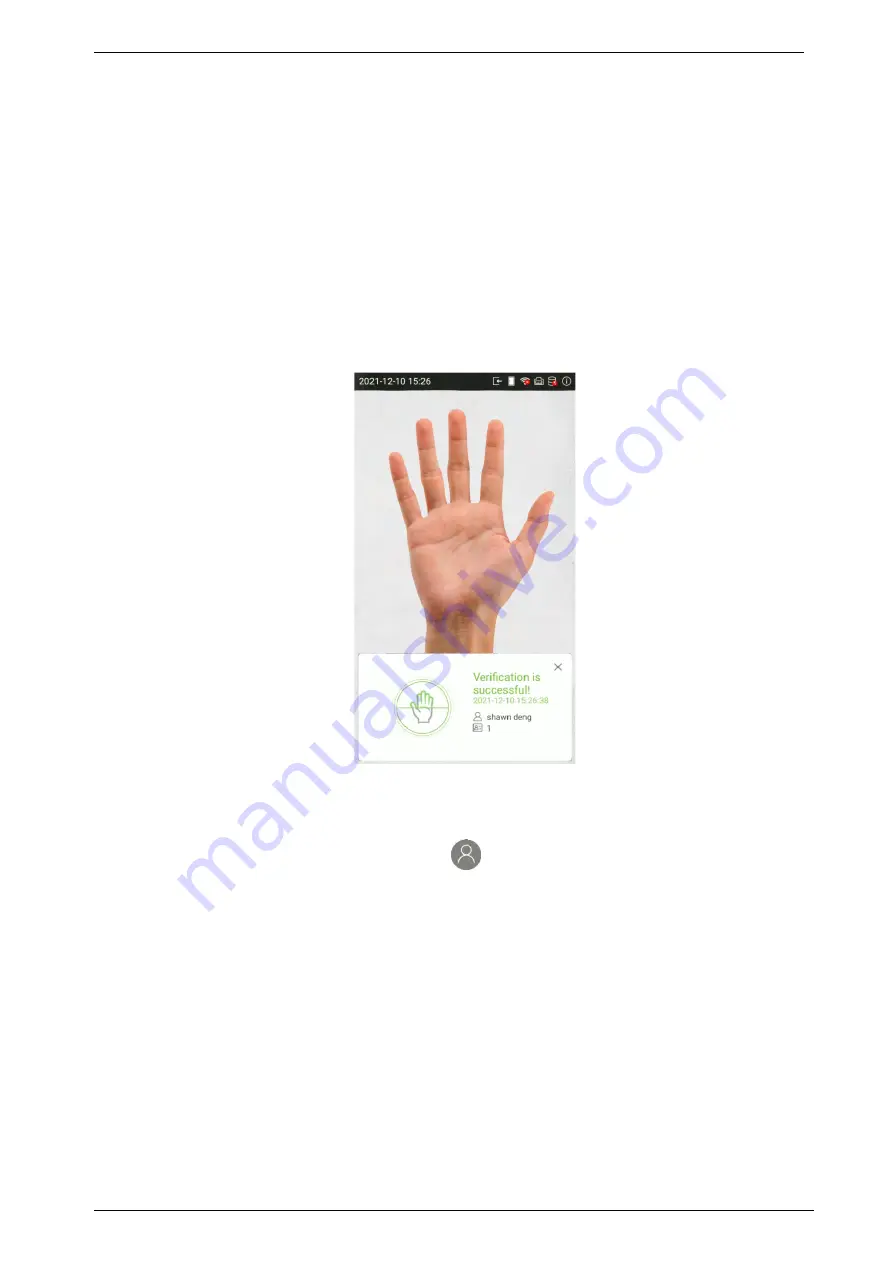
Palm Verification 


1:N (One to Many) Palm Verification Mode 

This verification mode compares the palm image collected by the palm module with all the palm 
data template in the device. 

The device will automatically distinguish between the palm and face verification mode. Place the 
palm in the area that can be collected by the palm module, so that the device will automatically 
switch to palm verification mode. 


1:1 (One to One ) Palm Verification Mode 

In this verification mode, the device compares the palm  captured by the camera with the palm 
template related to the entered user ID. Press       on the main interface and enter the 1:1 palm 
verification mode and enter the user ID and press

 [OK]

Summary of Contents for G4 Pro Series

Page 1: ...ead the instructions carefully before operation Follow these instructions to ensure that the product is functioning properly The images shown in this manual are for illustrative purposes only For furt...

Page 2: ...pment It is an essential pre requisite for the satisfactory operation and maintenance that the operating and maintenance personnel are fully familiar with the design and that the said personnel have r...

Page 3: ...etc for better operation and safety of the machine unit equipment The said additions or amendments are meant for improvement better operations of the machine unit equipment and such amendments shall...

Page 4: ...of biometric verification procedures and the productization of biometric verification SDK which was initially widely applied in PC security and identity authentication fields With the continuous enhan...

Page 5: ...cription Button or key names for devices For example press OK Window names menu items data table and field names are inside square brackets For example pop up the New User window Multi level menus are...

Page 6: ...8 1 QR CODE VERIFICATION 15 2 8 2 FACIAL VERIFICATION 16 2 8 3 PALM VERIFICATION 21 2 8 4 CARD VERIFICATION 24 2 8 5 PASSWORD VERIFICATION 26 2 8 6 FINGERPRINT VERIFICATION 27 2 8 7 COMBINED VERIFICA...

Page 7: ...IME FORMAT SETTINGS 70 10 3 ATTENDANCE PARAMETERS 72 10 3 1 ATTENDANCE EVENTS 72 10 3 2 STATUS MODE 77 10 3 3 WIDGET FUNCTION RULES 81 10 3 4 CAMERA MODE 82 10 3 5 VERIFICATION SETTINGS 82 10 3 6 VALI...

Page 8: ...DEVICE ON THE SOFTWARE 103 11 3 MOBILE CREDENTIAL 104 11 4 REAL TIME MONITORING ON THE ZKBIOSECURITY SOFTWARE 107 APPENDIX 1 108 REQUIREMENTS OF LIVE COLLECTION AND REGISTRATION OF VISIBLE LIGHT FACE...

Page 9: ...is also equipped with an ultimate anti spoofing algorithm for facial recognition against almost all types of fake photos and video intrusions This device is a perfect choice to reduce the spread of g...

Page 10: ...ature Temperature Measurement Range 20 C to 50 C 68 F to 122 F 2 Instructions for Use Before getting into the Device features and its functions it is recommended to be familiar to the below fundamenta...

Page 11: ...standing posture natural while enrolment or verification 2 3 Palm Registration Place your palm in the palm multi mode collection area such that the palm is placed parallel to the device Make sure to...

Page 12: ...the screen during registration Please face towards the camera and stay still during face registration The screen should look like this Correct face registration and authentication method Recommendati...

Page 13: ...the screen of the device If the glasses have been changed authentication may fail If the face without glasses has been registered authenticate the face without glasses further If the face with glasse...

Page 14: ...the power supply the device displays the following standby interface NOTE 1 Tap on the button to enter the personnel ID Input screen 2 Tap on the button to enter the main menu 3 If a super administrat...

Page 15: ...rification In this verification mode the device compares the QR code image collected by the QR code collector with all the QR code data in the device Tap Mobile Credential on the ZKBioSecurity App and...

Page 16: ...d 2 8 2 Facial Verification 1 N One to Many Facial Verification Mode 1 Conventional verification In this verification mode the device compares the collected facial images with all face data registered...

Page 17: ...he popups of the comparison result prompt interface Note This function is only applicable to products with temperature measurement module NOTE The temperature measurement data is only for reference an...

Page 18: ...namics Figure When the user enables the Display Thermodynamics Figure function the thermal image of the person is displayed in the upper left corner of the device while verification As shown in the im...

Page 19: ...tured by the camera with the facial template related to the entered user ID Press on the main interface and enter the 1 1 facial verification mode and enter the user ID and press OK If the user has re...

Page 20: ...rved Select the icon to enter the face verification mode After the prompt Please verify your face adjust your face in the center of the device screen for face verification Below are the sample for suc...

Page 21: ...l automatically distinguish between the palm and face verification mode Place the palm in the area that can be collected by the palm module so that the device will automatically switch to palm verific...

Page 22: ...and fingerprint in addition to palm and the verification method is set to face palm card password fingerprint verification the following screen will appear Select the icon to enter the palm verificati...

Page 23: ...G4 Pro Series User Manual P a g e 23 Copyright 2022 ZKTECO CO LTD All rights reserved Below are the sample for successful and unsuccessful verification Successful Verification Failed Verification...

Page 24: ...ase place the registered card on the card reader 1 1 One to One Card Verification Press on the main interface and enter the 1 1 card verification mode and enter the user ID and press OK If the user ha...

Page 25: ...22 ZKTECO CO LTD All rights reserved Select the icon to enter the card verification mode After the prompt Please swipe your card to verify Below are the sample for successful and unsuccessful verifica...

Page 26: ...stem This process is recommended for administrator users Press on the main interface and enter the 1 1 password verification mode and enter the user ID and press OK If the user has registered face pal...

Page 27: ...l Verification Failed Verification 2 8 6 Fingerprint Verification 1 N One to Many Fingerprint Identification This method compares the fingerprint of the user that is being pressed onto the fingerprint...

Page 28: ...device compares the fingerprint that is being pressed onto the fingerprint reader with the fingerprint templates associated with the respective User ID This method can be used when the system has tro...

Page 29: ...has registered face palm password and card in addition to fingerprint and the verification method is set to face palm card password fingerprint verification the following screen will appear Select th...

Page 30: ...ltiple forms of verification methods A total of 10 different verification combinations can be used as shown below Combined Verification Symbol Definition Symbol Definition Explanation or This method c...

Page 31: ...when an employee has registered only the face data but the Device verification mode is set as Face Password the employee will not be able to complete the verification process successfully This is beca...

Page 32: ...alarm Attendance Search Query the specified attendance data check attendance photos and blocklist photos Data Management To delete all the relevantdatafrom the device USB Management To upload or downl...

Page 33: ...ord verification is successful users can enter the menu 3 To ensure the security of the device we recommend registering an administrator the first time you use this device For detailed operating instr...

Page 34: ...r User ID can be modified before first login but cannot be modified once logged in The message User ID already exists please try again indicates that the ID number entered is already being used In tha...

Page 35: ...has two types of user privileges that is Normal User and Super Administrator If a Super Administrator exists on the device Normal Users can only login and view their accounts using different verificat...

Page 36: ...O LTD All rights reserved On the User Management interface tap on the required username from the user list to set the user privilege On the User Information interface tap User Roles and then tap Norma...

Page 37: ...egistration See the description in section Verification Mode Register Verification Modes The different verification modes are used to verify user login The verification mode includes registration of p...

Page 38: ...l rights reserved Register Card Number On the New User interface tap Card Number to enter the card number registration page On the Register a card number interface swipe the card to register And once...

Page 39: ...the password then on the Confirm password field re enter the same password Tap Confirm NOTE The user password must be 8 digit number Function Description Tap on this button to encrypt the password Ta...

Page 40: ...lete Overwrite Registered Password On the User management interface tap on the required username from the user list to delete or modify the password On the User information interface tap Password to d...

Page 41: ...e registration page On the Face Register interface move and adjust your face on the registration area Register Fingerprint On the New User interface tap Fingerprint to enter the fingerprint registrati...

Page 42: ...gerprint is enrolled successfully NOTE If you tap different fingers onto the fingerprint scanner during the 2nd and 3rd time the user will be prompted to Please use the same finger as shown in the bel...

Page 43: ...t verification mode and then tap on OK Period of Validity Settings This function sets the validity period for an employee s verification process for attendance So once this validity period has set the...

Page 44: ...ser Validity Rule is not displayed on the New User interface then on the Main menu tap System Settings Access control record settings and enable User validity settings and then the function User Valid...

Page 45: ...device supports up to 99 access control groups Set the Time Period Tap Time Period to set the time of access for the user By default users follow the defined settings of their groups If the time perio...

Page 46: ...Management interface and search for the required username NOTE The required users can be searched based on their IDs username surname or full name Tap on the Search bar to search for the users with t...

Page 47: ...the required user information NOTE Please notice that the user ID cannot be modified and other operations are similar to adding a new user For further information please see section Add User 4 4 Delet...

Page 48: ...ess Control Settings The access management allows users to set Access control parameters Time rules Holidays Verification combinations Access Groups Anti passback settings Duress Settings etc 5 1 Acce...

Page 49: ...ns Door sensor delay s If the door is not locked and is being left open for a certain duration Door Sensor Delay an alarm will be triggered The valid value of Door Sensor Delay ranges from 1 to 255 se...

Page 50: ...door open Trigger Alarm Trigger door open and Alarm Alarm The default is Off Local Alarm Transmits a sound alarm or disassembly alarm from the local When the door is closed or the verification is suc...

Page 51: ...Start Time such as 23 57 23 56 it indicates that access is prohibited all day When the End Time is later than the Start Time such as 00 00 23 59 it indicates that the interval is valid The effective...

Page 52: ...e which is applicable to all the users and the user will be able to open the door during the holidays The time period set here is taken as the standard Tap Holiday Settings and then tap on the button...

Page 53: ...liday On the holiday interface tap on the required holiday to modify Delete a holiday On the holiday interface tap on the button to delete the holiday Select the holiday which you would like to delete...

Page 54: ...erent access control groups or multiple members in the same access control group to verify in turn without sequence within a certain period of time the interval is 8 seconds and then the door can be o...

Page 55: ...5 5 Access Group Settings The Access Control group setting is used to create an Access Group and configure Time Period as per the requirements For the newly created access control group the Verificat...

Page 56: ...ck function is disabled which means successful verification through either the master device or slave device can unlock the door The attendance state is not saved in this option Anti passback Out Afte...

Page 57: ...hieve the purpose of duress alarm The specific parameter setting interface is as follows 6 Attendance Search The user s attendance records will be saved in the device making it easier to find users at...

Page 58: ...g e 58 Copyright 2022 ZKTECO CO LTD All rights reserved 2 Tap on the icon to access the following window where you can select the Starting Date and Ending Date to search the records 3 After setting th...

Page 59: ...Data Management The Data Management Settings allows the users to manage the device data including Delete Attendance data Delete All Data Delete Attendance Photos Delete Unregistered User Photos Clear...

Page 60: ...gs Deletes invalid user accounts Deletes the attendance photos within a specified time range Delete Unregistered User Photos 1 Deletes all including attendance records and the photos of the user in bl...

Page 61: ...e device Download to USB Download the data from the device to the USB disk USB Settings Configure the parameters of USB disk 9 Alarm Management Once an alarm has been set the device will automatically...

Page 62: ...G4 Pro Series User Manual P a g e 62 Copyright 2022 ZKTECO CO LTD All rights reserved 9 1 Add Alarm On the Alarm interface tap on the button to set the alarm and then tap Save to save and update...

Page 63: ...mber of counts to repeat the scheduled bell Alarm sound Select a ring tone Internal bell delay Set the replay time of the internal bell Valid values range from 1 to 999 seconds 9 2 Delete Alarm On the...

Page 64: ...play and Sound Serial port Biometric parameters Detection management etc On the Main menu tap System settings to configure the device settings 10 1 Network Settings On the System settings interface ta...

Page 65: ...rovider If DHCP is on you cannot manually set the IP of the device IP Address The default IP is 0 0 0 0 can be changed Subnet mask The default IP is 0 0 0 0 can be changed Gateway address The default...

Page 66: ...rk you can toggle the Wi Fi to disable button Tap Wi Fi settings on the Network settings interface The following screen will display Wi Fi is disenabled in the Device by default Toggle on button to en...

Page 67: ...ce is applied to a dial up network make sure that the device is within the signal coverage of the mobile operator GPRS 4G Please insert the IOT card into the 4G module before enabling Then tap on Mobi...

Page 68: ...work settings interface tap on Comm connection settings Function Description Function Name Function Description PC Communication password It is used to gain the connection permission when using offlin...

Page 69: ...All rights reserved 10 2 Date and Time 10 2 1 Date and Time Settings On the System settings interface tap Date and time to enter the date and time settings interface Tap Set date and swipe up and down...

Page 70: ...TECO CO LTD All rights reserved Tap Set time and swipe up and down to set the hour and minute After setting time tap OK 10 2 2 Date and Time Format Settings On Date and time interface tap Date format...

Page 71: ...able users can modify the time synchronization procedure and set the date and time Sync cloud server time It is used for synchronizing the time between the software and server to which the device is c...

Page 72: ...Attendance Events Attendance Events are used to record the clock in out status There are 6 default attendance statuses including Clock in Clock out Break out Break in Overtime in Overtime out The 6 d...

Page 73: ...t 2022 ZKTECO CO LTD All rights reserved 3 Enter the Name and Status Value of the new attendance event NOTE The maximum length of the name is 24 characters The status values must be unique and cannot...

Page 74: ...4 Copyright 2022 ZKTECO CO LTD All rights reserved 4 If the input status value repeats or exceeds the limit the following message will appear 5 If the attendance event is created successfully the succ...

Page 75: ...ght 2022 ZKTECO CO LTD All rights reserved Edit Attendance Events 1 Select an attendance event 2 Tap on Name or Status value to edit NOTE The first 6 attendance events cannot be edited The status valu...

Page 76: ...All rights reserved Delete Attendance Events 1 Select an attendance event and tap on the icon on the upper right corner NOTE The first 6 events cannot be deleted so the delete button will not appear 2...

Page 77: ...tus Mode There are three modes for attendance statuses Timed state transition Displays different attendance statuses at different times Fixed mode There is only one fixed attendance mode Disable mode...

Page 78: ...LTD All rights reserved 2 On the Timed state transition interface tap on Check in then tap on Repeat daily 3 When the Repeat daily option is enabled the following screen will be displayed 4 Tap on th...

Page 79: ...following screen will be displayed 6 Tap on the button for the date you would like to set then swipe up and down to set the corresponding time Tap on OK 7 After applying the settings the interface ap...

Page 80: ...ght 2022 ZKTECO CO LTD All rights reserved Fixed Mode 1 The status mode is set to Fixed mode tap on the button to open the Fixed Mode options menu 2 In the Fixed mode selection menu select the attenda...

Page 81: ...1 Copyright 2022 ZKTECO CO LTD All rights reserved Disable Mode Select the Status mode as Disable Mode 10 3 3 Widget Function Rules Tap on the Execute toggle button to enable The main interface will d...

Page 82: ...required parameters No photo User s photo will not be saved during verification Capture photo and save User s photo will be taken and saved during verification Save after successful verification When...

Page 83: ...attendance record memory has reached the full capacity the device will automatically delete a set value of old attendance records When the value is set as 0 the function will be disabled Periodic del...

Page 84: ...set as 0 to 9 seconds Verification time interval Set the verification time interval as needed The valid range is 0 to 999999 seconds 10 3 6 Validity Period of User Information This is used to determin...

Page 85: ...is enabled the domain name mode http will be used such as http www XYZ com while XYZ denotes the domain name when this mode is turned ON Disable Domain Name Server address IP address of the ADMS serve...

Page 86: ...s interface tap Wiegand in to open the settings Function Descriptions Function Name Function Description Wiegand format The Wiegand value could be 26bits 34bits 36bits 37bits or 50bits Wiegand in bits...

Page 87: ...s are the device codes The 18th to 33rd bits are the card numbers and the 34th to 35th bits are the manufacturer codes Wiegand36a EFFFFFFFFFFFFFFFFFFCCCCCCCCCCCCCCCCO Consists of 36 bits of binary cod...

Page 88: ...orresponding output digits in the Wiegand format Failed ID If the verification is failed the system will send the failed ID to the device and replace the card number or personnel ID with the new ones...

Page 89: ...eter or face recognition Idle time screen brightness Screen brightness when the device is on the standby mode Delay Menu timeout Menu timeout occurs when no operations are performed for a certain amou...

Page 90: ...ction Descriptions Function Name Function Description Serial port No used Do not communicate with the device through the serial port Baudrate The rate at which the data is communicated with PC there a...

Page 91: ...eceive voice prompts Voice prompts will not be received when this setting is disabled When voice prompts are disabled and then re enabled the volume level will be automatically set to 1 Touch prompt T...

Page 92: ...es the set value the system will return to the standby interface Palm parameters 1 1 Matching threshold Only when the similarity between the verifying palm and the user s registered palm is greater th...

Page 93: ...In face recognition the higher the threshold is set the higher the accuracy of face recognition will be which may lead to unrecognizable On the contrary if the threshold is too low the accuracy of fac...

Page 94: ...ion from multiple entrances When multiple devices are installed on the side by side entrance please enable this function to prevent multiple devices from simultaneously recognizing the face Set the th...

Page 95: ...he device will give a prompt and audio alarm The default alarm threshold is 37 30 C Temperature over the range access denied When enabled if the user s body temperature measured is above or below the...

Page 96: ...When enabled the device will display the user s body temperature value during the verification process Mask Detection Enable Mask Detection To enable or disable the mask detection function When enable...

Page 97: ...ace Function Descriptions Function Name Function Description Screen test It is used for testing the screen s display The screen will display red green blue white and black tests Check if the screen co...

Page 98: ...dvanced Settings On the System settings list tap on Advanced settings to enter the Advanced settings interface Function Descriptions Function Name Function Description Select language Select the langu...

Page 99: ...plate administrators attendance records attendance photos unregistered user photos and user photos Device Information It displays the device s name device type serial number MAC address algorithm vers...

Page 100: ...nction Description Security Mode Select whether to enable security mode to protect the device and the user s personal information You can set the device to work offline and hide the user s personal in...

Page 101: ...User Manual P a g e 101 Copyright 2022 ZKTECO CO LTD All rights reserved 10 15 Restart On the System settings interface tap Restart the device will pop up please choose whether to restart according t...

Page 102: ...n menu to set the IP address and gateway of the device NOTE The IP address should be able to communicate with the ZKBioSecurity server preferably in the same network segment with the server address 2...

Page 103: ...ow 11 2 Add Device on the Software Add the device by searching The process is as follows 1 Click Access Device Search to open the Search interface in the software 2 Click Search and it will prompt Sea...

Page 104: ...er needs to set the Server before login The steps are given below 1 In System Basic Management Parameters set Enable QR Code to Yes and select the QR code status according to the actual situation The...

Page 105: ...client After the client is identified successfully set the Client Name and tap Connection Test 5 After the network is connected successfully tap Save The Mobile Credential function is only valid when...

Page 106: ...actless authentication to open the door When using this function for the first time the App will prompt to authorize the modification of screen brightness settings as shown in the figure The QR code i...

Page 107: ...ure is displayed on the Abnormal Temperature information bar automatically according to the Temperature Threshold Setting is set 2 Click Epidemic Temperature Management Statistics Panel to view the an...

Page 108: ...tration 4 Please show your face and forehead and do not cover your face and eyebrows with your hair 5 It is recommended to show a plain facial expression Smile is acceptable but do not close your eyes...

Page 109: ...t light For persons with thick eyeglasses frame it is recommended to capture two images one with eyeglasses and the other one without the eyeglasses Face Complete face with clear contour real scale ev...

Page 110: ...User Registration Information At your first registration the feature template Fingerprint template Face template Palm template will be saved on the device according to the device type you have selecte...

Page 111: ...l the data uploaded by the Administrator to our products are automatically encrypted using the AES 256 algorithm and stored securely If the Administrator downloads data from our products we assume tha...

Page 112: ...learn more about how we collect use and securely store your personal information To keep pace with the rapid development of technology adjustment of business operations and to cope with customer needs...

Page 113: ...onent Name Hazardous Toxic Substance Element Lead Pb Mercury Hg Cadmiu m Cd Hexavalent chromium Cr6 Polybrominate d Biphenyls PBB Polybrominate d Diphenyl Ethers PBDE Chip Resistor Chip Capacitor Chip...

Page 114: ...ZKTeco Industrial Park No 32 Industrial Road Tangxia Town Dongguan China Phone 86 769 82109991 Fax 86 755 89602394 www zkteco com Copyright 2022 ZKTECO CO LTD All Rights Reserved...

Reviews: